
Game: Operencia: The Stolen Sun
Peripherals: –
Time to 100%: 26 – 34h
Difficulty: 4/10
Missable trophies: One Punch Man, Legend.
Trophies: ![]() 1
1 ![]() 3
3 ![]() 7
7 ![]() 37
37
Author: Sean
Welcome to the trophy guide for Operencia: The Stolen Sun. A roadmap is provided in the stages below.
Follow us on twitter for the latest news and giveaways.
Stage 1 – Play until the point of return.
Foreword: The newest patched has seemed to change the amount of secrets in Balvanyos, some speculation online about it being unobtainable. This is not true, as this guide contains all 15 of those secrets needed.
Operencia is a dungeon-crawler that has an interesting take; All enemies are pre-set and none respawn or generate. This makes for a relaxed exploration and allows you to backtrack and wander levels without any distractions or interruptions. There is a missable trophy due to this though alongside a missable difficulty trophy! So make sure you read the trophy One Punch Man before starting the game as well as Legend to see how to set-up your gameplay.
Since there is nothing missable whatsoever besides those two trophies, play stress free! No worries about missables or collectibles as you can return at anytime in the game, as you likely will anyways since most dungeons need end-game artifacts or treasures to fully explore. The point of no return is the final boss, so no worry about when or where the point of no return is. Here are 2 advisory points just two safeguard amongst any problems.
This image here is the bridge that’ll lead to the final boss:

Pathway to the final boss
If you manage to cross the above pathway somehow, maybe you forgot or you disregarded it, the game will even warn you about it:

Point of No Return Message
Once you reach this point in the game you can move onto Stage 2
Stage 2 – Pre-Final Boss Clean-Up
Before the final boss you can earn all trophies except for Underworld Defeated and Legend. So that’s what this step is for, now that you have every artifact in the game you can achieve 100% of everything everywhere. To aide you in doing so below are all the locations with 100% of everything.
Green Squares=Secrets
Purple Squares=Recipes
Yellow Squares=Keys
White Squares=Trophy Related Squares.
Everything else (Buried, campfires, etc) already have in-game symbols and are clearly visible.
Note: Sometimes the trophy related squares or other squares will overlap a secret and are a secret themselves. So there may be more secrets than there are green squares, but rest assured they are all there. Some of the green squares may contain recipes though, so if you’re ever missing something check the respective trophies.

Lake of Anna Basement 2 
Lake of Anna – Basement 
Lake of Anna 
Lake of Anna – Tower L1 
Laker of Anna – Tower L2 
Lake of Anna – Tower L3

The Great Forest 
The Great Forest – Underground

Tomb of Reka

Deva Fortress 
Deva Fortress – Floating Platforms 
Deva Fortress – Citadel 
Deva Fortress – Underground Barracks 
Deva Fortress 
Deva Fortress

Bàlvànyos – Basement 2 
Bàlvànyos – Basement 
Bàlvànyos 
Bàlvànyos – L2

World Tree – Inside 
World Tree – Inside II 
World Tree – Trunk 
World Tree – Trunk II

Atop the World Tree Branches 
Atop the World Tree – Canopy

Copper Forest 
Copper Forest – Underground

Deep in the Copper Forest 
Deep in the Copper Forest – Underground 
Deep in the Copper Forest – Underground 2

Gate to the Underworld – Ground 
Gate to the Underworld – Hideout 
Gate to the Underworld – Mine

Tomb of Attila – Iron Level 
Tomb of Attila – Silver Level 
Tomb of Attila – Golden level

Glass Palace – Secret Entrance 
Glass Palace – First Floor – Lower Level 
Glass Palace – First Floor – Upper Level 
Glass Palace – Second Floor – Lower Level 
Glass Palace – Second Floor – Upper Level 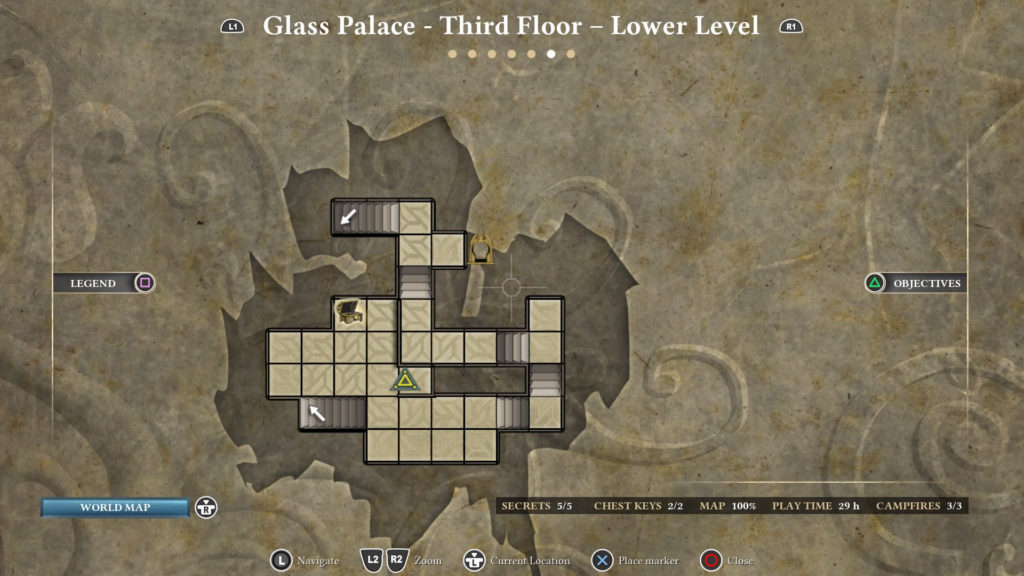
Glass Palace – Third Floor – Lower Level 
Glass Palace – Third Floor Upper Level
Trophies

![]() Lightbringer
Lightbringer
Acquire all trophies

![]() Legend
Legend
Complete the game with at least two difficulty settings switched to hard
When you click New Game to start Operencia after the prologue you’ll be given the freedom to choose many things. One of these choices is the “Choose difficulty Parameters” mechanics which’ll alter how you’re game is played. To earn this trophy 2 out of the 4 need to be selected.
The four difficulty parameters are:
Cartographer: Hard mode disables the minimap, level maps, and objective markers. IT IS HIGHLY NOT RECOMMENDED to choose this as all your collectibles, 100% exploration, and much more relies on this.
Battle-Hardened: Hard Mode has only saves at campfires and objective markers are not displayed.
Permadeath: Hard mode means your save file gets deleted upon game overs.
Betyar: Hard mode increased enemy difficulty.
It is highly recommended to choose Battle-Hardened as it’s not that invoncenient to only save at campfires manually, and Betyar as even with increased enemy difficulty the platinum difficulty sits around a 4/10.

![]() Bartender
Bartender
Brew all potions
There are a total of 17 potions to brew in Operencia, refer to Master Chef to see where to find them all.
Brewing potions is available somewhat through The Great Forest as that’s when you’ll get the neccessary Cauldron. Brewing isn’t particularly difficult as every potion has clues written out very riddle-like to figure out. Though with some guess work on the bigger potions it’s not too difficult, but in case you do have some troubles all the brewing recipes are below.

Cherry Bomb 
Herbal Tea 
Cold Fire 
Slivovitz 
Rhodiola Brew 
Dew-Drop Brew 
Melissae Oil 
Ginseng Brew 
Milfoil Extract 
Troll Blood 
Daphne’s Dust 
Nighsthade Decoction 
Milk-Thistle Potion 
Paprika Extract 
Aconite Potion 
Spectre Dust 
Water of Life

![]() Cartographer
Cartographer
Fully reveal all maps
Operencia has 12 dungeons where you’ll need to attain a 100% exploration rate, the prologue chapter does not count.
Be wary that there are parts of the dungeon that are inaccessible and certain edges that you won’t be able to explore, that WILL show up on maps and completed maps. This is because when a map attains a 100% exploration, they entire map (Inaccesible areas, blocked off areas, and anything else) will get fleshed in. The other thing to remember is almost every map has secrets requiring late game artifacts, so you on’t be able to earn 100% on many of your first visits and will have to return.
The last thing to mention is that the overworld map is glitchy, it does not represent the actual map percentages properly. So when looking at dungeon completions do not use the overworld feature. Here is an example of the differences:

100% The Great Forest 
Actual The Great Forest Percentage

![]() Lumberjack
Lumberjack
Pile up ten pieces of Firewood
Firewood in Operencia is what allows you to rest in the game at bonfires. You will obtain firewood through picking it up, breaking destructible objects, found in chests, or buy from the vendor. This trophy is rewarded for you holding onto 10 pieces of Firewood at one time. You needn’t rely on resting too much to accumulate this. If you’ve been scarce on it’s use and diligent in your searches this should pop up somewhere between The Great Forest and Tomb of Réka.

![]() Out of Stock
Out of Stock
Buy everything from Elia’s stock
Elia is the only in-game merchant you can buy stuff from. She’s accessible from your campfires and periodically stocks new equipment based on story progression. You can’t earn this trophy until end-game so play naturally until then. At the end of Glass Palace you can earn this. Amongst all the gold from battles, pick-ups, chests, and more you should have more than enough to buy everything.
If you do not, this trophy still isn’t missable. You can sell all your old equipment and items for large sums of cash as well then buy more. On the HIGHLY unlikely chance you still don’t have it, you can re-sell all the stuff you bought from Elia and use that money again to purchase new stuff.

![]() Perfectionist
Perfectionist
Unlock everything on two talent trees for at least one character
This trophy will likely come naturally as focusing on 2 trees instead of all 3 will build a stronger end-game character. In the case this does not come naturally for you, the game offers free skill resets so by end game reset a character’s skills so you’ll be able to freely reallocate your skills. Pump all the skills you have into only 2 trees (You’ll have skills left over, don’t fret) and this trophy will be yours.

![]() Over 220
Over 220
Reach 220+ on all three main battle stat at the same time
This trophy may come naturally depending on character build and which members you use in your party. If you don’t earn this by end game there’s a rather easy set-up to achieve this. First make sure you’ve found all dug treasures, secrets, and locked chests. Then put Joska into your party.
You’ll want to reset everything of Joska’s, starting with his stats. You’ll want to give him the following stats:

Joska’s stats
You’ll want to give bonuses to the stats you already applied, so reset his skill trees and give him the following:

Joska’s skill set-up
Now that his stats and skills are set-up you’ll want to finalize this with the right equipment. To prepare for this remove all equipment from every other character first. You’ll then want to click the “optimize all” button to auto-equip him with the best in-game equipment that’ll match your stats. You should have this as your set-up now:

Joska’s optimized equipment
After this it’s quite simple, you only need to adjust a single piece of equipment. change the optimized chest piece to Spahi Plate Mail the trophy will pop! Your final equips should look like this:

Joska with full 220+

![]() Every Corner
Every Corner
Reveal all secrets
This trophy is for fulfilling all the secrets in Operencia. Whenever you open your map it will state the amount of secrets you have left in that area. Not all the secrets count towards this. Sometimes hidden walls or rooms won’t count. For reassurance purposes, I’ll list all the secrets for you below (Regardless if they count or not).
Not all secrets are obtainable first visits within a chapter as you’ll need late game artifacts. You will be able to return to previous maps once you reach the 4th dungeon.

![]() Underworld Defeated
Underworld Defeated
Complete the game with any difficulty settings
This will be earned upon completion of the game but you should refer to the trophy Legend for further details.

![]() Master Chef
Master Chef
Find all recipes
Recipes are for potions that you can create to have consumables on-field or in-combat. They can be replenished when you rest at campfires. They’re found in a variety of ways and below will a list of where to find them all.

![]() Master Thief
Master Thief
Open all locked chests
Within Operencia there will be different types of chests. Only locked chests will count towards this trophy. You will know locked chests by the design of the chest and that when opened it will remove the Chest Key from your inventory. Be wary though, it does not always tell you when a key has been used.
Every map has the same amount of chests as it does keys. Luckily this game tracks all chests you have found on the map opened or closed. Be cautious, some chests only appear on-map if you’re in the dungeon which can be harder to track. In Stage 2 above is ALL 100% maps with screens taken WHILE in the dungeon, so you won’t have any issues cross checking which chests you’ve missed. The last locked chest is on the last floor of the Glass Palace, it’s before the sliding puzzle.

![]() One for the Team
One for the Team
Buy any equipment from Elia
Once you reach the 4th dungeon, Deva Fortress, you’ll need to activate the first campfire. From this point forth you can use the shoulder buttons to access Elia and Fast Travel. Scroll over to her shop and purchase any item.

![]() Cosplayer
Cosplayer
Equip a full armor set on any character
An Armor Set in Operencia is a set of equippable items that when equipped in conjunction with one another will grant bonuses to it’s wearer. You’ll know they’re part of a set as it’ll usually have a peculiar name and it’ll list in the stats that it has bonuses dependent on how much pieces you have equipped. This’ll come naturally as you’ll be exploring every map and earning all the secrets. The earliest you can obtain this is in The Tomb of Reka, as you can find all 5 pieces of Reka’s set in there. This set works really well with the likes of Joska or Sebastian.

![]() Shovel, Knight
Shovel, Knight
Dig up all buried treasures
In the second dungeon of the game, The Great Forest, you’ll come across a mini-boss by the name of Ogli. This mini-boss was guarding the Magic Shovel you need to have access to digging for treasure. Whenever you use the shovel it’ll tell you how close you are to a treasure, luckily for you I have listed below the maps that have treasures and you’ll find all treasure locations in the maps provided in the stages above.
Using the Magic Shovel will also tell you in there are no more treasures to be found and it’ll inform you when the last one is found.

![]() Battle Ready
Battle Ready
Equip an item to all slots of a character
There are 8 slots to equip stuff to a character in Operencia: Head, Accessory, Hand, Back/Shoulder, Main Weapon, Off Hand, Ranged, and Feet. This will come naturally but as for the earliest possible will be nearing the end of Lake of Anna.

![]() Let’s Do This
Let’s Do This
Level up a character
Leveling up is part of any RPG, just as it is so in Operencia. This trophy will come naturally and is unavoidable.
Though for this specific trophy you will should earn this after your 4th fight, which will likely be the 2nd Skeleton battle in Lake of Anna – Basement.

![]() Don’t Touch!
Don’t Touch!
Try to remove the channeling crystal after it was activated in the Glass Palace
Channeling Crystals inside the Glass Palace are removable and place-able crystals allowing you to give or take power to different devices. This trophy is for trying to remove a channeling crystal while it has power coursing through it. Mind you you have to interact with it quite a few times as you have to get through a rather comical exchange of dialogue before this will be earned.

![]() Highlander
Highlander
Defeat all enemies in the game
Operencia does not have random encounters nor generated enemies. All the enemies in the game come pre-set and won’t respawn. What this trophy wants you to do is defeat every enemy that’s been put into the game with the exception of the final boss.
This will come naturally as you earn Cartographer and work towards all the secrets and gathering items. Though to give you an idea of the amount of enemies or what kind of enemies are in each dungeon, the variety, or if there’s a boss per se, there’s a list of all in-game enemies below.
The only tip to give you is when you face Bob, he’ll have a massive pool of HP and your team will be automatically silenced after a specific amount of his HP’s been lost. Unfortunately when he has 5,000+ hp left and you can only do basic attacks it won’t work out, especially with your team having permanent D.O.T damage and Bob attacking you. The key to this battle is Joska, give him all the +% poison damage skills you can and have him equip 2 specific weapons; “war” and “Pestilence”. If he can’t due to stats, reset his stats and allocate it so he can. You’ll need this as it puts a D.O.T poison effect that stacks on Bob making this battle MUCH more manageable. As you can see from the image below it stacks VERY well against bob:

Bob’s poison stacks.

![]() I Know Kung Fu
I Know Kung Fu
Unlock at least three skills from any talent tree
Whenever you level up in Operencia you will gain 1 Skill Point. Every character has 3 different branches to their skill tree with each tier having choices between skills and stat modifiers. The stat modifiers (+3 intelligence, Poison Damage +5%, Etc) do not count towards this. Only the points that unlock new skills/abilities will count towards this trophy.

![]() Focus
Focus
Unlock the last tier of at least one talent tree
Every character in Operencia will have 3 tier trees to unlock skills in. The highest level in Operencia on the PS4 is 23 which grants you quite a lot of skill points. Do not worry about this trophy though, it will come early and naturally as you’ll need tier 3 skills to survive your upcoming battles. If you somehow manage to avoid this which you won’t, all skill resets are free and available whenever.

![]() First Blood
First Blood
Win a battle
Your first battles are actually during the prologue of the game but these do not count. This trophy is rewarded for winning a battle as your character, not the prologue characters.
That being said you first battle will be against some Zöldek in the Lake of Anna.

![]() One Punch Man
One Punch Man
Defeat an enemy group with one hit
This is the missable trophy of Operencia. Enemies don’t respawn in this game making this limited. Problem is you’ll never one shot an enemy group as you progress through the game, so you have to kill a weak team with your overpowered party.
A really easy spot for this is the first dungeon, Lake of Anna. After you defeat King Brek you’ll be able to venture into the 3rd tower, this is where you’ll do the trophy!
In the basement is a weak Skeleton Knights group, DO NOT GO DOWN THE STAIRS. You can complete the tower and keep going without it. Way later in the game, (I was able to do it with my Mage after Deva Fortress), fast travel to Lake Anna and make a manual save at the campfire just in case you mess up. Go into the basement and use an AoE attack. If they all die in a single spell/skill this trophy will pop.

![]() Boy Scout
Boy Scout
Reach the highest level with all characters
This trophy description is rather imprecise, as you can’t reach the highest level with all characters in the PS4 version of Operencia. This will pop dependent of you how you go upon playing the game, just know it’s not missable and once you achieve all the secrets, dug chests, locked chests, enemies, recipes, potions, etc. This will come naturally.

![]() Up, Up and Away
Up, Up and Away
Levitate twice in the Second Royal Tomb
During the 11th dungeon Attila’s Tomb you’ll find a sheet behind an invisible wall. Later in that level you’ll find an upward current from a grate, which is at the end of a corridor beside a campfire. You’ll have to interact with the floor grate and use the sheet you obtained. It’ll float you up for a secret and a chest, unfortunately you have to make your way back down and use it again then make your way back down again to continue the story.

![]() Dragonslayer
Dragonslayer
Complete Gate to the Underworld
Gate to the Underworld is the Prologue chapter of Operencia. Making this a story-related trophy that will come naturally. It will end after you defeat Thaid.

![]() Gatekeeper
Gatekeeper
Complete Gate to the Underworld
Gate to the Underworld is the 10th dungeon in Operencia, but will be the 11th story trophy earned. You will return to the same dungeon you started the game with, to… undo the work you did. There is a boss battle against Boldizsar again and by this time you should definitely know how to handle him. When you return from the second royal tomb with Attila’s sword you can break the seals ending this dungeon.

![]() Frogslayer
Frogslayer
Complete Lake of Anna
Lake of Anna is the first dungeon of the game. After defeating King Brek you’ll be required to rescue the final 3 maidens from the 3rd Tower. Using the 3 rune keys you find via the Vial of Light will free them ending this chapter.

![]() Escape the Woods
Escape the Woods
Complete The Great Forest
The Great Forest is your second dungeon, but third completed.
There isn’t much in the way of a final boss within this dungeon, though there are 2 tough boss-like enemies you’ll need to face: Ogli and The Spider Queen.
Besides those 2 the completion of this dungeon comes through finishing Olfa’s quest.

![]() The Ghost Queen
The Ghost Queen
Complete the First Royal Tomb
The First Royal Tomb is The Tomb of Réka, the third dungeon you’ll explore. Though it is the third dungeon, it is the second dungeon you’ll complete.
At the end of this dungeon you’ll face ‘The Ghost Queen’ Queen Réka. Before you face her you’ll fight The Four Great Chieftains, so you may need to rest.
Queen Réka is a pain. Though she’s susceptible to elements, she counters them a lot. She’ll abuse a shield that absorbs damage, constantly summon 2 skeletons, and has a dangerous AoE attack. Upon her defeat and leaving the tomb you’ll complete this chapter.

![]() Hammer Time
Hammer Time
Complete Deva Fortress
Deva Fortress is the fourth dungeon you’ll explore and complete. A fairly lengthy dungeon you`ll explore compared to the prior ones. The final map you’ll encounter is the Deva Fortress – Citadel. In this Citadel you will fight a boss, Anna. Defeating her is the key to completing Deva Fortress.
Anna herself is not very strong but she likes to constantly summon Golems who will protect her. Make use of A.O.E and D.O.T’s to make short work of this battle.

![]() Star Gate
Star Gate
Complete Bálványos
Bálványos is the fifth dungeon in Operencia. A big dungeon full of trials to undertake and a huge amount of secrets to find. The ending is guarded by the Ancient Elemental, not a particularly hard boss but more an annoying one. He’ll continuously change forms which shifts his immunities. Take it slow and you’ll be fine. Though Defeating him won’t end the chapter, you’ll need to solve a pillar puzzle to open a portal to complete this dungeon.

![]() Lord of the Fireflies
Lord of the Fireflies
Complete World Tree
World Tree is the 6th dungeon in Operencia, being the bottom half of the dungeon portion of the World Tree. Nothing too particular difficult about this dungeon, not the enemies, puzzles or even an end boss. Grow some beanstalks and climb up to the top.

![]() Leaf Lifter
Leaf Lifter
Complete Atop the World Tree
Atop the World Tree is the 7th Dungeon in Operencia, being the upper half of the dungeon portion of the World Tree. The end boss you’ll fight here is the illusive Boldizsàr, though it’s a scripted fight. After enough damage an invincible dragon will be summoned and you are to waste turns until it’s over.

![]() Keymaster
Keymaster
Complete Copper Forest
Copper Forest is the 8th dungeon in Operencia and the first of two halfs to the forest. It’s an unforgiving dungeon where a lot of the enemies will drain your magic really fast making it one of the tougher dungeons. Fortunately, it does not have an end boss. Complete the key and unlock the door to the next dungeon and this trophy is yours.

![]() Final Cut
Final Cut
Complete Deep in the Copper Forest
Deep in the Copper Forest is the 9th dungeon in Operencia and the 2nd half of the Copper Forest. Fortunately the Deep section is much more forgiving than the previous area as the enemies are not constantly sapping your energy here. Much shorter of an area too. The end of it is guarded by a summoner you’ve met before. Though he will summon a Metal Golem after half his HP is lost and flees. Overall this is a simple fight as it’s a singular enemy and you’ll have an array of D.O.T spells.

![]() A Royal Welcome
A Royal Welcome
Complete the Second Royal Tomb
Much alike the Tomb of Reka (in the sense of out of order), this trophy pertains to the completion of Attila’s Tomb. Attila’s Tomb is the 11th dungeon, but 10th story earned trophy. The end of the dungeon you’ll hve to fight Attila himself to complete the dungeon as you’ll need his sword. Fortunately for you, this boss is a huge pushover as he’s s susceptible to many things.

![]() Rooster Letterbox
Rooster Letterbox
Find “Letter to Olek” in Gate to the Underworld
Another trophy you’ll need to backtrack for is the Rooster Letterbox. After you earn the Rooster Artifact you can return to Gate to the Underworld – Mine to find 2 locations you can use the Rooster (One hidden behind a Symbol and the other behind a movable object). After the 2 places have been used, the gate in the middle of the map by the campfire will have opened which is where you’ll find the Letter to Olek.

![]() Deep Breath
Deep Breath
Spend two minutes under water in Lake of Anna
Lake of Anna is the first dungeon of the game. Throughout this sunken castle you’ll come across 2 sets of water; submerged rooms and submerged tiles. Being in either of these will start to deprive you of your oxygen and leaving them will restore said oxygen.
This trophy wants you to spend two minutes cumulatively in the water. So this will come as you traverse the level and if not, just play some Marco Polo before you leave the castle.

![]() Special Diet
Special Diet
Get the secret treasure of the Hungry Plant in The Great Forest
Special Diet is one of the few secret trophies that you have to return for later in-game. Return to The Great Forest Underground after you obtain the Hammer Artifact. You’ll find a stone bridge to repair, which happens to also be a secret. On the opposite side of this bridge you’ll fight Skeleton Knights which will drop a boot that you can feed to the Hungry Plant. Backtrack and feed the Hungry Plant the boot you found and he’ll spit out a chest and this trophy will be earned.

![]() Brothers
Brothers
Place both skulls onto the coffin in the First Royal Tomb
There will be a coffin-esque chest you come across with 2 empty sockets atop of it for the placement of the skulls. Once you place both these skulls in the slots and open the chest the trophy will pop. Refer to Stage 2 for all the maps, the skulls have been marked on the Tomb of Reka map annotated by white squares.

![]() Bone Chest
Bone Chest
Open the skeleton’s tresure chest in Deva Fortress
Deva Fortress is the fourth dungeon in Operencia. A little ways into to the fortress after freeing the Gryphon you’ll get an artifact to move objects. When you go past the bell and up the stairs, go into the room on your left and you’ll find a bookshelf immediately. An interactive book on here will open a passageway into a room with a chest on the table. Be warned you’ll enter into a slightly difficult battle against an enemy called Ferdinànd. Once he is defeated you will then be able to open the chest for the contents and this trophy.

![]() Skull Dice
Skull Dice
Reveal the secret chest in Bálványos’ block room
The Block Room inside of Bálványos is the final room of this dungeon. Here you’ll face the boss Ancient Elemental. After the Elemental’s defeat you’ll be able to explore the room. In the middle of this room are 4 dice implanted in the floor that can be rotated. Rotate them all so every die’s face shows a skull and the trophy will be yours.

![]() Speechless
Speechless
Force all mouths to close at least once in World Tree
On the last portion of the World Tree, World Tree – Trunk II there’ll be mouths similar to what you found in the Great Forest. You’ll need to go beneath them in World Tree – Inside II to move pillars with your feather artifact. The mouths do not stay closed, only as long as a pillar is beneath them. You will not be able to achieve this the first time you cross the mouths. There is a pillar you’ll find in the next section of World Tree – Inside II that you’ll have to backtrack to here and use on the final mouth. For this trophy every mouth has to have closed at least once as it can’t be simultaneously.

![]() Drunk Botany
Drunk Botany
Use up all the cheap wine in Atop the World Tree
Whilst on the map Atop the World Tree – Canopy you’ll come across some dangerous plants that will block your way. Inside a Gryffin’s nest you’ll find the Cheap Wine you’ll need to wither these plants. Making the plant withering a story related event but it’s not necessary to wither them all for the story. Instead of continuing on with the story, make sure to wither all the plants.

![]() Backdoor
Backdoor
Unlock and use the Copper Forest’s workshop door from the inside
This is a secret trophy you may obtain without even trying for it. Nearing the end of the Copper Forest you’ll use a mold in a workshop (Copper Forest – Underground) to help create the key but are warned it is too hot and you’ll need to cool it down. Do not leave the room, you could backtrack all the way back and out but instead explore the room (You should be doing this anyhow for the map exploration). To the western side of the room will be a door that leads outside, using this door will earn you the trophy.

![]() Well, Done
Well, Done
Get the treasure from the well in the Copper Forest
This trophy can come off as a tad bid misconstruing as it’s not the ‘Copper Forest’ per se. The Copper Forest has 2 areas in the game: Copper Forest and Deep in the Copper Forest. The well located for this trophy is in Deep in the Copper Forest. Earlier in the game you found a Copper Crown at the Lake of Anna which will be used now for this achievement. You’ll find a locked door in the eastern portion of the Deep in the Copper Forest map which will use the key you molded in the previous area. Inside interact with the well and throw in the Copper Crown.

![]() Summer Camp
Summer Camp
Discover all campfires
Campfires in Operencia act as your inns. Saving manually at them is free but the resting costs you a firewood. Firewood is a limited resource so be scarce when using them. Discovering them does not require the use of firewood, so to discover a campfire you only need to interact with it. Maps work in your favor for this trophy as each map shows the locations of campfires you’ve found and the amount there is.