
Game: New Super Lucky
Peripherals: –
Time to 100%: 10-15hrs
Difficulty: 4/10
Missable trophies: None.
Trophies: 1 ![]() , 1
, 1 ![]() , 7
, 7 ![]() , 46
, 46 ![]()
Author: Pete & Sean
Welcome to the trophy guide for New Super Lucky’s Tale. This can also be considered a walkthrough and may be used for PlayStation 4, Xbox One and Steam. Achievements for Steam and Xbox are in almost all cases the same as the PlayStation 4 Trophies. A roadmap is provided in the stages below.
Follow us on twitter for the latest news and giveaways.
Stage 1 – Complete the game while collecting everything
New Super Lucky’s Tale is a rather quaint and easy adventure game. The levels are short and sweet in which they all share the same 4 collectible pages per level. Nothing is missable as you can revisit levels anytime, but following the level guide below it’ll have detailed all the levels with their collectibles and where to unlock every trophy in a sort of chronological order.
Note: Upon spawning destroy the sandcastle on the beach for …monster
Note 2: Attack the Cash Register at the spawn, and 1 outside of Trapped In Paradise for Cashing Out
Note 3: Depending on replays, and how often you burrow – you can expect anytime this world or next for 10,000 Leagues Under The Ground
Gilly Island has a total of 18 pages, 12 of which come from the following levels:
Securing the Talent
Note: There are Extra Collectible Sets for trophies and a Miscellaneous in this level as well!
Speakers:
Note: These are Story Related but will be included for it’s ease.
~At the start of the level to the right.
~Above Letter C you’ll spot these, take the platforms around behind the cliff.
~After completing the Yeti Foxhole, there’s a speaker near your spawn.
~After Letter U continue climbing up. You’ll have to defeat some enemies to unlock a bouncy clam, to get above and break more speakers you’ll see.
~Finishing the Octopus’ mission will unlock a path to a small isle with a speaker to break.
~Go left from the level start, ignore the floaters and climb the cliff. Instead of going right across the bridge, use the umbrella to bounce up. You’ll find a speaker in the cage that you have to release (With a cooler you find nearby).
Breaking all these speakers will earn you Wormstock
Diamonds:
~Beside Letter U, there’s a drop-off onto a ledge with this diamond.
~On your way to Letter Y, this is on your path above a clam.
~Above the shell in the Yeti Foxhole.
~After completing the Yeti Foxhole, you’ll see it on a red crab floater below.
~An incredibly difficult one, but after breaking speakers past Letter U, from the roof you’ll need to jump to the small cliff isle to find an invisible diamond. The picture is below.
Nabbing these will secure you Treasure Hunter
L-U-C-K-Y
~L: To the right of where you start, you’ll see this on-top of some scaffolding. Jump on it then off to make it sink so you can nab it.
~U: At the start of the level go left. Ignore the floaters and climb up the cliff to find a clock event. Complete the clock event for this letter.
~C: Hop across the platform past Letter L, and you’ll need to hit a shiny anchor for this to appear.
~K: There’ll be an octopus you need to help, in which he will create floaters to a small isle with a speaker. Behind this isle is a red crab floater with the letter.
~Y: From Letter C, if you continue following the floating rafts you’ll climb up some ledges. Past the bees is your letter.
Note: After collecting the letter Y, go past the little hut stand to the end to find a fox hole. Complete it for Jump, Man!
Hidden Page: At the start of the level, to the right of the bar/band set-up you’ll see a hidden waterfall where the rafts pass by. Here you’ll find a fox hole.
300 Coins: This is a huge level with vast amounts of coins to collect, easily 700-800+.
Complete: Standard level completion.
Three Canon Salute
L-U-C-K-Y
L – Complete the clock event at the start of the level.
U – After you meet Buttons, they’ll start firing cannon balls at you. Destroy the barrels on the right to reach this letter.
C – Inside the big hut, you’ll notice this letter under the deck. Dig from the right to access it.
K – When the 2nd wave of firing cannons start, you’ll need to destroy more red barrels to lower a ramp for this letter.
Y – Very quickly after K, will be another kitty gong to hit to raise traps. The Y is hidden among the trap nest. You can take a hit and use the invincibility frames to jump and grab it too.
Hidden Page: After the 2nd barrage of cannons, drop down to the right of the checkpoint to find a foxhole. Collect all the coins for the page.
300 Coins: With the amount of hidden coins and gems around obtaining 400+ coins shouldn’t be a challenge.
Completing this level will also net you A Sinking Feeling
Note: Defeat the Pirate Ship with Fluffy at the end without taking damage for Lucky Is My Name. It’s not too difficult, but AS SOON AS THE DIALOGUE ENDS get in the foxhole for the battle, as Lucky has a absurdly long delay before moving after a fox hole. Utilize the ladder on the boat for a good safe spot too.
Trapped In Paradise
Note 1: Trapped in Paradise too has extra collectibles – this time it’s Maps.
Note 2: Do not use a switch in the level to earn a trophy. Remember double jump + tail whip makes for the longest jumps to get around or walk along the bamboo walls. It is recommended to do this first, then re-run the level for collectibles.
Maps:
Note: To make things easier I’ll list Umbrella’s in order from 1 to 5 in order of left to right on the map.
~Right at the very start to your right.
~Above umbrella number 4.
~Left of Umbrella 5.
~Above umbrella number 2.
~Above umbrella number 1.
Looking at all these maps will net you If There’s A Place You Gotta Go…
L-U-C-K-Y
L – Complete the clock event far north of umbrella 2.
U – From the beginning of the level head right, it’ll be the furthest middle right on the map. Jump over to the green ghost to find the letter.
C – South of umbrella 1 is a red bridge that wraps around. This letter will be on a pillar off of the red bridge.
K – Between Umbrella 2 & 1, there’s a path that has platforms that go higher. (North of Umbrella 1). You’ll find Letter K on the wooden platforms that move.
Y – Near umbrella 1 there are shower stalls. This letter is in the last shower stall.
Hidden Page: From the middle (spawn point) head North over the walls and you’ll see this foxhole behind a wall. You’ll have to use a blue switch then dig under. Complete the switch puzzle for this page.
300 Coins: This is quite a large level with a good amount of coins and hidden gems, you’ll easily find 400+ coins.
Completing this level will earn you Under My Umbrella
When you manage to open all 5 umbrella’s without a switch, you’ll earn Who Needs Walls?
Lastly, visit the 6 Foxholes laying around:
~An island left of Securing The Talent
~Left of Trapped In Paradise
~Below the bridge that leads to the boss
~On an island right of Securing The Talent
~Right of Three Canon Salute
~Left of Three Canon Salute, past the boss bridge, and up the cliff.
Upon finishing the last Foxhole you’ll be rewarded with Gone Fishin’
Now go fight the boss, and defeat her without being hit for both Show Stopper & Smooth Criminal
Stage 2 – Post-Game
After the credits you’ll unlock Foxington, a hub with a few different themed challenge levels. There Isn’t necessarily a playing order, but it is recommended to do Ch1p’s before PW as you’ll need the Mullet head piece. Also, unless you’ve done a lot of replaying you should unlock The Good, The Bad, And The Wealthy sometime during Foxington.
Trophies

![]() That’s a Wrap
That’s a Wrap
Collect all trophies in New Super Lucky’s Tale

![]() Not Spooped
Not Spooped
Collect all Pages in Hauntingham.
Hauntingham is the final world in the Main Story of the game. Hauntingham has a total of 18 Pages, 16 of which come from levels and 2 from the foxholes at the hub.
Refer to Stage 1 – Hauntingham for the details on how to obtain every page.

![]() A Real Veggie Villager
A Real Veggie Villager
Collect all Pages in Veggie Village.
Veggie Village is the 2nd World in the Main Story of the game. Veggie Village has a total of 22 Pages, 20 of which come from the levels and 2 of them from the foxholes at the hub.
Refer to Stage 1 – Veggie Village for the details on how to obtain every page.

![]() R&R
R&R
Collect all Pages in Wrestful Retreat.
Wrestful Retreat is the 3rd World in the Main Story of the game. Wrestful Retreat has a total of 26 Pages, 20 of which come from the levels and 6 of them from the foxholes at the hub.
Refer to Stage 1 – Wrestful Retreat for the details on how to obtain every page.

![]() The End Of A Tale
The End Of A Tale
Defeat Jinx once and for all!
Story Related
Jinx is the final boss of the game and is located at the end of Hauntingham. Jynx is no pushover, he is quite troubling because of his platform manipulation.
Jynx has a total of three stages, and no checkpoints. Though after each stage you can restore a heart, so be cautious. Jynx has the same attacks across all 3 stages, but he changes the speed/quantity/variation of them.
His attacks are as follows;
~Ground explosions which cause shockwaves.
~Tracking lasers that’ll follow you around.
~Ghost Summoning.
~Platform Shifting + Raising platforms.
~Shrinks into a ghost himself.
The way these variate is that he increases the amount of explosions, the speeds they happen, the amount of ghosts, his ghosts will set off shockwaves too and duplicate, etc. Just always expect increase in quantity and quality of his attacks.

![]() Cannon Fodder
Cannon Fodder
Defeat General Buttons and Lt. Fluffinstuff.
Story Related
This is for defeating them as the final boss of Wrestful Retreat. This boss will come as a Duo, but the attacks are always done in a singular manner so you’ll never be tag teamed.
You’ll go through different phrases;
~The giant cat will but slam multiple times, run back and forth to dodge this.
~Fire ball cannons will shoot out waves. You can stand still and slightly jump over most, while occasionally double jumping to move if there’s a dangerous wave.
~Enemies that throw bombs that you’ll whack back.
~The ship will fire bombs that you’ll need to whack back.
This trophy level is great to get Pancaked and Sticky Situation on as well.

![]() Brawn Over Brains
Brawn Over Brains
Defeat Tess.
Story Related
This is for defeating the final boss of Veggie Village. She will utilize a giant machine and different technologies to try and defeat you. Though her attack pattern is pretty regular:
~She will row down the middle with the saw’s in her chest.
~She’ll either attack the left or right with a claw arm.
~The surrounding area will have switches summoned you must tail whip, all the while dodging lasers.
~She’ll summon BuzzKills that you must jump on as well.
As the round progresses, she may increase the lasers and directions but nothing too dangerous.

![]() Sky-High
Sky-High
Collect all Pages in Sky Castle.
Sky Castle is the First World in the Main Story of this game. Sky Castle has a total of 22 Pages, 16 of which come from the levels and 6 of them from the foxholes at the hub.
Refer to Stage 1 – Sky Castle for the details on how to obtain every page.

![]() Black Belt
Black Belt
Defeat Master Mittens.
Story Related
This is for defeating the final boss of Sky Castle. Being the first boss of the game, he has a very introductory attack routine for you to be introduced to:
~Defeat the summoned enemies.
~Burrow underground to avoid the fireballs.
~Hit the new summons to hurt Master Mittens.
Like all bosses, after the third wave he’ll be defeated.

![]() Savage
Savage
Complete all PW levels.
Story Related
The PW Levels are the ‘challenge levels’ that are boss-oriented. You’ll find them with the ‘Wrestler Yeti’. There are only 3 levels to the PW challenges to complete.
Note: The PW Section has Soap, Please!, 80s Ready, and The New Champ trophies.

![]() Robot Rock
Robot Rock
Complete all Ch1p levels.
Story Related
The Ch1p levels are the ‘challenge levels’ that are platforming and mechanic oriented. You’ll find them with the exercising robot. There are 7 Ch1p levels to complete.
Note: The Ch1p Section has Grey Fox, On Top of Things, Everything Is Mine, and A “Diamond” Dozen trophies.

![]() A True Guardian
A True Guardian
Complete all of the levels in Foxington.
Story Related
Foxington has a total of 3 sets of challenge sections. To earn this trophy you’ll need to earn Robot Rock, Savage, and Brainworm trophies.

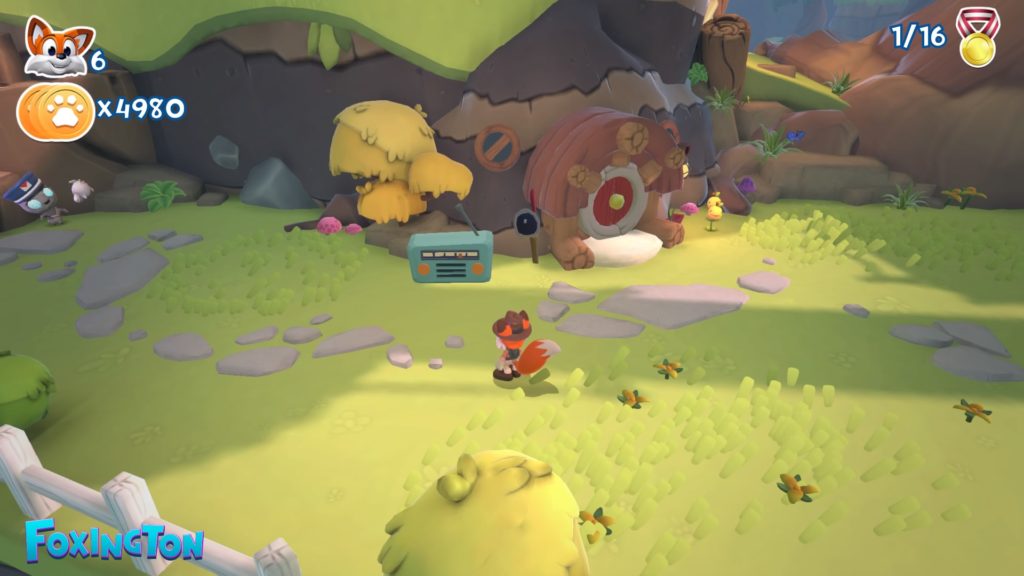
![]() Get Set Radio
Get Set Radio
Interact with all 5 radios in Foxington.
After completing the Credits for the game, you will unlock Foxington. In Foxington, there are 5 radios that you need to tailspin into and they are shown in the pictures below.
Radio 1 
Radio 2 
Radio 3 
Radio 4 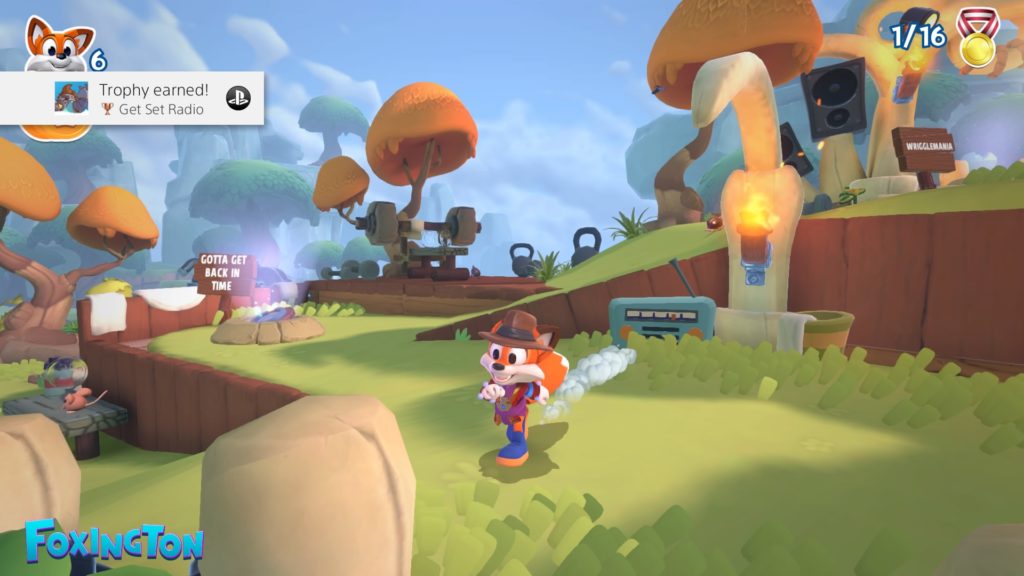
Radio 5

![]() A Real Hero
A Real Hero
Watch the Credits.
After earning ‘The End Of A Tale’ trophy, you will see and watch the credits for the game. Do NOT press anything and you will eventually earn this trophy.

![]() The Good, The Bad, And The Wealthy
The Good, The Bad, And The Wealthy
Collect 12,000 Coins.
Throughout the game you will be collecting coins by defeating enemies, gathering coins, and diamonds. You will need to have earned at least 12,000 coins and it is cumulative, so no need to save. Feel free to spend coins on costumes as they become available in the game.
Unless you replay a lot of levels, or scour for every single coin and diamond this likely won’t come until Foxington.

![]() A Few Dollars More
A Few Dollars More
Collect 5,000 Coins.
Refer to ‘The Good, The Bad, And The Wealthy’ trophy description.

![]() Fistful Of Dollars
Fistful Of Dollars
Collect 1,500 Coins.
Refer to ‘The Good, The Bad, And The Wealthy’ trophy description.

![]() Brainworm
Brainworm
Complete all Anna Lyd levels.
Story Related
Anna Lyd is the Bookworm in Foxington. Her levels consist of the ‘Marble Maze’ variant you’ve witnessed in previous foxholes. Anna Lyd has 6 levels to complete, and unlike the other 2 regions her levels have no related trophies.

![]() On Top Of Things
On Top Of Things
Defeat all of the enemies in Top That!
Top That! is a level in Foxington. It’s part of the Ch1p Levels. It’s a rather linear level with only a few branching paths, but nothing that strays too far. Kill every enemy for this to pop. It’ll pop during the level after the last enemy, so if you reach the scroll and it hasn’t popped, press Square to restart the level.
Do note that on death the enemies will not respawn, so you can rest assured at the timed platforms and events you won’t have to much stress.

![]() Grey Fox
Grey Fox
Never get caught in a single run through of Under Pressure.
In Foxington, there’s a Foxhole called Under Pressure on the far right. In this level, you will need to stay burrowed throughout the entire run of the level. While burrowed you will need to time your movements to avoid obstacles that will hurt you and reveal your location. Also, you will need to go quickly in areas where the platforms will dissolve as you are moving through them. If you do get caught, exit the level and re-enter it from Foxington to try again.
Note: This trophy is a bit glitchy. As there have been reportings of earning this despite hitting the mines.

![]() Lucky Is My Name
Lucky Is My Name
Take no damage at the end of Three Cannon Salute.
Found on the world Gilly Island, during Three Cannon Salute near the end of the level there will be a dock you will approach and a cut scene with General Buttons and Lt. Fluffinstuff. Immediately after the cutscene, destroy the boxes and enter the foxhole then move to avoid the cannon ball. Head to the right and up the ladder. You will position yourself so that when the cannon is fired you are close to the barrel of explosives and then move away from them to avoid damage. Drop down to the deck of the ship and have the cannon target the final barrels of explosives. The ship will start to take on water and you will earn this trophy.

![]() Soap, Please!
Soap, Please!
Take a shower in Foxington.
In Foxington, go up and to the far left to the PW Levels and there’ll be a workout area with an outdoor shower. Tailspin the pipes to get the water to flow and stand in the water that squirts out.

![]() Beetrayal
Beetrayal
Have a Buzzkill kill a fellow Buzzkill.
Where there are many Buzzkills (bees) close together, there is a chance that they will fire a red stinger at you and it will hit and kill another bee. Move close to a Buzzkill and avoid it killing you while the other bees are shooting at you and therefore they kill the Buzzkill you are near.

![]() The New Champ
The New Champ
Take no damage in WriggleMania.
WriggleMani is a level in Foxington. It is part of the PW Levels. This is a 4-round event where you’ll take on varying enemies, projectiles, and lasers. It get progressively harder, but fortunately it’s a rather short level so you won’t have to repeat long stretches if you mess up.
This is probably one of the hardest trophies in the game, but there is a saving grace. When you reach Round 4 you’ll notice a checkpoint behind the round announcer. So if you do get hit, die and you’ll restart from Round 3. Finishing from this one alone, will count.

![]() New Fit
New Fit
Equip your first costume.
As you progress through the game you’ll unlock various outfits for progression and page collecting. Every World Hub has a store that you can visit and purchase new costume pieces for 700 Coins each. Purchase any new costume and equip it to unlock this.

![]() Is My Shirt On Backwards?
Is My Shirt On Backwards?
Equip a mismatched costume.
As you progress through the game you’ll unlock various outfits for progression and page collecting. Every World Hub has a store that you can visit and purchase new costume pieces for 700 Coins each. You’ll need to purchase a Head Piece, and a Bottom Piece of different sets and then equip it to unlock this.

![]() Fashion Icon
Fashion Icon
Purchase all of the costumes from Sky Castle, Veggie Village, Wrestful Retreat, and Hauntingham.
This trophy wants you to purchase all of the costumes your main worlds have to offer. To obtain them all you’ll first need to collect every page in the game, so make sure you do that first.
After you have beat the game and collected all the pages, you will need the following costume sets;
~Alpine So Fine + Lederhosenpantz
~Law ‘N’ Order + Protect ‘n’ Serve
~Top Knotch + Canyon Spun Cummerbund
~Perennial Favorite + Bodacious Boardshorts
~Tremendous Tophat + Apparitional Apparel
If it does not pop after those, purchase – Top-Of-The-Line Tophat, Financial Finery, and The Favorite Fedora.

![]() A “Diamond” Dozen
A “Diamond” Dozen
Find all 4 diamonds in A Road to Nowhere.
A Road to Nowhere is a level in Foxington. It is part of the Ch1p level set. You’ll have to nab 4 different diamonds and they’re all easy to find and early in the level:
~At the beginning you’ll go to the 2nd pillar, climb the ladder and jump across to one.
~Above the first Plant Enemy. Take the conveyor belt across then climb your way up to this.
~From your first checkpoint, go around behind the wall and backtrack a little with the bouncepads for this.
~From the first checkpoint continue across the rotating columns. One of them will have a bouncepad. Use it to reach a platform off to the left.

![]() That Went Swimmingly
That Went Swimmingly
Take a dip in Foxington.
In Foxington, fall into the surrounding water in the Hub World.
![]() Everything Is Mine
Everything Is Mine
Collect all of the collectibles during the cross ladder section of Step by Step.
Step By Step is a level in Foxington. It is part of the Ch1p Levels. For this trophy you’ll need to collect all the collectibles in this level. This entails the coins, diamonds, and a food bucket.
Luckily the level is a sideways linear level and there isn’t a branching path that you can miss stuff to easily. Make sure you look and scan your area carefully before moving forward. Some of the collectibles will blend in to the environment, for example a diamond on a purple wheel, so keep your eyes peeled.
Unfortunately, if you lose a life – collectibles SINCE you activated the checkpoint will respawn. So be cautious. This trophy will pop during the level, so if you have not achieved it by the time you reach the page, press square to replay the level.

![]() Cashing Out
Cashing Out
Activate all the Cash Registers.
This is a finnicky trophy as it’s not clearly marked what is ‘all’. The Cash Registers you need to activate are the registers at the Gilly Island world hub. There are a few of them laying around, but it’s popped as early as tail-whipping just the one at the hub spawn, and the one outside of Trapped In Paradise.

![]() If There’s A Place You Gotta Go…
If There’s A Place You Gotta Go…
Look at every map in Trapped in Paradise.
Trapped In Paradise is a level in Gilly Island. There are 5 maps, one for each umbrella. Finding them is relatively easy as well since the umbrellas are mandatory to complete this level, there is a map beside every umbrella. View each map at least once for this trophy.
It has been noted that this trophy can refuse to pop and may need to be re-ran for it to pop.

![]() Jump, Man!
Jump, Man!
Defeat the Yeti in Securing the Talent.
Securing The Talent is a level in Gilly Island. The Yeti in question is in a hidden foxhole that you’ll have to maneuver over barrels and such in the fashion of Donkey Kong. Defeat him at the top for this.
Refer to Stage 1 – Gilly Island for the Yeti’s location in this level.

![]() Gather ‘Round, Chicken
Gather ‘Round, Chicken
Help the Wormal farmer gather his chickens.
The Wormal farmer can be found in Egg Roll, a level in Veggie Village. This quest to gather the chickens, is actually needed to secure the letter U. All the chickens are located on the same small island, so you won’t have to scour the level for them. So stay in the area with the chickens and look around for them all.

![]() Don’t Need A Third Dimension
Don’t Need A Third Dimension
Finish a 2D level.
Story Related
2D Levels are one of the few variants of levels that this game has to offer. You will earn this in Sky Castle during Aqueducts.

![]() A New Tale
A New Tale
Complete the Prologue.
Story Related.
The prologue is an automatic story you’ll see upon starting the game. This will be your first trophy.

![]() Slide To The Left
Slide To The Left
Complete a Sliding Block Puzzle.
Sliding Block Puzzles are one of the variant playstyles of the hub foxholes you’ll encounter. The first Sliding Block Puzzles are in Sky Castle.

![]() Marble Madness!
Marble Madness!
Complete a Tess Marble Minigame.
The Tess Marble Minigame is one of the variant playstyles of the bun foxholes you’ll encounter. The first Tess Marble Minigame is found in Veggie Village.

![]() What’s Down Here?
What’s Down Here?
Use a foxhole.
Foxholes in this game are sort of portals that lead to various different “mini-games”; puzzles, boards, platformers, mazes, etc. Inside of levels they often lead to hidden pages while at the main hub of worlds, they’ll offer the the pages outside of levels.

![]() Sticky Situation
Sticky Situation
Fall into a tar pit.
Tar pits are one of the hazards that you may run into if you fall off an edge depending on the level. One of the first places you’ll see Tar Pits is during Wrestful Retreats boss fight.

![]() Pancaked
Pancaked
Get crushed.
Getting crushed is a hazard you may run into through this game. One of the first and easiest ways is to get squished by the giant cat during Wrestful Retreats boss fight.

![]() You Got LUCKY
You Got LUCKY
Collect all the LUCKY letters in a single level.
Every single level of the Main Story has 5 letter’s (L, U, C, K, and Y) hidden throughout them. To achieve this trophy you need to find any one level’s full set of letters. Refer to Stage 1 to find all the Letter Locations.
![]() 10,000 Leagues Under The Ground
10,000 Leagues Under The Ground
Burrow 10,000 meters.
Burrowing is one of the main features and mechanics of this game. You’ll be utilizing burrowing to go under walls, fences, lasers, enemies, traps, and so much more. 10,000 meters may seem like a lot, but as long as you’re not repeating levels a bunch this will come somewhere between worlds 3 & 4.

![]() You’re A Fungi!
You’re A Fungi!
Solve the mushroom puzzle in Grave Awakening.
Story Related
Grave Awakening is a level in Hauntingham in which this puzzle resides. Puzzle is a loose term, as all you’ll need to do is tailwhip 5 different mushrooms to complete this. This is a story-related event as you’ll need to do this to awaken one of the members you need for the blockade.

![]() Gone Fishin’
Gone Fishin’
Collect all Pages in Gilly Island.
Gilly Island is the Fourth Island of the Main Story. There are a total of 18 Pages, 12 that come from levels and 6 of which come from the Hubs Foxholes. Refer to Stage 1 – Gilly Island for all the Page Locations.

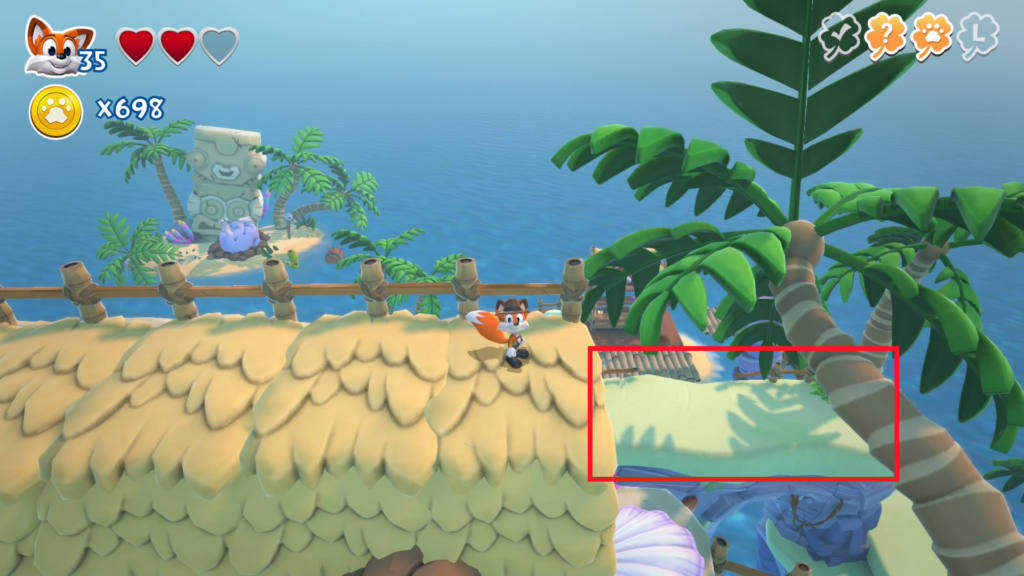
![]() …monster
…monster
Must… destroy… sandcastles!
Sandcastles need little explanation, but to find them you must be in a sandy world in this game. Whether your in a level or on the main hub of the world, destroy any sand castle you come across as there are multiple different ones. The easiest and fastest way to achieve this though would be from the initial spawn in Gilly Island, there’ll be a sand castle on the beach to your right.

![]() A Sinking Feeling
A Sinking Feeling
Defeat General Buttons and Lt. Fluffinstuff in Three Cannon Salute.
Story Related
Three Cannon Salute is a level located in Gilly Island. General Buttons and Lt. Fluffinstuff is a mini-boss located at the end of this level. This trophy goes hand-in-hand with Lucky Is My Name. Refer to that trophy for mini-boss details as well.

![]() Under My Umbrella
Under My Umbrella
Complete Trapped in Paradise.
Story Related
Trapped in Paradise is a level located in Gilly Island. This trophy only requires you to complete the level, which you’ll need to open 5 umbrellas to do so.
![]() Wormstock
Wormstock
Rescue the Soggy Boggy Boys’ audience.
Story Related/
Soggy Boggy Boys is a mandatory quest in the level Securing The Talent found in Gilly Island. You’ll need to destroy all the speakers to rescue them and complete the level.
Refer to Stage 1 – Gilly Island for all the Speaker Locations in this level.
![]() Showstopper
Showstopper
Defeat Lady Meowmalade in her dance club.
Lady Meowmalade is the final boss of Gilly Island. She is annoying to say the least. Her attack patterns aren’t too varied, or heavily skill reliant, but it is luck oriented to a sense:
~The floor panels will randomly change color (Red and Blue), you’ll want to manage to get onto the blue as the red will hurt you when activated. After enough times Meowmalade will descend.
~When Meowmelade descends, it’s the same as above but now with added lasers. Attack her when she exhausts.
~She’ll restart the above processes, but now with spawned enemies. Now you’ll have to worry about the dangerous floor, enemies, projectiles, and lasers!!!
~As the rounds go on, her lasers will move faster and there’ll be more of them and the floor tiles will get smaller making it a guessing game on where it will stop and if you can manage to get there without being injured.
There are no checkpoints, so you’ll have to do the level all in one go.

![]() Treasure Hunter
Treasure Hunter
Collect all Diamonds in Securing the Talent.
Securing the Talent is a level in Gilly Island. The diamonds you need to collect are your regular blue diamonds and there are five of them to find. Four of these are in plain sight around the areas you need to visit, except one is ‘hidden/invisible’ and you’ll have to keep an eye out for it.
Refer to Stage 1 – Gilly Island to find the locations of the Diamonds for this level.

![]() Gotta Run!
Gotta Run!
Finish a Burrow Run level.
Story Related
Burrow Run levels are levels in the game where you have no directional control, nor speed control over Lucky. Lucky, unless damaged or stuck on something, will continuously run. These levels are only a tad more tricky to collect things on as you can’t backtrack and are only able to control Lucky’s jumps and attacks.
As for your first Burrow Run level, it’ll be Dungeon Run in the Sky Castle world.

![]() Who Needs Walls?
Who Needs Walls?
Beat Trapped in Paradise without flipping a switch.
Trapped In Paradise is a level located in the world Gilly Island. There are 2 methods that are very applicable for doing this. You will need to open up all 5 umbrella’s without activating any switches.
Method 1; Utilize double jumps + tail spin for extended reach. This method will let you do long jumps, and jumping around walls. 4 out of the 5 umbrella’s are easily done with this method but the umbrella furthest right on the map is a bit finnicky to reach with this method.
Method 2; Walk along the bamboo walls. This method will let you easily access everywhere and get around, the difficulty is staying on the walls.
It’s best utilizing both methods whenever you can to achieve the opening of all the umbrellas. As long as you don’t hit a switch, this is just a slow and steady effort.

![]() Smooth Criminal
Smooth Criminal
Defeat Lady Meowmalade without getting hit.
Probably one of the most difficult trophies. Lady Meowmalade is the final boss in Gilly Island. You’ll need to defeat her without taking a single hit, which is a mixture of skill and RNG luck.
Refer to Showstopper for more details.

![]() 80s Ready
80s Ready
Defeat WriggleMania while wearing the Maxi-Mullet.
The Maxi-Mullet is an equippable headpiece in the game. To unlock the Maxi-Mullet you must first complete all of Ch1p’s Levels. You’ll then be able to purchase it for 700 Coins. Equip the Maxi-Mullet then complete WriggleMania, which is a PW Level.