
Game: Apocalipsis: The Tree of The Knowledge of Good and Evil
Peripherals: –
Time to 100%: 1 – 2 hours
Difficulty: 2/10
Missable trophies: Soldier, Cannoneer, Diver, Stonemason, Absinthium, Chopin, God of Snakes, The End?, True Ending, Behemoth, Perfect Pitch, Slide and Unlock, Demonology.
Author: Pete
Welcome to the trophy guide for Apocalipsis: The Tree of The Knowledge of Good and Evil . This can also be considered a walkthrough and may be used for PlayStation 4, Xbox One and Steam. Achievements for Steam and Xbox are in almost all cases the same as the PlayStation 4 Trophies. A roadmap is provided in the stages below.
Follow us on twitter for the latest news and giveaways.
Stage 1 – Play through the Harry, Zula, and Apple Tree Games.
Follow this text guide to earn all the trophies in one play session through the 3 games.
Harry and the End of the World. 
One Night in the Woods. 
The Tree of Knowledge.
Apocalipsis: The Knowledge of the Tree of Good and Evil
Notes:
Press L2 to use the cursor to pick up, use, and interact with objects. Pressing L2 again hides cursor.
If a Hand icon is shown on an object, you can grab it.
If a small Gear icon is shown, you can interact with objects.
An arrow with blink marks means “go to”.
Press Triangle to change the selected item(s) in your inventory.
Hold down Circle to move faster.
Game 1: Harry and the End of the World
1. Tutorial Level
-Pick up the STICK, use the STICK on the cart.
-Pick up the LARGE STICK, use the LARGE STICK on the rat.
-Move towards the cat, interact with the cat so it comes down the tree.
The next level could come up as a blue screen glitch. If this happens, close the game, restart and continue. If at any point through the game this happens again, close the game and restart to continue where you left off.
2. Crow in the Room
-Pick up the CRYSTAL BALL, HAND, and the LADDER.
-Put the LADDER in front of the cabinet, go up the LADDER, pick up the KNIFE, -Open the right cabinet door, pick up the BOOK.
-Use the KNIFE on the LEAVES hanging downwards on the top right, move more to the right and pick up FLOWER #1 from the BASKET.
-Use the LEAVES with the GRINDER, pick up the POWDER, and the 4 CANDLES laying on the floor.
-Interact with the 4 corners of the star on the floor with the CANDLES.
-Use the HAND and then the CRYSTAL BALL on the star on the floor.
-Put the BOOK on the pedestal in the top left, interact with the CRYSTAL BALL, then interact with the BOOK.
(cutscene) (Magic Trophy)
3. Dead Guy on Stake near Two Holes
-Pick up the LADDER, put on the left hole’s side, go down and to the right into a cave, solve the Water Pipe Puzzle.

-Pick up the LUMBER and the 2 GEARS.
-Put one GEAR on the right, interact with that GEAR twice.
-Move to the middle. There’s another gear. Interact with that GEAR once.
-Put the other GEAR on the left, interact with that GEAR twice.
-Water will drain. Now exit to the left.
-Go up the LADDER, pick up the LADDER, put the LADDER across the gap, put the LUMBER across the second gap, go back and pick up the LADDER, put the LADDER against the far right, go up the LADDER to exit.
4. Tombs
-Interact with the right tomb on the second floor, pick up the TONGUE
-Interact with the middle tomb, pick up the TONGUE
-Pick up the TONGUE in the left tomb that is already open
-Interact with the 1st archway on the 1st floor
Hallway
-Interact with the boxes. The password is shown below:

-After the tongue pictures disappear, there is a POTION that appears from inside a box, pick it up.
-Go back to the previous room
-Interact with the BOTTLE beside the guard on the 2nd floor, use the POTION, take the KEY.
-Go back to the hallway.
-Use the KEY on the lock at the dead person’s feet, pick up the BALL, exit to the previous room.
-Use the BALL on the hook to the right of the archway.
-Go left, take the MEAT, and use the MEAT on the dog.
-Go to the right.
(cutscene)
5. War Scene
-Pick up the TARGET INFO below where the hook with teared paper piece is located, put it on the wall at the hook.
-See pictures below (Under Soldier trophy) to see where to bomb the top 3 targets on the list, interact with the arrows to set the angle and degrees of the angle (Soldier Trophy).
-Go through the battle area without being hit, dodge and watch timing of when to run just after bomb(s) explode (You can hold ![]() to run, making it easier at points)(Evasion Trophy).
to run, making it easier at points)(Evasion Trophy).
-Pick up FLOWER #2 after going down the stairs and to the left.
-Go to the right to exit.
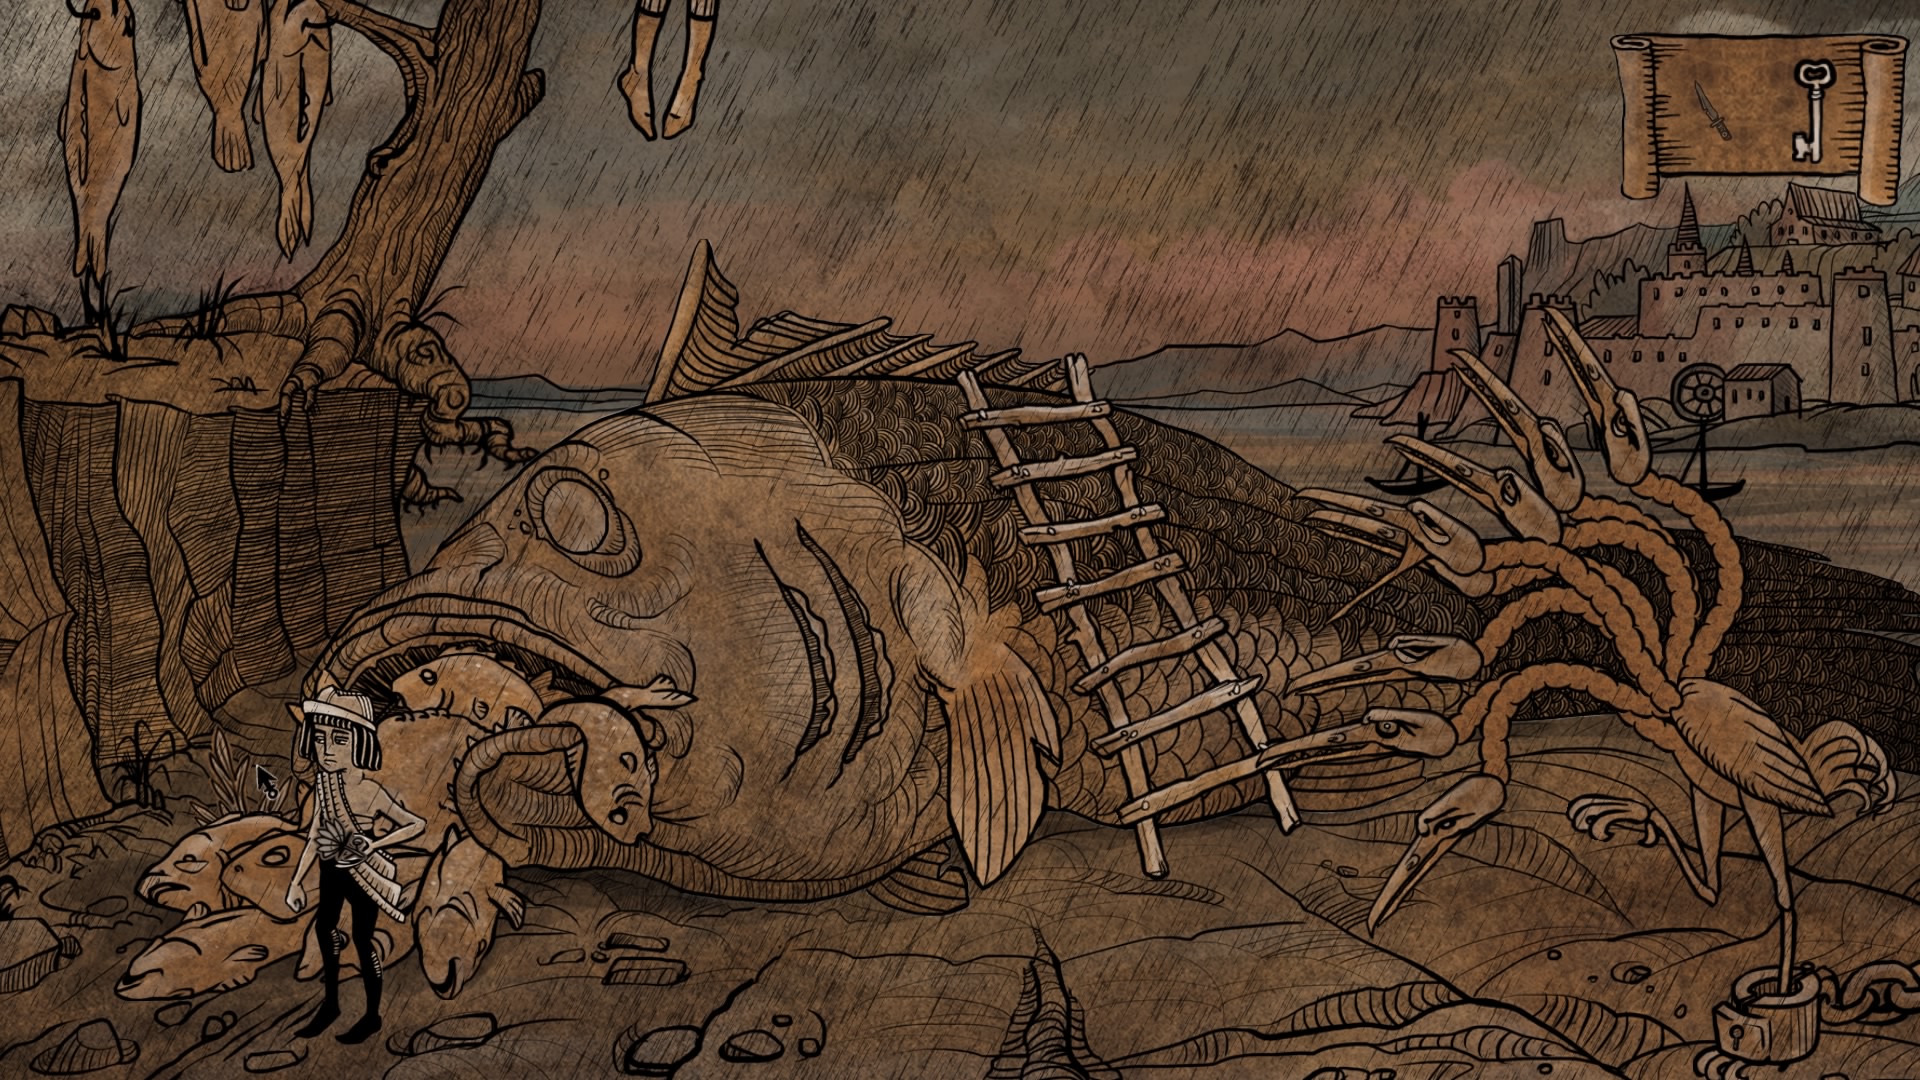
6. Dead Fish and 8 Headed Flamingo
-Pick up the LADDER, place the LADDER on the right side of the dead fish.
-Hit the hanging socks that will release a KEY that falls to the ground.
-Pick up the KNIFE from the fish’s eye.
-Go down the LADDER, pick up the KEY, and HILT of the sword.
-Go to the left to pick up FLOWER #3.
-Interact with the small wiggling fish using the KNIFE.
Fish Cutting Puzzle

-Use the KNIFE on the fish to cut it into 8 pieces
-Interact with the 8 headed flamingo to feed it the 8 pieces
-Use the KEY on the lock on the 8 headed flamingo’s feet. See picture below on how to solve the LOCK PUZZLE.

7. Sailboat Scene
-Go onto the boat to the middle, there’s a dead man wearing a mask, interact with him, then look to the left side of the dead man’s body to see a SWORD BLADE, pick it up. After that, turn behind the dead man, there’s a HAMMER behind the sailboat.
-Go to the top right to the captain and take the SWORD piece.
-Go to the anvil, place the SWORD BLADE and the HILT. Use the HAMMER to make a new SWORD, pick up the SWORD.
-Go back onto the boat and use the SWORD on the dangling person’s arm, hit it 3 times
-Go to the top left and use the SWORD on the owl
-Go off the boat to the owl again, hit it with the SWORD, when the rat moves pick up the MONEY
-Go back onto the boat to the top right and give the MONEY to the captain
8. Boat Under the Stars
-Interact with the CONSTELLATION CHART on the right
-See picture below for the correct order (Astronomer Trophy)

Save the game here by exiting to the main menu and then making a backup save either in the Cloud Saves or USB Saves.
9. Boat Hull
-interact with the BELL, go back to the cannon, wait until the guard comes up to look at the bell, then move down to where the chest was guarded, interact to pick up a ROPE.
-move to the left of the lowest deck of the ship, pick up a CANNON BALL, go to the barrels and use the CANNON BALL, go up one level to the left and use the CANNON BALL on the nails, then take the RAMMING ROD from the wall, go back to the front of the cannon.
-use the RAMMING ROD on the cannon, use the CANNON BALL on the canon, interact with the floor switch, use the ROPE on the back of the cannon to kill the sea monster. (Cannoneer Trophy)
Note: if you do not get this trophy then reload and make sure that you follow the correct order described here
10. Diver in Water
-Avoid the tentacle of the sea monster and the pieces of debris falling by moving left and right (Diver Trophy)
Note: Holding down ![]() will cause Harry to swim faster. If you do not get this trophy then reload and make sure that you follow the correct order described here.
will cause Harry to swim faster. If you do not get this trophy then reload and make sure that you follow the correct order described here.
11. Raft Making
-pick up the SPEAR, LARGE LEAF, and POLE. The LARGE LEAF and POLE will automatically change into an OAR in your inventory
-use the SPEAR to collect the matching 4 pieces indicated
-use the SPEAR to collect a TOOLBOX, then interact with the TOOLBOX to obtain a HAMMER
-use the HAMMER to interact with the raft surface to mend it
-use the OAR to move to the top right, interact with this TOOLBOX to obtain a KNIFE
-move to the bottom right, then use the KNIFE on the barrel
12. Shore
-pick up the KNIFE, and the LARGE STICK
-go to the left, and use the LARGE STICK on the BASKET, pick up the STRING and BASKET
-interact with both dead animals to get 2 LARGE BONES, then use the SHARP BONE on the large stone
-on the large stone use 1 LARGE BONE and then the KNIFE, pick up the SHARP BONE
-repeat this again with 1 LARGE BONE and the KNIFE, to make another SHARP BONE, now collect the SHARP BONE
-go to left where the partial ladder is, interact with the holes above with the SHARP bones, go up the ladder to exit the area
13. Dry Land with Contraption
-pick up the 2 RECTANGULAR WEIGHTS, use the RECTANGULAR WEIGHTS on the hanging chains (one at a time)
-pick up the LEFT RECTANGULAR WEIGHT and put it on the right hanging chain, go up the ladder
-pick up the SPRAYER, use the SPRAYER on the flying bugs
-go back down the ladder to the left to the dead bugs, interact with the dead bugs to pick up a NEEDLE
-collect FLOWER #4
-go to the gate to the left for the GATE PUZZLE
Moving the pieces
A1>A2, B1>B3, A2>A3, C1>C2, A3>A1, B3>B2, A1>A2, D1>D3, A2>A3, B2>B1, A3>A1, C2>C3, A1>A2, B1>B3, A2>A3

Labels for all parts of the Puzzle 
Final Solution to Puzzle
-in as few as moves possible get the left stack to the far right in the same order (Tower of Hanoi Trophy)
14. Inside the Walled Area
-pick up the STICKS
-turn well wheel, take the BUCKET that appears
-pick up the MATCHES (looks like a flame)
-pick up the SHOVEL
-go to the left to collect FLOWER #5
-pick up the WATER SEEKER Y BRANCH, interact with it on the ground at the indicated spots, when the WATER SEEKER Y BRANCH is moving very quickly back and forth this is where you dig to get WATER
-use the SHOVEL on the spot where WATER may be located, if you do not get a stream of WATER squirting upwards then use the WATER SEEKER Y BRANCH again on the indicated spots and the SHOVEL until you get the WATER squirting upwards out of the hole
-use the BUCKET on the WATER to collect it
-go to the left and use the BUCKET of WATER on the dry spot near some plants, collect the SEEDS
-go back to near the hut where the woman is standing
-use the STICKS, MATCHES on the outdoor oven, use the SEEDS on the BEAN shaped item to the right of the outdoor oven on the ground, collect the BEAN shaped item, interact above the fire area with the BEAN shaped item, this makes some BREAD, collect the BREAD and give it to the woman
15. Cow
-pick up the PLANT on the right and the KNIFE near the cow’s head, use the KNIFE on the harness holding the cow up, use the PLANT on the top right of the cow
-go to the left and collect the WOOD, CHAIN WITH WOOD, and MATCHES
-use the CHAIN WITH WOOD on the post with the chain
-use the WOOD and MATCHES on the spot indicated to make a fire
-use the PLANT on the pot above the fire
-interact with the pot to collect a BLACK LIQUID
-wait until the strange man leaves and then use the BLACK LIQUID on the back of the cow, the strange man is now trapped in a cage
-pick up the KEY to the left
-use the KEY on the lock of the cage to release the woman
16. Bucket Platforms and Woman
-interact with the right BASKET on the 1st platform middle level, place the BASKET on the far left on the 2nd platform on the middle level
-interact with the left BASKET on the 1st platform on the middle level, place the BASKET in the middle on the 2nd platform on the middle level
-interact with the middle BASKET on the 1st platform on the middle level, place the BASKET on the right on the 2nd platform on the middle level
-go up the ladder to the nose of the face on the top level of the 2nd platform, pick up the SWITCH
-go down the ladder to the ground under the 1st platform, use the SWITCH on the wood post on the left under this 1st platform
-interact with the SWITCH
-go under the tree to the left, pick up the LEAVES
-go to the right, use the LEAVES with the ground under the far left basket on the 2nd platform
-interact with the woman so she goes towards the hut
-the woman stops in front of a hut, interact with her again and she picks up a STICK, interact with her to get the STICK
-use the STICK on the birds in the tree, she picks up a FEATHER
-go around the side of the hut to the faces on the ground, interact with the faces and the RELIEF PUZZLE to the left
Relief Puzzle – Match the pieces as follows below (Stonemason Trophy), if you do this incorrectly you must replay this level. Then touch the pieces on the completed Relief in order 1 (top right), 2 (middle) and 3 (bottom left) as shown in the pictures below. If you do it correctly you will see white smoke. If it is not done correctly you will see black smoke and then you must replay this level.

Move the pieces as shown 
Interact with the Puzzle by touching the spots shown in order from 1 to 3.


(cutscene)
17. Special Green Inside Building
-go to the left to the boat, pick up the FLASK
-go to the woman, give her the FLASK (Angel of Death Trophy)
-interact with the coffin, interact with the chains to attach the coffin to the hoist
-go up to where the gears are located
-interact with the gears as follows: hit the middle once, right twice, and left once
-go to the far left, pickup the COINS
-go to the right, interact with the COIN PUZZLE (see picture below)

-interact with the COIN PUZZLE again to get 2 COINS
-interact with the switch near the doorways to move the coffin
-interact with the left pipe to pay the undertaker, use one COIN and then another COIN.
-go to the boat, interact with the switch
18. Doorway with Large Bug Above
-pick up the MUSHROOMS and Flower #6 on the left
-pick up the ARM on the right
-go to the door, place the ARM, MUSHROOMS, move away to the left, the large bug eats the MUSHROOMS and ARM
-go back to the door and interact with the pieces as shown below for the DOOR PUZZLE

19. Organ
-go to the far left, interact with the skeleton on the far left to get the BONES
-interact with the HUMAN SKULL and the BAG to collect both of them
-go through the open door on the right
-use the BONES on the top hole and the BAG on the lower hole on the left
-pick up the ANIMAL SKULL, interact near the missing key to pick up TUBE PIECE, go to the right to collect FLOWER #7 (Absinthium Trophy)
-use the ANIMAL SKULL on the right set of tuning forks under the animal skull and use the HUMAN SKULL on the left set of tuning forks under the human skull
-interact with the BAG, hear a tune, go back to the other room
-place the TUBE PIECE on the organ pipes where indicated
-play the correct song on your first attempt (see pictures below) (Chopin Master Keys Trophy)
Note: if you do not get this trophy then reload and make sure that you follow the correct order described here

(cutscene)
-after the next area is available, pause the game and in the menu go to the map. Go back to the Organ level.

-play the song indicated (see pictures below) (Behemoth Trophy)

20. Puzzle with Snake
-pick up the 2 BLACK TEETH and 1 WHITE TOOTH
-interact with the snake’s mouth
SNAKE TEETH PUZZLE
-correct order is 1, 12, 2, XI, 8, VII, 6, V, 10, 4, IX, III
-pick up the KEY from the snake
SLIDE PUZZLE (see pictures below)

-use the KEY on the keyhole to open the cave door
21. Woman with Hourglasses
-pick up the HOURGLASS second from the right side
-place the HOURGLASS on the left under the woman
-collect the PIECES on the left flat area, the bottom PIECES go in the indicated places to form the creature (see the pictures below).
PIPE PUZZLE appears, interact with it (see pictures below)

22. A) CIRCLE PUZZLES
-pick up the DEAD BUG on the right CIRCLE PUZZLE, interact with this puzzle to pick up the PIECES
-use the DEAD BUG on the plate on the altar
-go to the MIDDLE PUZZLE that appeared and spell out “MEDICAMEN”
-pick up the CHALICE that appeared
-go to the left CIRCLE PUZZLE, interact with this puzzle to make a double star pattern (see pictures below)

Circle Puzzles Solutions 
Pod for the plate 
Flower for the plate


-go to the left, pick up the POD and FLOWER (as shown above)
-go to the altar, use the CHALICE on the star on the ground, use the POD on the plate, then use the FLOWER on the plate
-Harry takes out another FLOWER from his bag, use the FLOWER on the plate
-interact with the CHALICE
The End (True Ending Trophy)
(cut scene)
Back at the main menu, choose Game 1: Harry and the End of the World, go to continue and now you are back at the CIRCLE PUZZLES level.
22. B) CIRCLE PUZZLES
-pick up the DEAD BUG on the right CIRCLE PUZZLE, interact with this puzzle to pick up the PIECES
-use the DEAD BUG on the plate on the altar
-go to the MIDDLE PUZZLE that appeared and spell out “MEDICAMEN”
-pick up the CHALICE that appeared
-go to the left CIRCLE PUZZLE, interact with this puzzle to make a double star pattern (see pictures below)
Circle Puzzles Solutions Pod for the plate Flower for the plate
-go to the left, pick up the POD and FLOWER (as shown above)
-go to the altar, use the CHALICE on the star on the ground, use the POD on the plate, then use the FLOWER on the plate
-Harry takes out another FLOWER from his bag, DO NOT use the FLOWER on the plate
-interact with the CHALICE
The End (The End? Trophy)
Game 2: One Night in the Woods
Night Outside of House/Inside of House
-go to the right, interact with the window shudders, pick up the BROOM HEAD, place the BROOM HEAD on the bench below the window that has the HANDLE on it
-go inside the house, collect the MATCHES, GLUE BOTTLE, and PLANT IN POT
-interact with the chest, pick up the SCISSORS from the left wall
-use the MATCHES on the fireplace
-interact on the left side of the counter top
-place the PLANT IN POT, interact with the PLANT IN POT to collect LEAVES
-use the LEAVES on the pan above the fireplace
-go outside and use the GLUE BOTTLE on the BROOM HEAD and HANDLE to fix the BROOM, pick up the BROOM
-go to the left, use the BROOM on the pile of bones on the left to collect BONES
-go back inside the house
-interact with the pan using the BONES
-collect the PAN
-go to Harry in the bed and use the PAN on him, use the SCISSORS on Harry’s head (now you have HAIR CLIPPINGS in your inventory) (Goodnight Trophy)
-pick up the LANTERN
(cut scene)
-go to the left, pick up the CANE when the boy is looking to the left
-go to the right, use the CANE on the trap holding the animal
-interact with the front of the animal using the LANTERN (Bark and Bite Trophy)
-go to the left, pick up the FLUTE near the dead boy
-go down the screen to the left to go to the next area
-Interact with the bird in the tree, use the FLUTE on the bird
FLUTE PUZZLE (see pictures below) (Perfect Pitch Trophy)

Flute Puzzle Press where 1 is located 
Flute Puzzle Press where 2 is located 
Flute Puzzle Press where 3 is located


-pick up the CROSS, use the CROSS on the right structure before the bridge
-interact below the CROSS in the rectangular area
-CROSS PUZZLE click on the following: RED, then WHITE; GREEN, then WHITE; and BLUE, then WHITE (Slide and Unlock Trophy)
-go across the bridge to the right
Satanic Statues
-pick up the TORCH and BOWL near the fire
-go to the right
Waterfalls
-interact with the moon to collect MOON BEAM
-use the BOWL on the water
-go up the stairs to the WATERFALLS PUZZLE (see pictures below) (Italian Sidejob Trophy)

Interact with the 2 blocks to remove them 
Interact to place the blocks as shown


-use the TORCH on the vines
-pick up the KNIFE
-go to the left
-from the left, use the TORCH on the left chalice
-use the BOWL on the next
-skip over the middle statue
-use the KNIFE on the next
-use the MOON BEAM on the right
-interact with the middle statue using the HAIR CLIPPINGS and use the LANTERN on the circle of the blue beam (A Deal with the Devil Trophy)
Harry in a Room (cut scene)
Game 3: The Tree of Knowledge (use R1 to switch between the Harry and Zula)
The Tree of Knowledge
Apple Tree Puzzle:
-Zula: interact with the skull bird using the LANTERN
-Harry: collect the EGGS (BLUE EGG and RED EGG), interact with the blue snake’s head using the BLUE EGG and interact with the red snake’s head using the RED EGG, interact with the snakes again for the SNAKE PUZZLE (see pictures below)

Interact with the bones to cover the shadows 
Interact with the bones until the shadows are covered


-Harry: pick up the RED SNAKE
-Zula: interact with the blue snake with the LANTERN, then again interact with the blue snake
-Harry: use the RED SNAKE on the apple
-Zula: interact with the apple (The Fruit Trophy)
The End
(Platinum Trophy)
Stage 2 – Trophy Cleanup
If you miss any trophies (Soldier, Cannoneer, Diver, Stonemason, Absinthium, Chopin, God of Snakes, The End?, True Ending, Behemoth, Perfect Pitch, Slide and Unlock) you can replay any levels across the 3 games. Harry and the End of the World has a level map to quickly go to any level to obtain the trophy(ies) that may have been missed. The other two games are short and can be quickly replayed for any missed trophy(ies).

Map for Harry at the End of the World game
Trophies

![]() End of the World
End of the World
Unlock all trophies
Earn all other trophies.

![]() Chopin
Chopin
Master the Keys
Interact with the organ keys in the correct order as shown above in the text walk through for Game 1: Harry and the End of the World.

![]() Demonology
Demonology
Understand the Demons
Interact with the four Demons’ chalices and the circle in the middle Demon’s blue beam. See the text walk through above in Game 2: One Night in the Woods.

![]() Italian Sidejob
Italian Sidejob
Stomp the Plumbing Problem
See the text walk through above for the correct order to solve the Waterfalls puzzle in Game 2: One Night in the Woods.

![]() Behemoth
Behemoth
O Father O Satan O Sun!
See the text walk through above for the correct order to play this tune on the organ in Game 1: Harry at the End of the World.

![]() True Ending
True Ending
Break the Mirror
In this ending of Game 1: Harry and the End of the World, use the CHALICE to break the mirror.


![]() God of Snakes
God of Snakes
Solve the Teeth Problem First Try
See the text walk through for Game 1: Harry at the End of the World for the correct order to solve the Snake Teeth puzzle without making a mistake. This level is replayable from the map if needed.

![]() The Fruit
The Fruit
The Original Sin
See the text walk through above for the correct order to solve the Game 3: The Tree of Knowledge Apple Tree puzzle.

![]() Stonemason
Stonemason
Make No Mistake When Fixing the Relief
See the text walk through above for the correct order to solve the Relief puzzle for Game 1: Harry at the End of the World.

![]() Angel of Death
Angel of Death
Get to the Other Side
See the text walk through above for the correct order on how to solve the Coin puzzle and where to use the Coins for Game 1: Harry at the End of the World.


![]() Diver
Diver
Escape the Kraken Untouched
Get through the underwater section by dodging left and right to avoid the Kraken’s tentacle and the falling debris from the destroyed ship. This is level is replayable from the map if needed. This is in Game 1: Harry at the End of the World.

![]() The End?
The End?
Finish the Game
The ending of Game 1: Harry and the End of the World where the CHALICE is not used to break the mirror.


![]() A Deal with the Devil
A Deal with the Devil
But There’ll be Hell to Pay…
See the text walk through above for the correct order to solve the Satan Statue puzzle for Game 2: One Night in the Woods. Also, see the picture below.


![]() Slide and Unlock
Slide and Unlock
Open the Bridge as Fast as Possible
See the text walk through above for the correct order to solve the sliding puzzle for Game 2: One Night in the Woods.

![]() Soldier
Soldier
Never Miss Your Target
Hit the 3 targets in the order given in the text walk through above. See pictures below. This is in Game 1: Harry at the End of the World.

Building #1 
Building #2 
Building #3


![]() Absinthium
Absinthium
Gather Artemisia
Find and collect all 7 Flowers. Repeat any level from the map if one or more are missed. These are all in Game 1: Harry at the End of the World.

Flower #1: To the far right 
Flower #2: Left after going over the Cannonball Platform 
Flower #3: Left of the Dead Fish 
Flower #4: Left of the Raised Ground 
Flower #5: Under the tree 
Flower #6: Left of the doorway 
Flower #7: Behind the Organ on the Right


![]() Tower of Hanoi
Tower of Hanoi
Master the Puzzle
See the text walkthough for Game 1: Harry at the End of the World for the correct and fastest way to solve the stacking puzzle.


![]() Magic
Magic
Perform the Ritual
See the text walk through above for the correct order on how to perform the Ritual puzzle for Game 1: Harry and the End of the World.

![]() Cannoneer
Cannoneer
Kill the Kraken with One Shot
See the text walk through above for the correct order to on how to kill the Kraken with one shot from the cannon. This is in Game 1: Harry at the End of the World.

![]() Astronomer
Astronomer
Follow the Stars
See the text walk through above for the correct order to solve the astronomy puzzle. This is in Game 1: Harry at the End of the World.

![]() Goodnight
Goodnight
Get Harry to Fall Asleep
See the text walk through above for the correct order to make the pan of liquid to put Harry asleep in Game 2: One Night in the Woods.

![]() Bark and Bite
Bark and Bite
Release the Wrath and Hunger
Interact with the lock on the animal’s hind leg and use the Lantern on the front of the animal in Game 2: One Night in the Woods.


![]() Perfect Pitch
Perfect Pitch
Play It By Ear
See the text walk through above for the correct order to solve the Flute puzzle in Game 2: One Night in the Woods.

![]() Evasion
Evasion
Dodge all Cannonballs
Go through this area without getting hit by a cannonball. Hold ![]() to sprint while pressing X at the appropriate time. If you do get hit, it resets at the start of this area, and repeat until you pass through this area. This is in Game 1: Harry at the End of the World.
to sprint while pressing X at the appropriate time. If you do get hit, it resets at the start of this area, and repeat until you pass through this area. This is in Game 1: Harry at the End of the World.