
Game: Inscryption
Peripherals: –
Time to Platinum: 25 hours
Difficulty: 5-6/10, depending on your familiarity with card game mechanics
Missable trophies: None
Trophies: 1 ![]() , 3
, 3 ![]() , 12
, 12 ![]() , 25
, 25 ![]()
Author: Stargazer14096
Welcome to the trophy guide for Inscryption. This can also be considered a walkthrough and may be used for PlayStation 4, 5, Xbox One, Series X and Steam. Achievements for Steam and Xbox are in almost all cases the same as the PlayStation 4/5 Trophies. A roadmap is provided in the stages below.
Follow us on Twitter for the latest news and giveaways. Feel free to join our Discord server if you have questions!
Stage 1 – Finish the main story.
Inscryption is a card game with horror elements. It’s not exactly a traditional horror game as it doesn’t really feature any jumpscares, but instead provides a generally creepy atmosphere, leaving you constantly uneasy and always at the edge of your seat. Mechanically, if you have played other TCGs in the past, mainly Yu-Gi-Oh! or Magic the Gathering, you will feel right at home here, as Inscryption borrows most of its core gameplay mechanics from these two games. It lifts the tribute summoning mechanic from YGO, and like MTG, each card’s stats are represented by a power/toughness pair, and some card abilities are also taken from MTG, like Flying and Deathtouch. But even if you have never played a card game before in your life, it will not take you long to get used to Inscryption’s mechanics. The game does a really good job of explaining everything, and it introduces new concepts gradually so as not to overwhelm the player. After a few runs, you will eventually get the hang of things.
In this stage, your objective is to complete the game’s main story until the credits roll. Inscryption’s story is very unique, and is best experienced with as few spoilers as possible. There are a few trophies that you may not get naturally throughout the game, but missing them is not really a big deal since Chapter Select is available after beating the game.
Stage 2 – Clean up any miscellaneous trophies from the main game.
After beating the main story and unlocking chapter select, you may now feel free to reveal any hidden trophies that you haven’t unlocked yet. Each of the game’s three Acts has three miscellaneous trophies, and details on how to unlock each can be found in their respective trophy descriptions.
Stage 3 – Kaycee’s Mod.
Kaycee’s Mod is an expansion pack of sorts, and it’s a challenge mode that has you repeatedly playing the first act of the game (Leshy’s Cabin) with increasingly difficult challenges. There are a total of 12 challenge levels, and you need to complete all of them, and then complete the mod one more time with every challenge enabled. You will also have a collection of 8 starter decks which you will gradually unlock as you clear the challenge levels, and you also need to complete the mod once with each deck. It might sound intimidating at first, but with some careful planning and RNG manipulation, this stage becomes significantly more manageable.

 Hey There Card Gamers
Unlock all other trophies
Your reward for clearing every challenge set by the trophy list.

![]() Blood Artist
Blood Artist
Complete your first Deathcard.
This will automatically unlock after your first run ends.

![]() Innocuous Insect
Innocuous Insect
Free a Stinkbug from the safe.
This will unlock after you open the safe in the cabin. At some point during your runs, the Stoat will mention something about the code to the safe being found in the rulebook. Once you check it, you’ll find the code on one of the pages, which is 273. Opening the safe adds the Stinkbug to your deck, and unlocks this trophy. This will also get you a key which is used for unlocking Uncage the Menagerie.


![]() Uncage the Menagerie
Uncage the Menagerie
Free the Wolf Statue from its cage.
Upon obtaining the key from the safe, you can use it to unlock the cabinet at the back of the cabin. This cabinet features four puzzles where you must deal 5 damage in a single turn by correctly setting up the cards in each column. None of them are too difficult, but the solutions to each can be found below:
Puzzle 1:
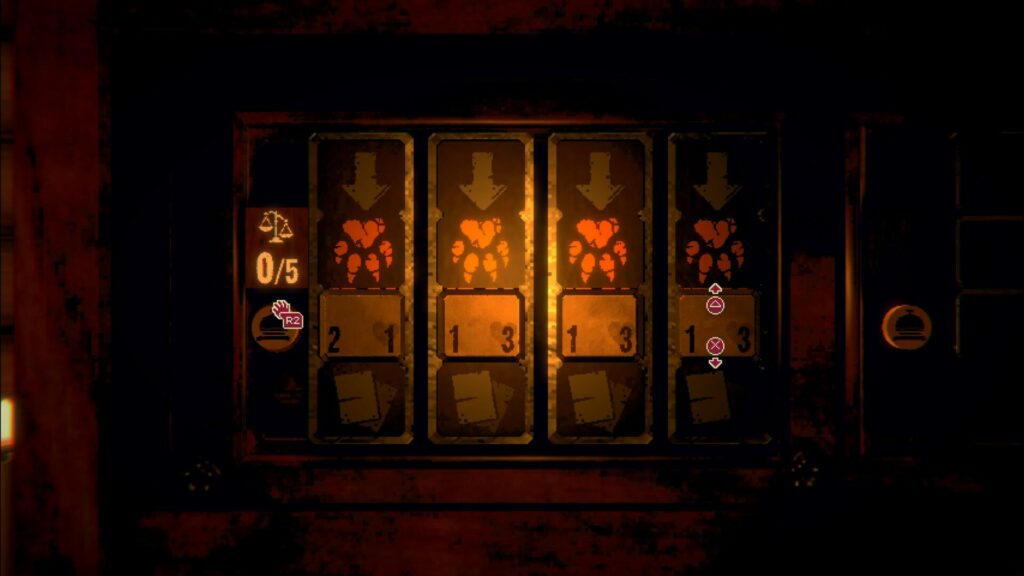
Puzzle 2:

Puzzle 3:

Puzzle 4:

Upon solving puzzle 3, you will obtain the Caged Wolf card, which has 0 power and 6 health. You will then need to play this card in a game, and let it die. Once it dies, it will be replaced by a standard 3/2 wolf, and the trophy will unlock.

![]() Ancestral Vision
Ancestral Vision
Fill your empty socket with something magical.
After releasing the Caged Wolf card, you’ll also notice that the Wolf figure in the cabin, the one to the left of the cabinet with puzzles, is also now uncaged, and you can pick it up. You then need to place it on the pedestal to the right of the cabinet, which will allow you to pick up the knife. This knife is actually an item you can use during the card game, and it will give you a whopping four free damage, but at a high cost.
After the game, you’ll be asked to choose a new eye to replace the one you lost, and one should immediately stand out, which is the top-left one. Picking that eye will unlock the trophy, and will also give you a clue to help you escape – Find Salvation in Cuckoo Clock.


![]() Reborn Hope
Reborn Hope
Find a spare film roll.
With your new eye, you’ll start to see some things in the cabin that you couldn’t before. Most importantly, you can now see the solution to the Cuckoo Clock puzzle directly behind you. You simply need to line up each clock hand to the corresponding arrow marker, based on each hand’s length. The shortest hand goes on 4, the middle hand on 5, and the longest hand on 1. Once the hands are lined up properly, a door containing the film roll (and a new card) will open, unlocking the trophy.

Additionally, while this isn’t related to any trophy, you may also want to set the clock hands to 11’o clock, which will open another door, containing a ring. This will help us defeat Leshy later on.

![]() Enduring Victory
Enduring Victory
Defeat Leshy.
After beating all three bosses, one final challenge awaits you at the end, Leshy himself. Prior to starting the fight, you’ll be given two chances to obtain boons. If you were able to obtain the Ring from the Cuckoo Clock, you’re guaranteed to have at least one boon, but if you can also win the other challenge, then even better! These boons are extremely overpowered, and in particular you should look to get either Ambidextrous (allows you to draw 2 cards per turn) or Magpie’s Eye (allows you to search for any card in your deck instead of drawing one at random). Having one of these is already very advantageous, but having both at the same time almost guarantees a win.
Leshy, being the final boss of this section, has three phases instead of just two. Phase 1 has him spamming the board with rare cards, while also rotating between the gimmicks from all three previous bosses. It’ll be in your best interest to end this phase as quickly as possible, as having your best units turned into Gold Nuggets by The Prospector is never a good thing.
Phase 2 will have Leshy summoning some of your old Deathcards, as well as some premade Deathcards common to all players. Thankfully, this phase no longer has the gimmicks from the old bosses. As usual, you’ll want to end this phase as quickly as possible.
Phase 3 will have Leshy with his back against the wall, and in his final act of desperation, he summons The Moon, which has 1 power and 40 health! But by this time, you should have accumulated enough resources in hand to flood the board, and you should be able to take out The Moon within a few turns. Once it’s defeated, Leshy will have run out of options and you can finish him off.
Note that you should have obtained the Film Roll as described in Reborn Hope before fighting Leshy, otherwise you’ll just get sent back to the beginning even after you beat him, and you’ll have to do it all over again!

 Renewal
Start a new game.
After you beat Leshy while in possession of the Film Roll, you’ll finally be able to find out what’s been glowing behind the door in the cabin. Turns out it’s the New Game option! You might have noticed when you started the game that New Game wasn’t actually clickable, so now you know why.
After picking up the New Game card, you’ll be trapped inside the room, and to proceed, you’ll need to exit back to the main menu. The New Game icon should now be clickable, and upon starting a New Game, this trophy will unlock, and you’ll officially begin Act 2.

![]() Doomed Necromancer
Doomed Necromancer
Complete the Temple of the Dead.
In Act 2, the game takes a drastic shift in both mechanics and presentation. The game is no longer a roguelite, it’s now a fully-fledged deckbuilding game! You have a starter deck, and obtain more cards from shops and by defeating other players.
In Act 2, your main goal is to defeat all four Scrybes. If planning to do this normally, it’s recommended to either choose Leshy’s or Grimora’s starter decks, as they’re the easiest to use, and you’re already familiar with both the Blood and Bone mechanics by now.
Alternatively, you can use the Ouroboros strat to completely cheese every fight in this game (and even Act 3). For more details, check this link:
https://www.ign.com/wikis/inscryption/How_to_Get_Infinite_Ouroboros_Upgrades
This trophy is unlocked by beating Grimora. To even be allowed to fight her, you’ll need to first defeat her three minions and solve a small puzzle. All her three minions are found in the same room, and the tombstone parts are all also pretty easy to find. Just interact with everything in each room and you’ll eventually have all 9 pieces. The solution to the puzzle is:
Left: Kaycee Hobbes – Hit by falling ice – The defibrillator failed
Middle: Sawyer Patel – Eaten by a hungry dog – Does not hold a grudge
Right: Right: Royal Dominguez – Brought down by scurvy – There was no cure

![]() Avenging Druid
Avenging Druid
Complete the Temple of Beasts.
This trophy unlocks after defeating Leshy (again). As with all the other scrybes, you’ll need to defeat his three minions first in order to fight him, and their faces should be very familiar to you by now. But first, speak to Leshy in the cabin to receive a camera.
In order to challenge The Prospector, you’ll need to unlock the safe, which thankfully still uses the same code as Act 1, 273. You’ll get some meat which you should drop into the dog bowl outside. The dog will appear, and with your camera, you can take a picture of it, which will allow you to fight The Prospector.
To fight The Angler, first head past The Prospector and take a picture of the Chum Bucket, then interact with the fishing rod. A shark will come up (a Great White perhaps?), which you should take a picture of too, and then show that picture to The Angler.
Lastly, to fight The Trader, walk past The Angler and you’ll see a rabbit hopping around. You’ll need to set a trap along its path to capture it. It might take a little bit of trial and error but you should get it eventually. Once done, take a picture of it and then return to the cabin. You can find the Trader in the basement, show him the picture and he will challenge you to a card game.
Once all three have been defeated, you can fight Leshy. Defeat him to unlock this trophy.

![]() Accomplished Automaton
Accomplished Automaton
Complete the Temple of Technology.
This trophy unlocks after defeating PO3.
As usual, you’ll need to first challenge and defeat three of his minions before you can fight him. You’ll also need to solve six circuit puzzles along the way, two for each minion. The solutions to the puzzles can be found below:
Puzzle 1/2:


Puzzle 3/4:


Puzzle 5/6:


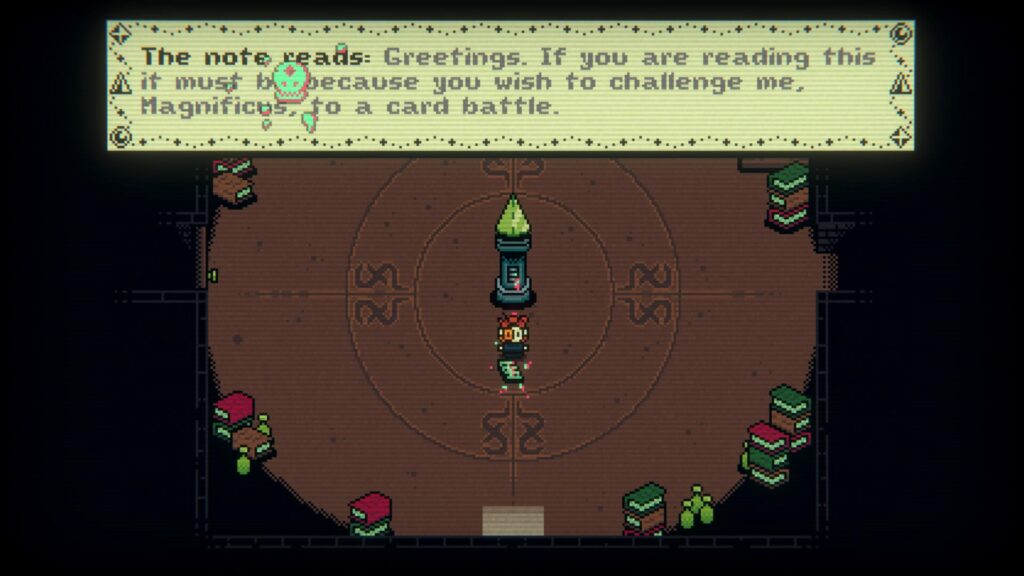
![]() Wizard Mentor
Wizard Mentor
Complete the Temple of Magicks.
This trophy unlocks after defeating Magnificus.
You know how this goes by now – to challenge him, you’ll need to defeat three of his minions. But before you can fight each minion, you have to solve a puzzle first.
The first puzzle is straightforward enough – pick up the monocle on the table at the back of the room, and then read the paper on the floor. You’ll see three symbols pop up, namely the SKULL, WING, and another SKULL. That’s the solution to puzzle #1.


The second puzzle will require a bit more work. You’ll need to interact with the training dummy, and then take out its cards one by one.
Start by eliminating the Practice Mage on the left, and the second one will come in. This Practice Mage will have a SKULL icon on it.

Take out the second Practice Mage and it’ll spawn a Ruby Mox with a PUSHING HAND symbol.

Finally, take out the Ruby Mox to bring in the last Practice Mage behind it, which will have a WING symbol on it.

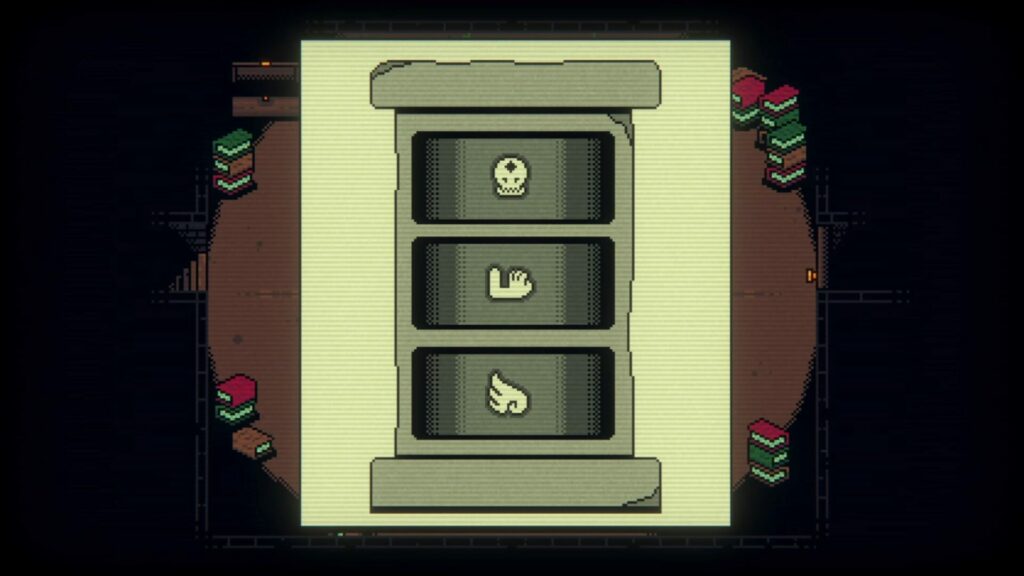
The third puzzle might be a bit trickier if you don’t know where to look. There are hints on the ground hinting at each sigil’s location.
The first hint says The TOP sigil is found by the greedy. Interact with the chest at the back of the room, and after getting the card inside, interact with it again. You’ll see a WING symbol.

The second hint says The MIDDLE sigil is found by the pale. Enter the back-left corner of the room and you’ll find yourself in a pitch-black room with a SKULL symbol.

The third hint says The BOTTOM sigil is found by the hard of hearing, or those who hear too easily. For this one, you’ll actually need to go into your options menu, and check the sound settings. You’ll then see an ARROW symbol.


![]() Miner’s Bane
Miner’s Bane
Defeat The Prospector.
The Prospector is the first boss in Leshy’s cabin. During the first phase, you’ll want to try to take out the Pack Mule if you can, as doing so will give you several free cards, massively turning the tides in your favor. But also, do try to not play out all your best cards during the first phase, since the prospector will turn all your cards into Gold Nuggets upon entering the second phase. You’ll want to keep a few strong cards to make sure that you still have enough resources to finish the fight.

![]() Grizzled Angler
Grizzled Angler
Defeat The Angler.
The Angler is the second boss in Leshy’s cabin. His main gimmick is that every other turn, he will use his hook to attempt to steal one of your cards towards his side of the board. However, this can easily be bypassed by playing a Squirrel or some other 0 power card during the turns he attempts this, as he will always steal the most recent card you played.
During Phase 2, he will start to lay down Chum Buckets, which will turn into Great Whites when killed, which are 4/2 with Waterborne. Thing can get out of hand really quickly if you let too many of them come to life, so your best bet is to have a card with Airborne in your hand before starting Phase 2, and then sacrifice your cards to play it, allowing you to deal direct damage without having to engage with the Chum Buckets.
Note that if you make it to The Angler on your first run, Phase 2 will not play out normally and Leshy will instead flood the board with 6/4 Grizzlies, making winning near impossible.

![]() Face to Face
Face to Face
Defeat The Trapper and The Trader.
The Trapper/Trader is the third boss in Leshy’s cabin. This boss has some annoying gimmicks, but can still be managed with some careful planning.
In Phase 1, the board will mostly consist of Strange Frogs and Leaping Traps. The Strange Frogs are basically Bullfrogs stat-wise, but turn into Leaping Traps once killed. The Leaping Traps are annoying since they instantly kill whatever’s in front of them once they die, but at least you get a pelt added to hand in exchange. Don’t play these pelts, as they will be key for winning Phase 2.
Once you move to Phase 2, The Trader will take over, and will spawn 8 random powerful cards with various sigils. This is where the pelts you accumulated in phase 1 come in, as The Trader will allow you to take one of the 8 cards for each pelt you have. Try to go into Phase 2 with at least 3 pelts, and you should be able to easily set up a one-turn kill.
Note that like with The Angler, if you manage to reach the Trapper/Trader during your first or second run, Phase 2 will not play out normally, and the board will once again be flooded with Grizzlies instead.

Squirrel Wrangler
Win a battle with damage from Squirrels.
The Squirrel normally has 0 power, as it’s not meant to attack, but it can be given damage-dealing capabilities by pairing it with the Alpha Wolf, or any other card with the Leader sigil, which gives the cards to its immediate left and right +1 power each. Make sure that the Squirrel is able to attack during the turn that you deal lethal damage, and this trophy will unlock.

Gruesome Encore
Allow The Mycologists to experiment on a creature that is already itself an experiment.
The Mycologists are one of the random nodes you can find during the Cabin section of the game, and they’re represented by a Mushroom icon. They sacrificing two of the same card, and in exchange, give you back a single, more powerful card that obtains the total stats of both sacrifices, as well as all sigils both cards had.
To get this trophy, you’ll need 3 of the same card in your deck, and you’ll need to encounter two Mycologist nodes throughout your run. In the first Mycologist encounter, you’ll merge two of the three copies to create an experiment, and in the second, you’ll merge that experiment with the third copy to unlock this trophy.

Role Reversal
Steal back one of your creatures from The Angler.
After you beat The Angler for the first time, you’ll be rewarded by having the Fish Hook available as one of your single-use items at the start of every succeeding run.
To get this trophy, simply hold on to the Fish Hook up until you reach The Angler, then let him steal one of your cards and steal it back afterwards.

![]() Balance of Power
Balance of Power
Allow P03 to gain control of Inscryption.
After defeating all four Scrybes in Act 2 and returning to the starting area, this trophy will unlock after a cinematic plays, which starts Act 3.
Once you’re allowed to walk around, interact with the cuckoo clock and set the time to 4:00, and you’ll get your Ouroboros card back. If you powered this up in Act 2, it will retain its stats, and you can easily cheese this entire section, so it’s highly recommended to get this.

![]() Rank and File
Rank and File
Defeat The Archivist.
Story-related, The Archivist is one of the four main bosses of Act 3. Beat them to unlock this trophy.
Agonizing Remorse can also be obtained in this fight, see the trophy description for more information.

![]() Essence Capture
Essence Capture
Defeat The Photographer.
Story-related, The Photographer is one of the four main bosses of Act 3. Beat them to unlock this trophy.

![]() Painter’s Servant
Painter’s Servant
Defeat The Unfinished Boss.
Story-related, The Unfinished Boss is one of the four main bosses of Act 3. Beat them to unlock this trophy.

![]() Natural Connection
Natural Connection
Defeat G0lly.
Story-related, G0lly is one of the four main bosses of Act 3. Beat them to unlock this trophy.

![]() Murder
Murder
Witness the death of P03.
Story-related, this trophy will unlock at the end of Act 3.

Dramatic Finale
Complete the finale of Inscryption.
Story-related, this trophy will unlock upon finishing the main game.

Collective Effort
Collect every card in the Original Inscryption.
A large chunk of the cards in Act 2 can be obtained either by purchasing them as singles from the various Merchants, or by buying packs. If you’ve already done Devil’s Play, you should have a ton of foils to buy cards and packs with.
But aside from these, there are also a few cards that you have to complete certain conditions to obtain. These are:
Great Kraken – You have to interact with two tentacles in the world. The first can be found in a secret area in Leshy’s region, in the small dock area where you can find the clover. Wait a few seconds and the tentacle will eventually appear. The second can be found at the very top of the Tower, in the room on the right.
Drowned Soul – In Grimora’s Lair, there is a well. Interact with it a few times to get this card.
Bone Lord’s Horn – After obtaining Dark Offering, talk to the Bone Lord a few times and he’ll give you this card.
Spore Mice, Spore Digger, Sentry Spore, and Blue Sporemage – These are obtained from the Mycologists. Their area will only spawn to the right of the map after you beat two Scrybes, and as in Act 1, they need two of the same card to create a stronger one. Bring them two Field Mice, two Gravediggers, two Sentry Drones, and two Blue Mages.

 Devil’s Play
Attack for over 666 damage in the Original Inscryption.
There are a couple ways to get a card to 666 power, but if you used the Ouroboros strat, that will probably be the most straightforward way. Just keep going until the Ouroboros has 666 power, and then attack.
Alternatively, you can also set up a board with a Stim Mage and an Energy Circuit. Stim Mage allows you to pay energy to give it +1/+1, and Energy Circuit prevents your energy from ever depleting, allowing you to just keep raising Stim Mage’s power indefinitely. Of course, it’s best to attempt this against the Training Dummy since it will never fight back.


Dark Offering
Make an offering to The Bone Lord.
First, you’ll need to buy the left and right halves of the Broken Obol, which are both sold by the Merchant in Grimora’s Lair. You then have to play both cards beside each other, and they’ll combine to give you the Ancient Obol. Once you have that, visit the basement in Grimora’s Lair and interact with the chest, and a new path will open up. The trophy should unlock shortly after.

Forgotten Lore
Receive all 5 cards from The Trader in P03’s factory.
Throughout the map in Act 3, there will occasionally be hidden paths you can take that aren’t highlighted by arrows. As long as you try to pass through every side of every room, you should find these secret areas without much effort. Some of these rooms will contain a rabbit and a trap, simply click the trap when the rabbit jumps over it to turn it into a pelt, and collect it. There are five pelts in total to collect.
Once all five have been obtained, exit the gameboard and go to the room on the left, and you’ll find The Trader. Give him all five pelts and the trophy will unlock.

Grim Bounty
Destroy a Level 3 Bounty Hunter card.
As you accumulate more and more money in Act 3, your bounty level will increase. Eventually, you will have 3 stars on your head and have a chance of spawning a very strong bounty hunter card during any game. This bounty hunter card is quite difficult to defeat normally, so it’s recommended to have a Sniper Bot with Touch of Death ready to take it out instantly once it enters play.
Note that if you lose a fight, your bounty level will reset, so if you think you misplayed something, you can always exit back to main menu to retry the fight.

Agonizing Remorse
Don’t empty the Recycling Bin.
At some point during fight against The Archivist, the boss will ask you to sacrifice one of your files to turn into a card. Once done, simply play the card and then let it die to unlock this trophy. You can even hammer it yourself as soon as you play it if you prefer.

![]() Dubious Challenge
Dubious Challenge
Clear Challenge Level 1 in Kaycee’s Mod.
See Skull Storm.

![]() Taunting Challenge
Taunting Challenge
Clear Challenge Level 4 in Kaycee’s Mod.
See Skull Storm.

Roar of Challenge
Clear Challenge Level 8 in Kaycee’s Mod.
See Skull Storm.

Rise to the Challenge
Clear Challenge Level 12 in Kaycee’s Mod.
See Skull Storm.

Skull Storm
Complete a run with every Challenge active in Kaycee’s Mod.
The bulk of your playtime in Kaycee’s Mod will be spent working towards this trophy. There are a total of 13 challenge levels you have to clear, each requiring one playthrough of the mod, so you’re looking at 13 playthroughs minimum. The final challenge turns Leshy into a pirate at the end of the run, so once you complete a run with that challenge enabled, along with everything else, you’ll unlock this trophy.

This might seem like a ton of work, but there’s a strat that basically trivializes the entire mod, which involves the Mantis God Deck. While you don’t have the Mantis God Deck unlocked yet, you can approach your first few challenge runs in any way you wish, but these shouldn’t pose much of a problem. But once you do unlock it, you can pretty much just stick to the same strat for the rest of the levels and you’ll breeze through all of them just fine.
The Mantis Deck consists of the deck’s namesake, the Mantis God, and two Ring Worms. The basic idea of this deck is to kill on the first turn with the Mantis God by raising its power in campfires and giving it more attacks via sigil transfer from a Mantis, Pronghorn (5 hits), or Dire Wolf (4 hits).
“But what if I don’t draw the Mantis God in my opening hand?”, you’re probably asking. Well, there’s actually a way to manipulate the game’s RNG by taking advantage of the fact that your opening hand will always consist of a 1 blood card, so that you always have something to play turn 1. So if you can get rid of all of your other 1 blood cards (i.e. the Ring Worms) and never pick up any more 1 blood cards after, you’re guaranteed to always open with the Mantis God.
With that in mind, it’s imperative to get rid of the Ring Worms ASAP. You’ll ideally want to see a campfire as one of the first few nodes you encounter. It’s good to note that at you can actually reroll the nodes at the start of each stage by exiting to the main menu and loading back in, so you can keep doing this until you find the node you need the most at that point. You’ll also want to see one of the three other cards mentioned in the pool you can trade pelts for at the beginning, but if not, you can still obtain them later on. Now start your run by heading to the campfire and try to sacrifice your Ring Worm. If the hunters eat your Worm, this will actually clear them from all future campfires, allowing you to upgrade twice with zero risk, which is great! Just back up your save before doing so, as if the hunters don’t actually eat your Worm, you’ll want to toss the Mantis God instead for the bonuses.
Afterwards, you’ll want to obtain a card with the extra attack sigils and transfer them to your Mantis God, and then get rid of your last Worm. Once everything’s set up, you’ll steamroll through every fight with zero effort. Other nodes to watch out for are the Painter nodes, which will give you a second copy of your Mantis God, and the Mycologist nodes, which can merge your two copies (if you have them) into a single more buff Mantis God.
The only thing to note here is that during the fight with the Prospector, you’ll actually want to hold off on playing the Mantis God in phase 1, as it’ll get turned into a Gold Nugget upon entering phase 2. You can keep scissors for this fight to immediately kill the Pack Mule and get more resources, or deal with phase 1 however you wish. For the other bosses though, you can immediately play Mantis God without any worry.
The only other thing that you might need to prep for is the Grizzly Bears challenge, which replaces each boss’ phase 2 with eight 4/6 Grizzlies. If your Mantis God has at least 6 power, this shouldn’t be a problem, but otherwise, you’ll want to keep scissors too to get rid of the Grizzly in a cell that the Mantis God will strike twice, to net you the OTK. Alternatively, you can also use a combination of the brush (gets rid of the Grizzlies’ anti-Airborne sigils) and fan (grans Mantis God Airborne) items so Mantis God can strike your opponent directly.

![]() Master Trinketeer
Master Trinketeer
Unlock all 3 items from the oil painting in Kaycee’s Mod.
Like in the main game, there is an oil painting in the Cabin which shows a particular board configuration. At the start of each run, you’ll want to take note of what the board is showing, and try to pick up cards that match the ones shown. You’ll eventually want to play the cards on your side of the board in the same way shown on the painting, and once you do, you’ll be awarded with a new item to use. Do this three times to unlock the trophy.

Start // Finish
Complete a run with every Starter Deck in Kaycee’s Mod.
There are a total of 8 starter decks available for you to use in Kaycee’s Mod, which gradually unlock as you clear higher and higher challenge levels. The decks vary in strength, so it’s recommended to attempt this on runs with no challenges enabled. Once you finish a run with every deck, this trophy will unlock.


![]() Rookie Mistake
Rookie Mistake
Make 10 misplays in a single Kaycee’s Mod run.
This should unlock naturally during one of your runs. It’s not clear what counts as a “misplay” for the game, but as long as you’re not using one of the OP decks like the Mantis God or Black Goat, then you’ll likely have one run with at least 10 misplays.

![]() Pulling Teeth
Pulling Teeth
Pull out 32 teeth in Kaycee’s Mod.
Simply use the pliers item at least 32 times throughout all of your runs to unlock this trophy.
To speed things up, you can use all your items as soon as you get them and always prioritize resupply nodes, to maximize how many pliers you see in a single run.

![]() Bad Moon
Bad Moon
Defeat Leshy in Kaycee’s Mod without destroying The Moon.
To obtain this trophy, you will need both a card with the Airborne sigil, as well as the brush item which wipes away the opponent’s sigils. Use the brush on The Moon to allow your Airborne card to attack Leshy directly.