
Game: Trigger Witch
Peripherals: –
Time to Platinum: 8 – 10 hours
Difficulty: 2/10
Missable trophies: Shout-out to Nikola
Trophies: 1![]() , 1
, 1 ![]() , 8
, 8 ![]() , 48
, 48 ![]()
Author:
Welcome to the trophy guide for Trigger Witch
Follow us on twitter for the latest news and giveaways.
Stage 1 – Play through the Story.
Play on whatever difficulty you like. This will affect your weapon efficiency and the number of gems you collect from killing enemies. See the pictures below.
Play through the story of the game while naturally obtaining most trophies along the way as they are story-related. Once the credits roll, you are can free roam the entire map and areas/buildings, except for where the areas where the Man in Black game-ending potion happened. Therefore, make sure to collect the final mysterious weapon that is located in this area!

Controls. 
Very Easy Difficulty Details. 
Normal Difficulty Details.


Note:
-Use the dash ability to move more quickly and to avoid attacks.
-Your default weapon is the Hand Cannon when you run out of ammo for your other equipped weapon.
-The story missions are noted with red “X”‘s on your map even if you have not cleared the map fog yet.
-The collectible weapon parts are marked with a “?” on your map after buying the corresponding map from a shopkeeper.
-Use the map frequently to navigate the area/buildings, this will clear the fog and reveal the details for the area. This will help you to determine where to look next for keys, loot, maps, weapon part chests, weapon chests, broomstick areas, and mini bosses/bosses. However, if you die the enemies that you previously killed will have respawned.
–Weapon Part Chests are purple with green trim and two orange symbols on them.
-Weapon Chests are brown with yellow trim.
-Doors with skulls require you to kill all enemies within the area to open the door.
-Keylock doors require you to find keys from brown chests within the area/building.
Stage 2 – Clean Up Miscellaneous Trophies.
Now that you have completed the game, you can free roam to obtain any miscellaneous trophies for a number of kills, gems collected, weapon parts, broomstick rides, etc. – See the associated trophy description for more details.

 Trigger Witch
Unlocked all other Relics!
Congratulations on your shiny new platinum!

 Evertonian Legend
Finish the game.
Follow the story from beginning to end to defeat the final boss of the game. After the credits, you can continue the game to find/obtain any missing items and trophies. The only area that is not accessible after finishing the game is the final boss area where you traveled to defeat him.

 Upped Your Arsenal
Fully upgrade 4 weapons.
Each gun has 4 upgrades that you can unlock. To unlock an upgrade you need to have collected a Weapon Part (chests that are purple with green trim and two orange symbols on them) and visited Barrel O’Parts in Ozryn Village to perform the upgrades to your guns. Therefore, you will need to have 16 Weapon Parts and 19,200 gems to allow you to upgrade 4 guns fully. Once you have unlocked an upgradeable part of a gun, you will need to spend gems to fully upgrade that particular part. It costs 4,800 gems to fully upgrade any gun.

The Power Is Yours
Collect all weapon parts.
There are 36 Weapon Parts in the game that are inside of treasure chests. You can buy the treasure maps from Hacim’s Emporium and The Blue Cauldron for the locations. They will appear as “?” on your maps. However, you can also find these treasure chests that contain Weapon Parts when exploring any of the areas in the game. The number of collected Weapon Parts are shown on the Pause Menu Screen and they are:
1. Evertonia – 27
2. Stock Gauntlet – 1
3. Shimmer Lode – 2
4. Firearm Foundry – 1
5. Snapfrost Dungeon – 1
6. Sky Pavilion – 2
7. Old Nux Castle – 1
8. Casino – 1 (not part of the collectibles but you can redeem points for one)
In Evertonia you may have to enter caves and exit these caves to otherwise inaccessible areas. Some caves have multiple exits too. Inside of any of the areas/buildings, you will always want to search the entire area and open all chests for loot, keys, weapon parts, and weapons.
See the pictures below.
Note: The blue hat is where Colette is located on the map.

All Weapons Upgraded, All Items Collected, and All Collectibles Collected. 
Stock Gauntlet 1. 
Stock Gauntlet 1. 
Evertonia 1. 
Evertonia 1. 
Firearm Foundry 1. 
Firearm Foundry 1. 
Shimmer Lode 1. 
Shimmer Lode 1. 
Evertonia 2. 
Evertonia 2 (Enter Cave). 
Evertonia 2. 
Snapfrost Dungeon 1. 
Snapfrost Dungeon 1. 
Evertonia 3. 
Evertonia 3 (Enter Cave). 
Evertonia 3. 
Evertonia 4. 
Evertonia 4 (Enter Hut). 
Evertonia 5. 
Evertonia 5. 
Evertonia 6. 
Evertonia 6. 
Evertonia 7. 
Evertonia 7. 
Evertonia 8. 
Evertonia 8. 
Evertonia 9. 
Evertonia 9 (Enter Cave). 
Evertonia 9. 
Evertonia 10. 
Evertonia 10 (Enter Cave). 
Evertonia 10 (Exit Cave through other exit). 
Evertonia 10. 
Evertonia 11. 
Evertonia 11 (Enter Cave). 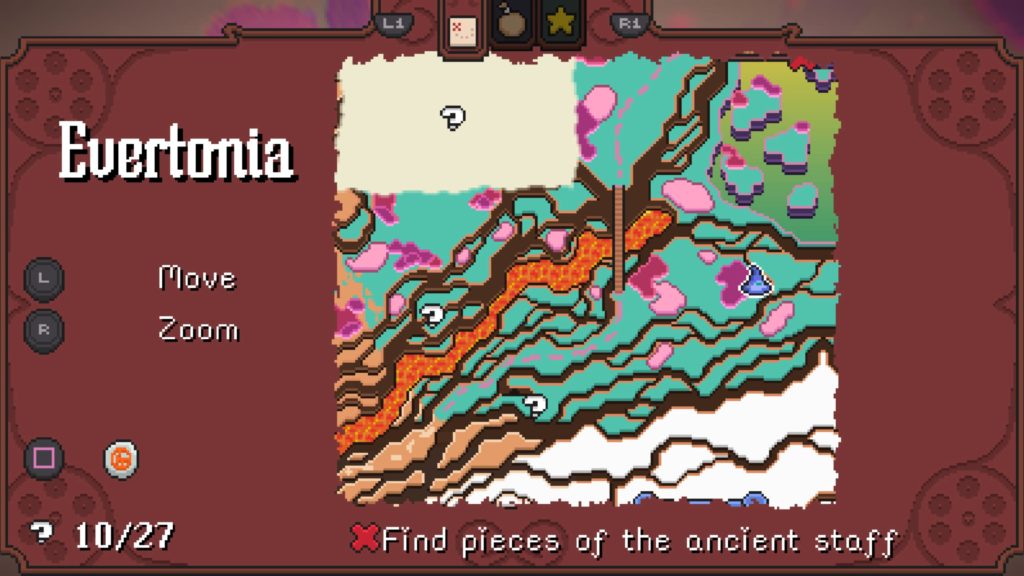
Evertonia 11 (Exit Cave through the other exit). 
Evertonia 11. 
Sky Pavilion 1. 
Sky Pavilion 1. 
Sky Pavilion 2. 
Sky Pavilion 2. 
Evertonia 12. 
Evertonia 12. 
Evertonia 13. 
Evertonia 13. 
Evertonia 13. 
Evertonia 14. (Enter Large Cave with Multiple Exits). 
Evertonia 14. 
Evertonia 14 (Exit Cave). 
Evertonia 14 (Exit Cave). 
Evertonia 14 Continue to next Cave Entrance. 
Evertonia 14 (Enter Cave). 
Evertonia 14 (Enter Cave). 
Evertonia 14. 
Evertonia 15 (Enter Another Cave). 
Evertonia 15 (Enter Another Cave). 
Evertonia 15 (Enter Another Cave). 
Evertonia 15. 
Evertonia 16 (Enter Cave). 
Evertonia 16 (Enter Cave). 
Evertonia 16 (Exit Cave through the other exit). 
Evertonia 16. 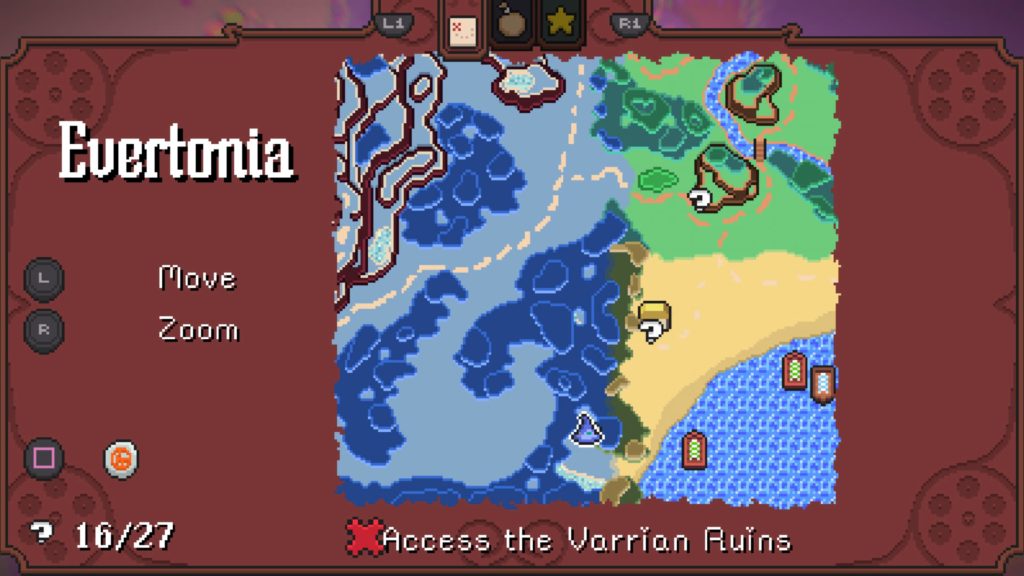
Evertonia 17. 
Evertonia 17. 
Evertonia 18. 
Evertonia 18. 
Evertonia 19. 
Evertonia 19 (Enter Cave). 
Evertonia 19 (Exit Cave through another exit). 
Evertonia 19 (Follow pathway around and enter another Cave). 
Evertonia 19 (Where you enter another Cave). 
Evertonia 19 (Exit Cave through another exit). 
Evertonia 19 (Where you exited the Cave). 
Evertonia 19. 
Evertonia 20 (Enter Cave). 
Evertonia 20 (Exit Cave through another exit and go behind the waterfalls). 
Evertonia 20 (Walk behind the waterfalls). 
Evertonia 20 (Walk behind the waterfalls and Enter Cave). 
Evertonia 20. 
Evertonia 21 and 22 (Exit from behind the waterfalls and go left). 
Evertonia 21 and 22 (Enter Cave). 
Evertonia 21 and 22. 
Old Nux Castle 1. 
Old Nux Castle 1. 
Evertonia 23. 
Evertonia 23. 
Evertonia 24 (Enter Cave). 
Evertonia 24 (Exit Cave through another exit). 
Evertonia 24. 
Shimmer Lode 2. 
Shimmer Lode 2. 
Evertonia 25 (Enter Arena). 
Evertonia 25 (Earn 5000 points to unlock). 
Evertonia 25. 
Evertonia 26. 
Evertonia 26 (Enter Cave). 
Evertonia 26 (Exit Cave through another exit). 
Evertonia 26. 
Evertonia 27 (Exit Cave through yet another exit). 
Evertonia 27.


To the Moon and Back
Defeat the Man in Black
Eventually, you will enter the Varrian Ruins, where there is a building to enter. Inside of here, you will follow the Man in Black through a portal. This will lead to the final areas and parts of the game. This area is called “???”. You can only go into this area once, and it is not accessible after completing the game.
There are multiple battles against the Man in Black with waves of spawning enemies. The location of the battles will change too. It’s best to fully upgrade your favorite or the best weapons in the game. Good ones to upgrade are the: Battle Blaster, Fire Lance, Thunderer, and Telescopic Shooter. You will receive the Redacted (mysterious firearm) while in this area, which is a very powerful gun to use for this boss.

Every Witch Way
Uncovered every area in Evertonia.
As you play through the story of the game, you will naturally move to uncover more locations within the game. When you have uncovered all the different locations in the game you will earn this trophy.

Gemologist
Collect 10,000 gems.
As you kill enemies, they will drop gems that you can collect. You do not need to have 10,000 gems at one time, so feel free to spend your gems on upgrading weapons and buying treasure maps in the shops.

Population Control
Defeat 500 enemies.
As you play the game, you will naturally kill 500 enemies. Enemies will respawn if you die in an area or if you leave/return to some areas.

Wicked Witch
Score above 10,000 in the Arena Challenge.
In the Wasteland you can go into the Arena and talk to the owner (Mhoppus) to play the Arena Challenge. It is an endless run where there will be increasing amounts of enemies from all areas of the game that you have/could encountered. Get 10,000 points or more to complete this trophy. See the picture below.

Endless Mode.


Triggermometry 101
Read the full history of the Great Trigger in The Chamber.
In Ozryn Village, there is the Chamber (building with pews) that has an open book on the front table. Interact with the book to read the history of the Great Trigger in The Chamber. Continue to read every time you are prompted until you have finished reading the entire book. See the picture below.

Read the History Book Fully.


![]() Don’t Call Me “Sabrina”
Don’t Call Me “Sabrina”
Score above 5,000 in the Arena Challenge.
In the Wasteland you can go into the Arena and talk to the owner (Mhoppus) to play the Arena Challenge. It is an endless run where there will be increasing amounts of enemies from all areas of the game that you have/could encountered. Get 5,000 points or more to complete this trophy.

![]() Are You Not Entertained?
Are You Not Entertained?
Attempt the Arena Challenge.
In the Wasteland you will eventually be in the Arena to attempt the Arena Challenge as part of the story. As soon as the challenge begins you will earn this trophy.

![]() Who’s Afraid Of The Dark?
Who’s Afraid Of The Dark?
Kill 10 enemies hidden by darkness in Old Nux Castle.
As you are moving through the Old Nux Castle, there will be areas where there are no lights on, use your gun(s) to kill 10 or more enemies that are outside of the ring of light around Colette to earn this trophy.

![]() Richie Witch
Richie Witch
Spend 10,000 gems.
Use your collected gems to buy maps, health upgrades, and weapon upgrades at the various shops in the game. Once you have spent a collective amount of 10,000 gems you will earn this trophy.

![]() What’s This Doing Here?
What’s This Doing Here?
Collect your first weapon part.
Interact with your first Weapon Part to take it into your possession. Weapon Parts are inside of Chests (purple, green trim, and 2 orange symbols on them) and one is in the Casino where you can exchange points for it. Your pause menu will show you how many you have collected and from what areas.

![]() Safety Hazard
Safety Hazard
Make 10 enemies fall to their death.
In the Sky Pavilion, there are enemies that are fans, and there are stationary fans blowing in this area. Since this area is all little floating islands in the sky, you can maneuver to avoid falling off yourself, but allowing other enemies to fall off the edges of the islands. Using the dash move will help you avoid the falls and let your enemies fall to their deaths.

![]() As Good As It Gets
As Good As It Gets
Fully upgrade a weapon.
You can visit Barrel O’Parts in Ozryn Village when you have collected 4 Weapon Parts and have about 4,800 gems. Talk to Litchfeld and upgrade a gun. Place the 4 upgrade Weapon Parts on that gun and then spend gems to fully upgrade each of the 4 parts to their maximum ability. Once each part is maxed out you will have fully upgraded a gun.

![]() There’s No Place Like Home
There’s No Place Like Home
Use the Wayfarer’s Stone.
Colette will receive the Wayfarer’s Stone once you have beaten the Stock Gauntlet. The Wayfarer’s Stone can be used to immediately travel back to her house in Ozryn Village. It can be used as many times as needed throughout the game. For example, if you need to upgrade a weapon while inside an area or building, you can use it to instantly travel back to Colette’s house and go and upgrade a weapon.

![]() Sergeant Angle
Sergeant Angle
Kill 10 enemies by wall bouncing.
There are lots of walls and environmental objects in the game that will allow your fired ammo to ricochet off its surface. Use the bullet bouncing off these surfaces to kill 10 or more enemies.

![]() Supporting Small Business
Supporting Small Business
Talked to every business owner.
You will need to talk to the 5 business owners in the game:
1. Carcana -The Blue Cauldron in Ozryn Village.
2. Litchfeld – Barrel O’Parts in Ozryn Village.
3. The Gambler – Casino in Radiance Bay.
4. Hacim – Hacim’s Emporium in Nuxvarr Village.
5. Mhoppus – The Arena in the Wastelands.
See the pictures below.

The Blue Cauldron in Ozryn Village. 
The Blue Cauldron – talk to Carcana. 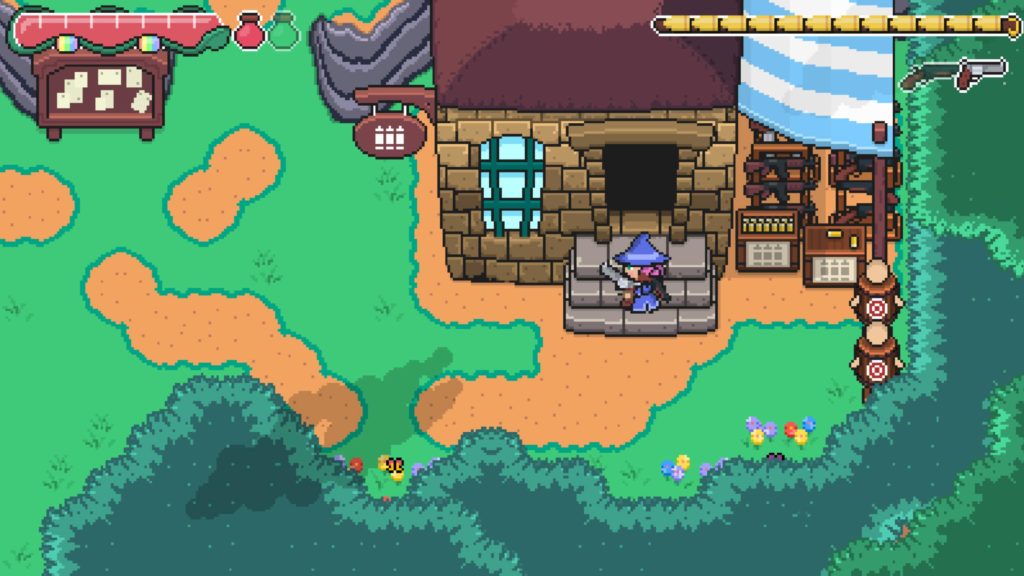
Barrel O’Parts in Ozryn Village. 
Barrel O’Parts – Talk to Litchfeld. 
Casino in Radiance Bay. 
Casino – talk to the Gambler. 
Hacim’s Emporium in Nuxvarr Village. 
Hacim’s Emporium – Talk to Hacim. 
Arena in the Wastelands. 
Arena – Talk to Mhoppus.


![]() Word On The Street
Word On The Street
Talk to villagers 10 times.
In the main village where your character’s home is, there are NPCs that are wandering around that you can interact with that have a conversation bubble. Talk to any 10 different villagers to unlock this trophy.

![]() How Do You Fold These Things?
How Do You Fold These Things?
Collect every map.
There are 14 maps: 6 maps are hidden in chests inside of the main story related areas/buildings of the game, 3 maps are sold at Hacim’s Emporium in Nuxvarr Village, and 5 maps are sold at The Blue Cauldron in Ozryn Village. It is important to always open all chests in the game as they contain loot, keys, and/or hidden maps. See the pictures below.

The Blue Cauldron – Health Upgrades and Maps. 
Hacim’s Emporium – Health Upgrades and Maps.

![]() Beam Me Up
Beam Me Up
Use teleporters 10 times.
There are orange/purple teleporter pads (like the trophy icon image) that you are able to interact with to do quick travel between other teleporter pads that you have unlocked within a certain area or building. Use any of the teleporters throughout the game 10 times to earn this trophy.

![]() Clean Sweep
Clean Sweep
Complete each broom section.
There are broom sections in the game that are story-related where you fight mini-bosses and they cannot be missed. However, there are broom sections that you could potentially miss. These are in: The Firearm Foundry has 2, the Sky Pavilion has 1, and the Arena (choose Endless Broomstick Mode) has 1 broom section. For all of these areas, you will need to interact with the broom icon to begin the broom section. Then you will need to avoid being hit while shooting the enemies/mini-bosses that are in these sections. See the pictures below.

Firearm Foundry Location 1. 
Firearm Foundry Location 1. 
Firearm Foundry Location 2. 
Firearm Foundry Location 2. 
Sky Pavilion Location 1. 
Sky Pavilion Location 1. 
Arena – Endless Broomstick Mode. 
Arena Endless Broomstick Mode.


![]() Sweet, Tasty, Life Essence
Sweet, Tasty, Life Essence
Consume 25 healing potions.
To replenish your health, you can take a healing potion at any time. The healing potion will fill back up as you defeat more enemies with your guns.

![]() This Feels Familiar
This Feels Familiar
Impress The Gambler.
Visit the Gambler at his casino and play the casino game near the top. In this game, you will have to bounce the pinball through the hoops to score points. The scored points can be redeemed by interacting with the Gambler.
The available items are:
1. Weapon Part for upgrading – 250 points.
2. Familiar – 500 points.
3. Health Potion Upgrade – 750 points.
The Gambler will only accept points to be converted into any of the 3 mentioned items above. For this trophy, you will only need to obtain the Familiar.
See the pictures below for the location of the Gambler and his Casino.

Go to the south east. 
Go to the cave beside this boat. 
Go through the cave, walk the pathway to the Casino. 
Talk to the Gambler. 
Enter the Casino, talk to the Gambler, and play the Casino game at the top of this area. 
Buy at least the Familiar for this trophy.


![]() Did You Expect Cake?
Did You Expect Cake?
Shoot into the Ordnance Rift
At any time you can visit the Ordnance Rift and fire off the gun into it. See the pictures below for the location. See the pictures below.

Ordnance Rift is where you received the Hand Cannon. 
Fire your gun into the Ordnance Rift.


![]() Firearm Safety 101 – Failed
Firearm Safety 101 – Failed
Shoot your firearm inside your house.
Fire off any gun inside of Colette’s house in Ozryn Village.

![]() Confetti Explosion
Confetti Explosion
Kill 25 enemies with gore mode off
By default, the Gore Mode is on, which shows blood and debris. You will need to play the game with the Gore Mode off and kill 25 enemies. Under Options>Gameplay>Piñata Mode>On.

![]() Friendly Fire
Friendly Fire
Make 5 enemies die from fire traps.
There are flying enemies that will drop fireballs on the ground. It is easiest to move backward from a large group of enemies where the walking ones will move through the area that has been set on fire from the flying enemies’ fireballs. Kill 5 enemies this way to earn this trophy. A very easy location to earn this is in the Snapfrost Dungeon or the Arena Challenge.

![]() Need For Speed
Need For Speed
Beat the Stock Gauntlet time trial with more than 15 seconds left.
At the end of the Stock Gauntlet there is a time trial where you will enter and you will quickly need to shoot and hit 22 targets and cross the finish line. Use your dash ability and have the Laser Sights on to make this easier to complete.

![]() Why Run When You Can Stand Still?
Why Run When You Can Stand Still?
Travel 500 metres by conveyor belt.
Inside the Firearm Foundry, there are conveyor belts on the floor. You will need to ride around on them for a combined total of 500 meters to earn this trophy.

![]() Boom! Shake The Room
Boom! Shake The Room
Unlock the Mortar Launcher.
This gun is found in the Firearm Foundry in a Weapon Chest (brown, yellow trim).

![]() Hot Wings
Hot Wings
Complete the Firearm Foundry.
Defeat all the enemies, find all the keys, break the chains, and find the related story items needed to solve and complete this building.

![]() Unaccompanied Miners
Unaccompanied Miners
Complete the Shimmer Lode Mine.
Defeat all the enemies, find all the keys, find all the miners, and find the related story items needed to solve and complete this area.

![]() Ice to See You
Ice to See You
Complete the Snapfrost Dungeon.
Defeat all the enemies, find all the keys, meet the Oracle, and find the related story items needed to complete the dungeon.

![]() Potent Potable
Potent Potable
Receive the Norsou Potion.
This is story-related as you will need to remove the Norsou Partition to go north. You will need to talk with Colette’s mother and then you will receive the Norsou Potion from Carcana in The Blue Cauldron. See the pictures below.

Norsou Potion is needed to take down the Norsou Partition. 
Meet Colette’s mother in your home. 
Meet Carcana in The Blue Cauldron for the Norsou Potion.


![]() Some Birds Aren’t Meant To Be Caged
Some Birds Aren’t Meant To Be Caged
Escape the Nuxvarr cell.
You will be captured in Nuxvarr Village and will eventually end up in jail (Nuxvar cell). After talking to the Sheriff, he will leave, and then you can interact with the broken window to escape.

![]() Sacred Symbols
Sacred Symbols
Complete the Floating Pavilion.
The Floating Pavilion is called the Sky Pavilion in the game. Go through the entire area to uncover all the floating islands while completing the story in this area.

![]() The Tragedy of the Goblin Prince
The Tragedy of the Goblin Prince
Compete the Old Nux Castle.
Defeat all the enemies, find all the keys, defeat the Goblin Prince, and find the related story items needed to complete this area.

![]() The Power of Friendship
The Power of Friendship
Embrace the power of magic.
This is story-related and you will talk to your two childhood friends in the Varrian Ruins, and afterward, you will receive the power of magic.

![]() Colette the Courageous
Colette the Courageous
Catch up with all your old friends and acquaintances.
After finishing the main story of the game, you will be able to free roam. Open your map and you will see the locations of all of the characters that you will need to interact with. Find them and talk to them.

![]() Glockamole
Glockamole
Receive your first weapon from the Ordnance Rift.
This gun is given near the beginning of the game at the Ordnance Rift as it is story-related.

![]() Going Fully Auto!
Going Fully Auto!
Unlocked the Battle Blaster.
This gun is found in the Stock Gauntlet in a Weapon Chest (brown, yellow trim).

![]() Uzi Does It
Uzi Does It
Unlocked the Dual Mini Blasters.
This gun is found in the Shimmer Lode in a Weapon Chest (brown, yellow trim).

![]() Top of The Stock
Top of The Stock
Beat the Stock Gauntlet and join The Clip.
Complete the Stock Gauntlet by defeating all the enemies and the final boss in this area.

![]() Cooking With Gas
Cooking With Gas
Unlocked the Fire Lance.
This gun is found in the Snapfrost Dungeon in a Weapon Chest (brown, yellow trim).

![]() This Ain’t Light
This Ain’t Light
Unlock the Heavy Blaster.
This gun can be obtained once you earn 7500 points in the Arena Challenge. The gun is in a Weapon Chest (brown, yellow trim).

![]() .50 Caliber Love Letter
.50 Caliber Love Letter
Unlock the Telescopic Shooter.
This gun is found in the Sky Pavilion in a Weapon Chest (brown, yellow trim).

![]() Two Barrels Is Better Than One
Two Barrels Is Better Than One
Unlock the Thunderer.
This gun is found in the Old Nux Castle in a Weapon Chest (brown, yellow trim).

![]() Shout-Out To Nikola
Shout-Out To Nikola
Unlock the mysterious firearm.
This gun is called Redacted and it is found in the “???” (this is the proper name in the game) on a Weapon Rack.

![]() Guns. Lots of Guns
Guns. Lots of Guns
Complete your firearm collection.
You will be able to collect all 9 guns in the game. The first gun is obtained for Colette’s Stock Gauntlet training and completion. Another gun is obtained by spending points that you have earned in the Arena to buy this gun. The other 7 guns are all obtained by defeating the mini-bosses in the story-related areas/buildings.

![]() Uzi On The Eyes
Uzi On The Eyes
Empty a full clip of the dual mini blasters without missing an enemy.
Fully upgrade the dual mini blasters and then have groups of enemies follow you to line them up. Then start firing the guns and do not stop until you earn this trophy. You will need enough enemies together so that you do not miss with any bullets fired.

![]() Ring of Fire
Ring of Fire
Spread fire between 20 enemies with the fire-lance.
Using the Fire-Lance gun, approach a large group of enemies and hold down the trigger to spread the flames all over the numerous enemies. As soon as you have spread the fire between 20 enemies you will earn this trophy.

![]() Three For One
Three For One
Kill 3 enemies at once with the telescopic shooter.
Use the telescopic shooter to fire into a line or large group of enemies so that the bullet will kill 3 or more enemies at once. Having the Laser Sight on will make this easier to perform if needed.

![]() They Drew First Blood
They Drew First Blood
Kill 10 enemies with a single clip from the Heavy Blaster.
Use the Heavy Blaster to kill 10 enemies without having to reload your clip at all. You can miss enemies and this does not reset this trophy at all.

![]() Blink And You’re Dead
Blink And You’re Dead
Kill 4 enemies with 4 different weapons in 10 seconds.
Use the quick wheel to select/change a weapon. Find a large group of enemies and then use a gun to kill one or more enemies, quickly switch to another weapon and kill one or more, quickly switch again to another weapon and kill one or more, and finally switch one last time and kill one or more enemies. Do this in 10 seconds or less to earn this trophy.

![]() Hunting Blind
Hunting Blind
Kill 25 enemies without the laser sight.
By default, the Laser Sight is on for all of your weapons. You will need to play the game with the laser sight off and kill any 25 enemies. Under Options>Gameplay>Laser Sight>Off.