Game:
Peripherals: –
Time to Platinum: 25+ hours
Difficulty: 5/10
Missable trophies: None
Trophies: 1![]() , 4
, 4 ![]() , 10
, 10 ![]() , 26
, 26 ![]()
Author:
Welcome to the trophy guide for Green Hell
Follow us on twitter for the latest news and giveaways.
Stages.
Suggested order for completing the Stages:
- Play the tutorial of the game to earn 4 trophies.
- Play the Story on “Welcome to the Jungle” difficulty. Most of the trophies can be earned here by doing specific things. Make a Save at the Research Lab Camp in the Swamp. Give the cure and have the Gold Sack in your backpack for the good ending and Greedy trophy.
- Reload the save from Stage 2 and do not give the cure for the bad ending trophy.
- Play Survival mode for 3 trophies.
- Play the Challenge mode (all 7 Challenges) for 1 trophy.
- Play the Story on “Green Hell” difficulty for this trophy and the platinum trophy.
Notebook - Story Details

Story Details 1. 
Story Details 2. 
Story Details 3. 
Story Details 4. 
Story Details 5. 
Story Details 6. 
Story Details 7.
Notebook - Health, Diseases, and Health Problems/Treatments

Health, Diseases, & Problems/Treatments 1. 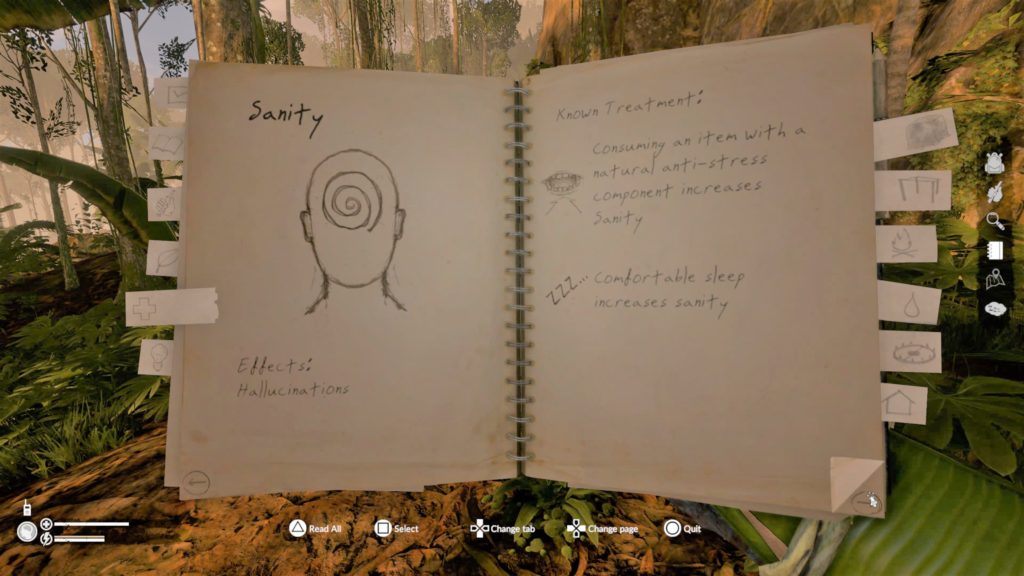
Health, Diseases, & Problems/Treatments 2. 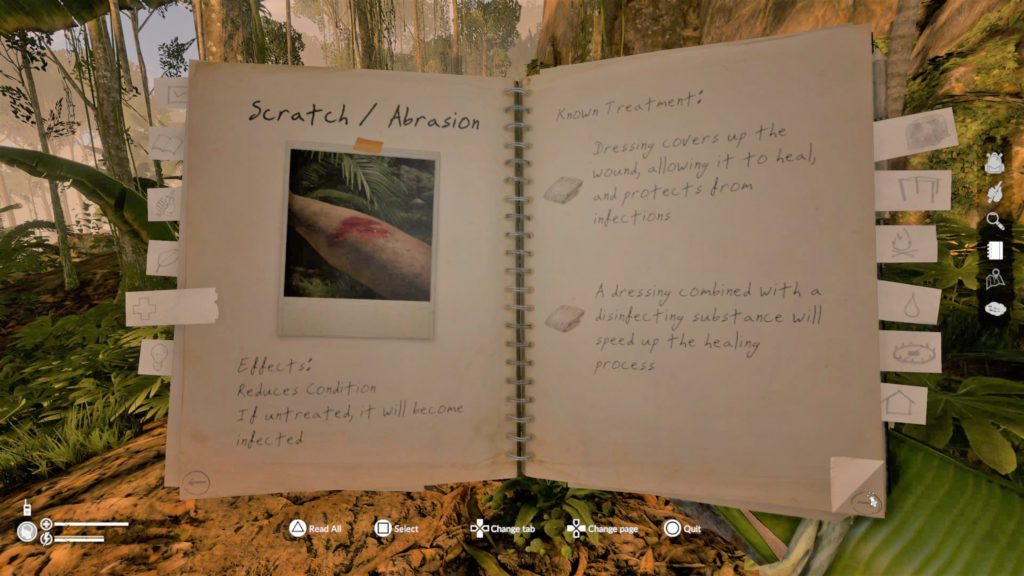
Health, Diseases, & Problems/Treatments 3. 
Health, Diseases, & Problems/Treatments 4. 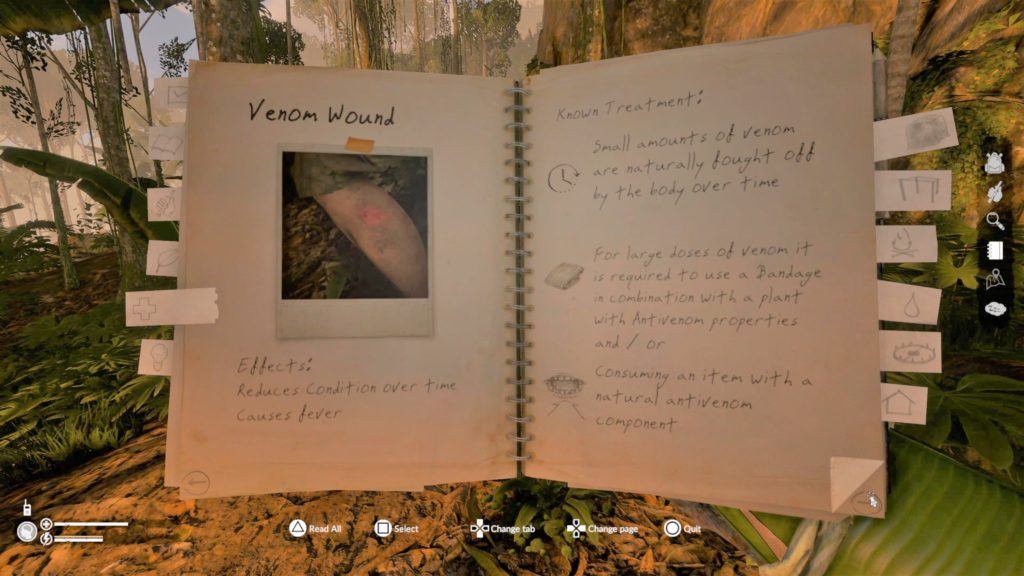
Health, Diseases, & Problems/Treatments 5. 
Health, Diseases, & Problems/Treatments 6. 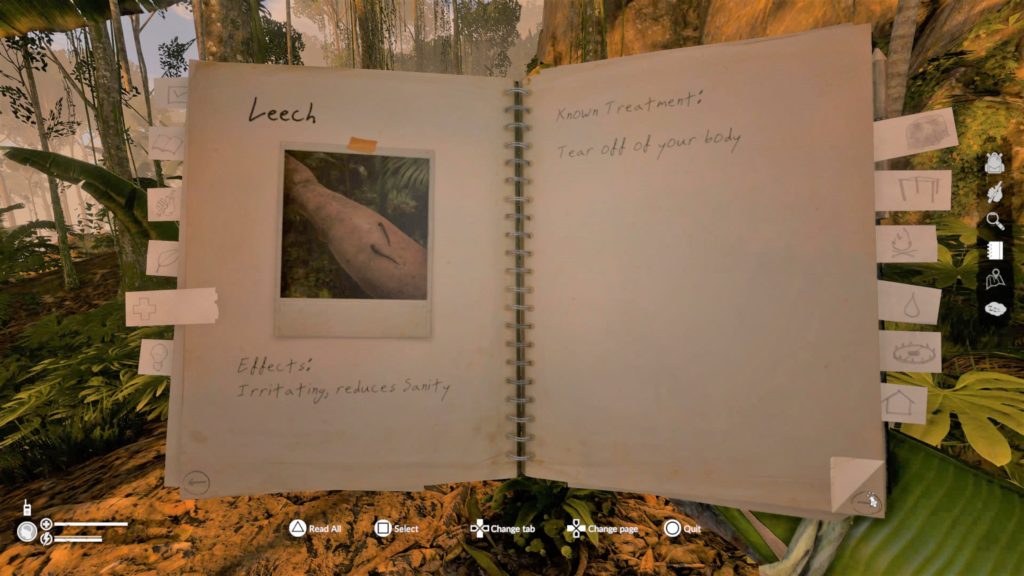
Health, Diseases, & Problems/Treatments 7. 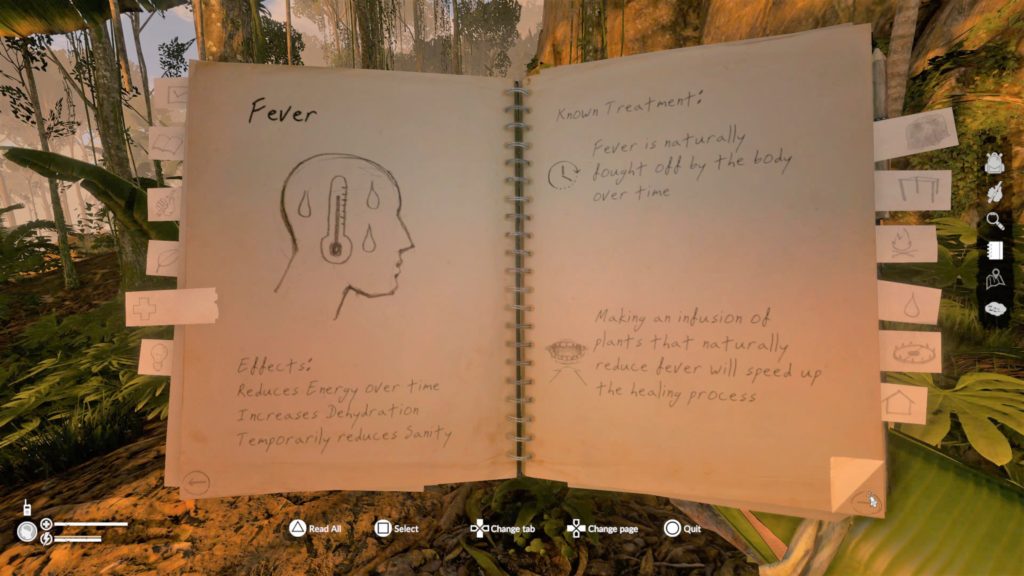
Health, Diseases, & Problems/Treatments 8. 
Health, Diseases, & Problems/Treatments 9. 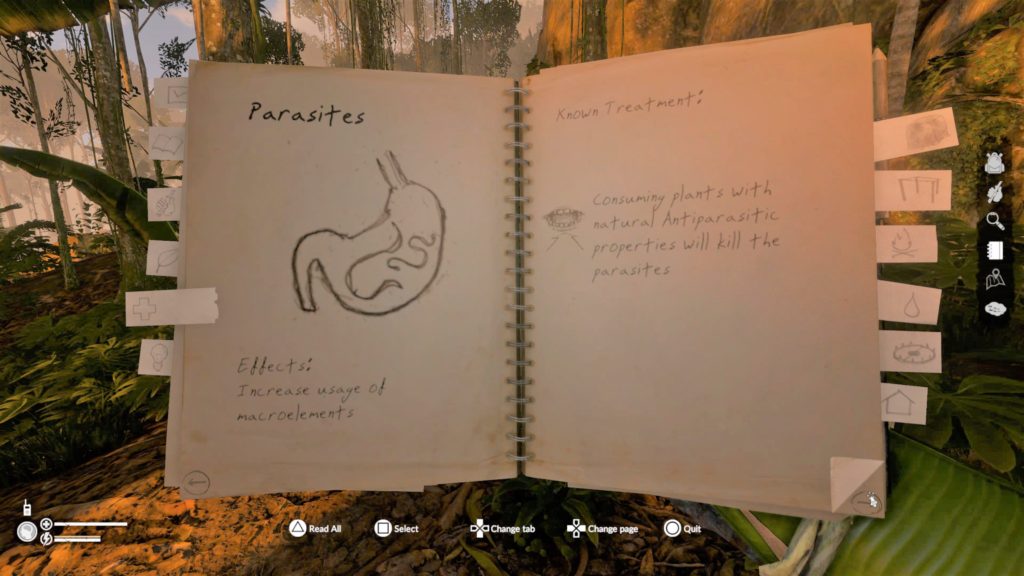
Health, Diseases, & Problems/Treatments 10. 
Health, Diseases, & Problems/Treatments 11. 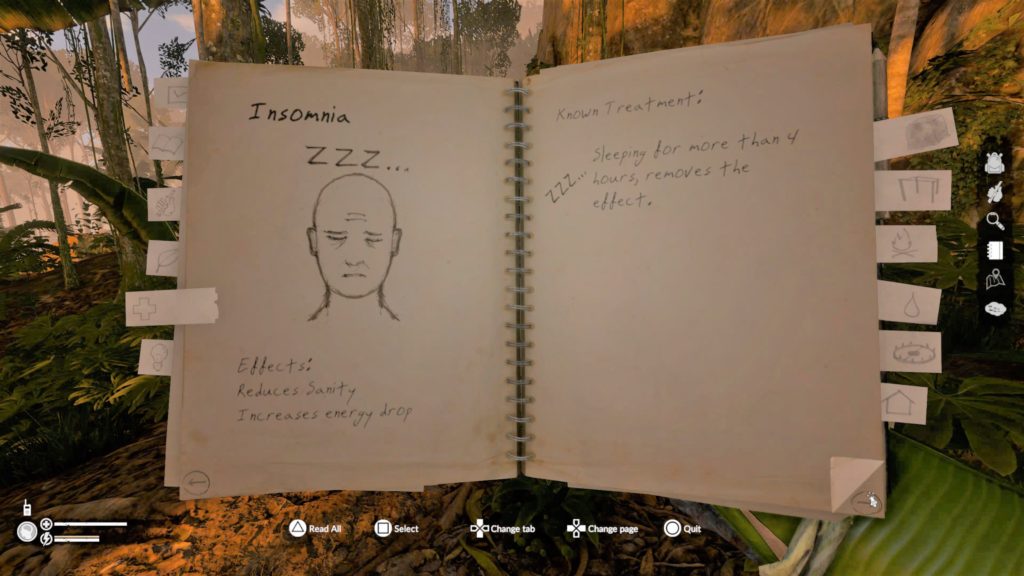
Health, Diseases, & Problems/Treatments 12. 
Health, Diseases, & Problems/Treatments 13.
Notebook - Crafting Tools/Weapons
Crafting Tools/Weapons 1. 
Crafting Tools/Weapons 2. 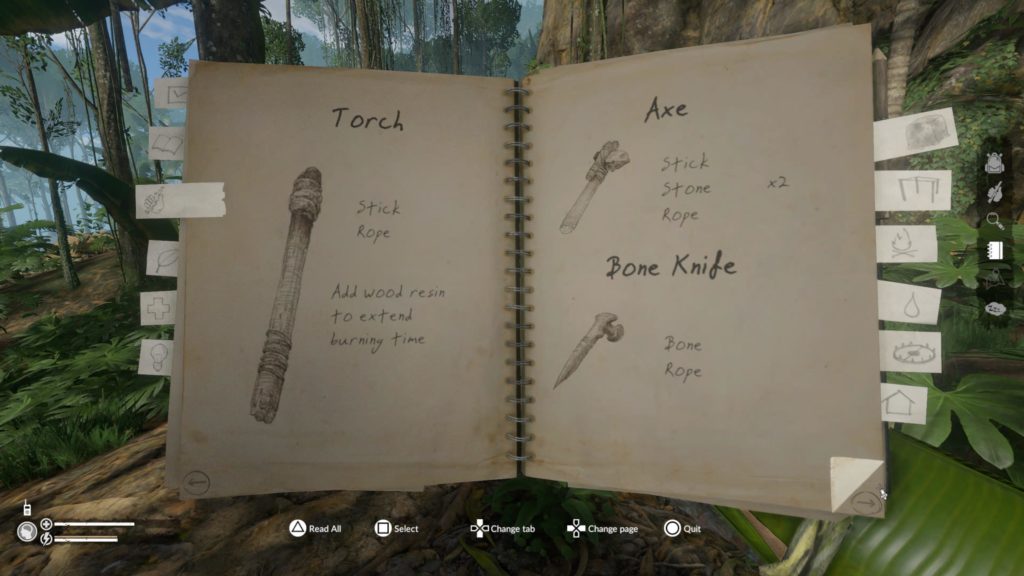
Crafting Tools/Weapons 3. 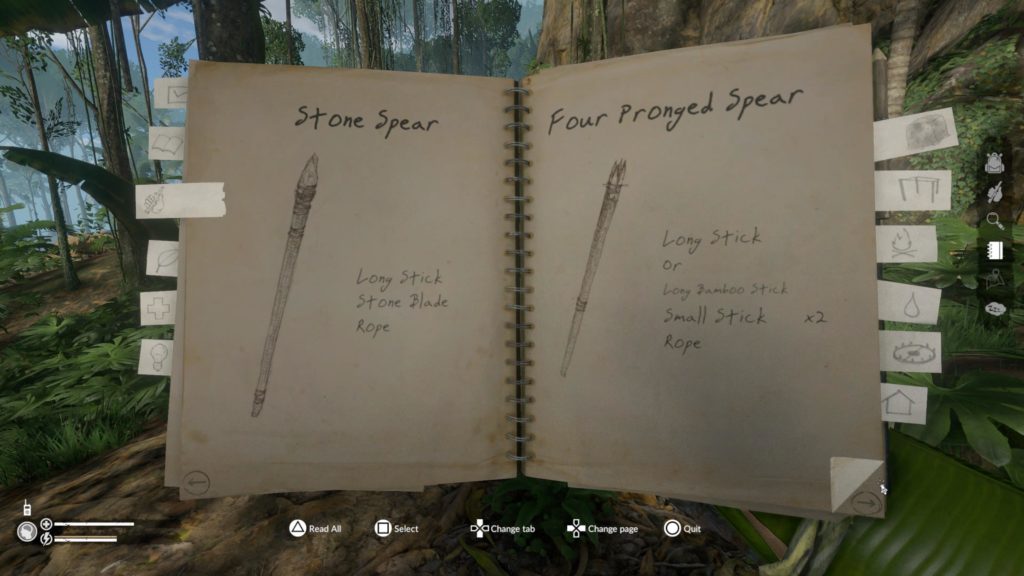
Crafting Tools/Weapons 4. 
Crafting Tools/Weapons 5. 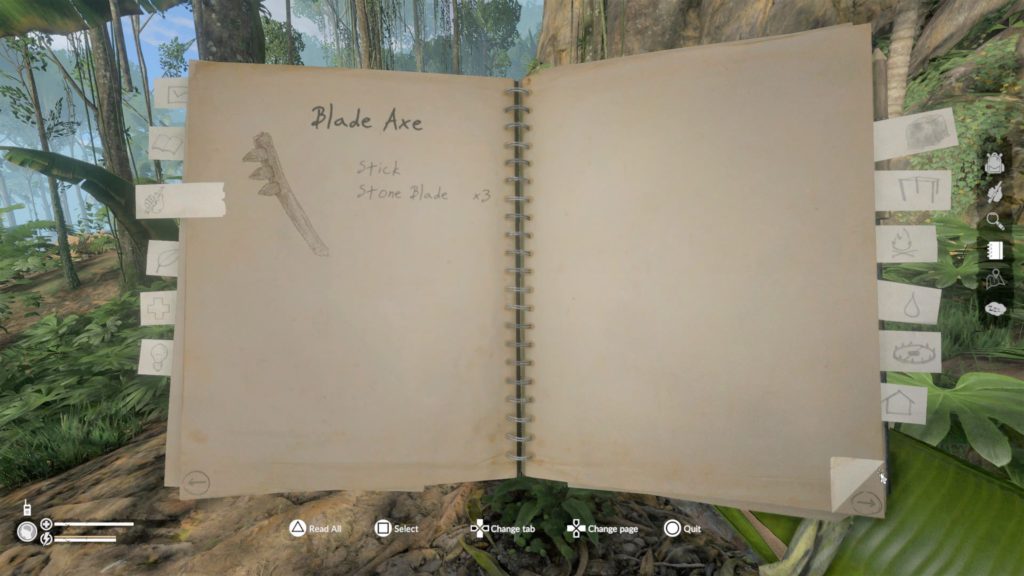
Crafting Tools/Weapons 6. 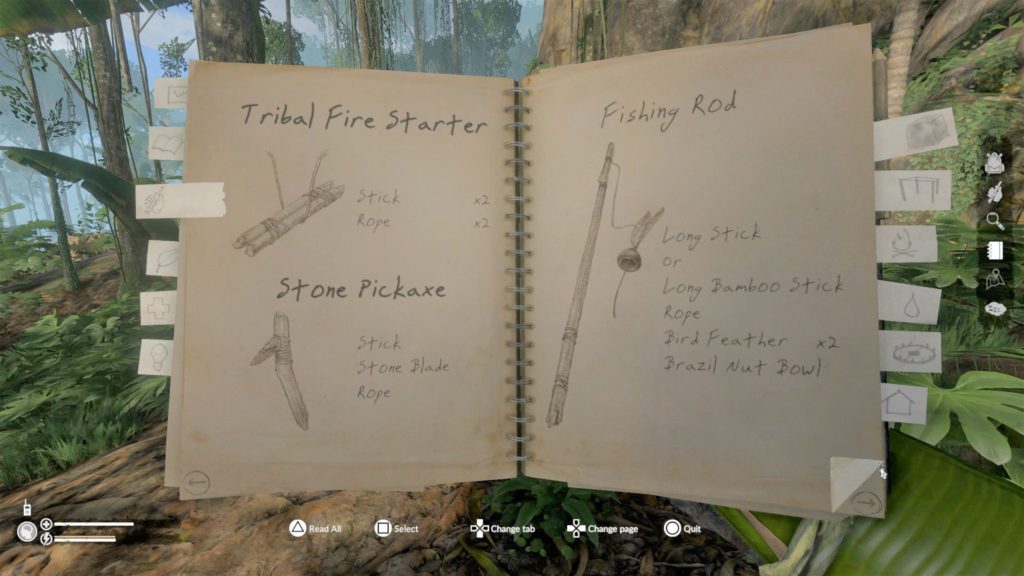
Crafting Tools/Weapons 7. 
Crafting Tools/Weapons 8. 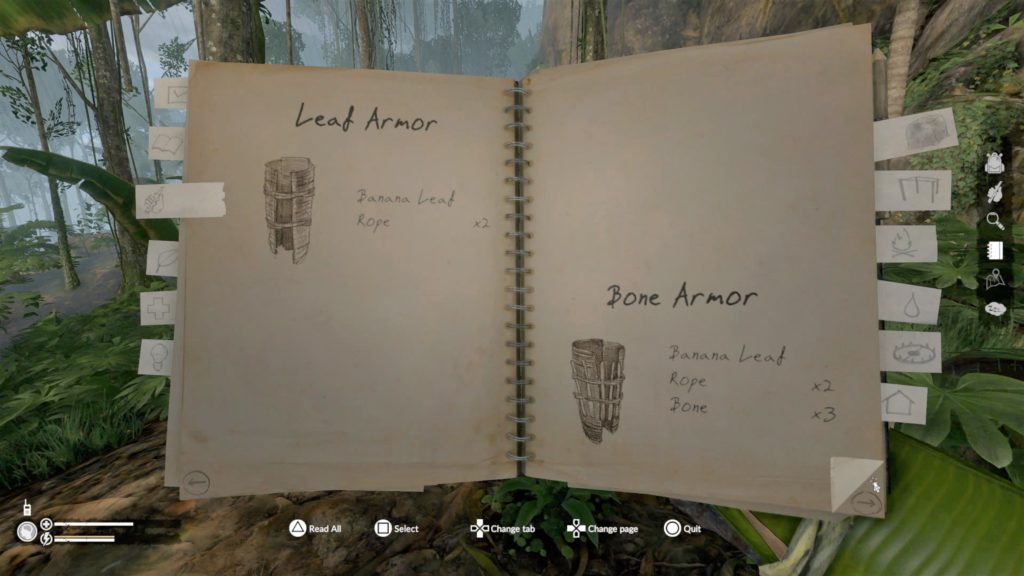
Crafting Tools/Weapons 9. 
Crafting Tools/Weapons 10. 
Crafting Tools/Weapons 11.
Notebook - Shelter/Building Items
Shelter/Building Items 1. 
Shelter/Building Items 2. 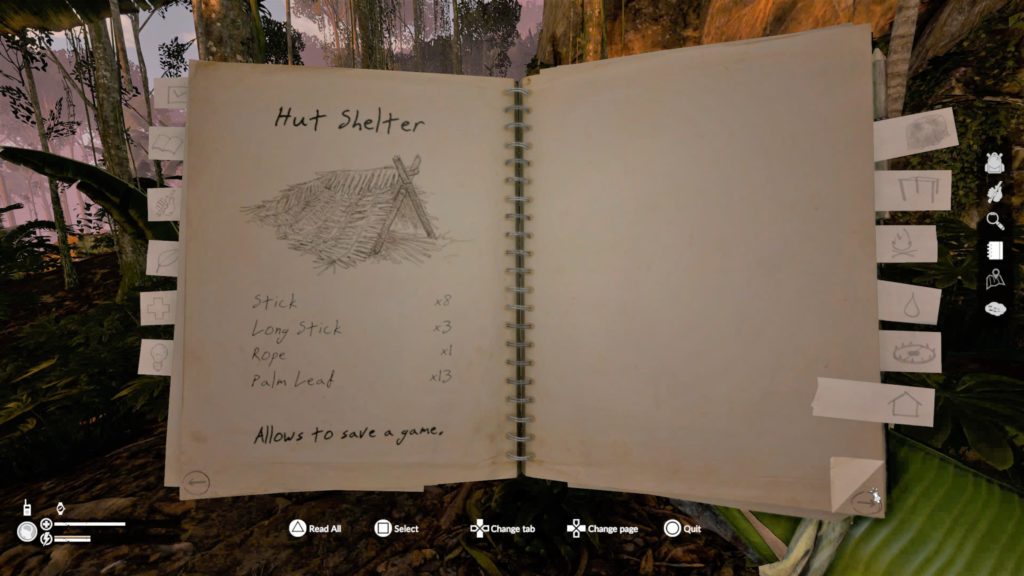
Shelter/Building Items 3. 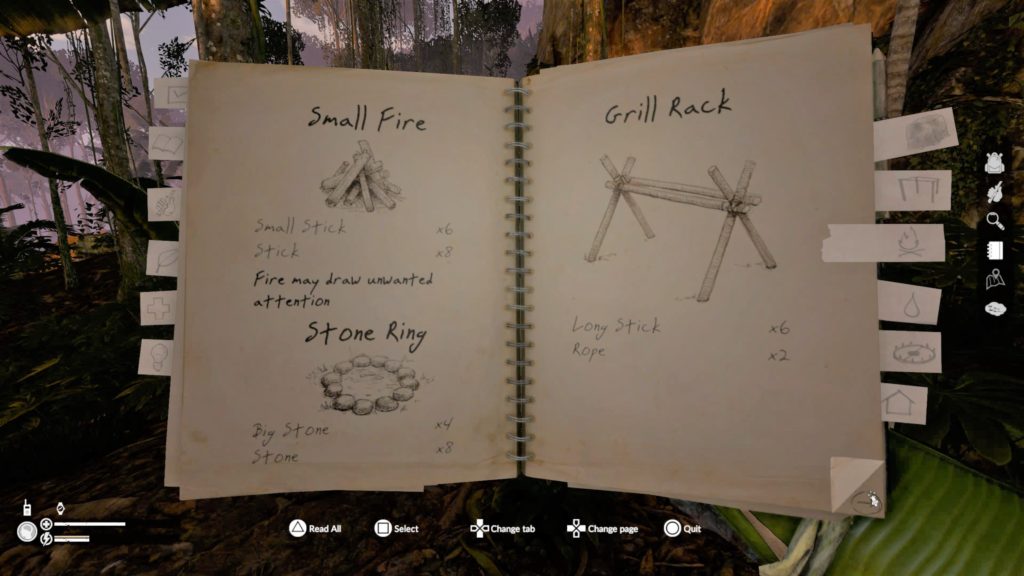
Shelter/Building Items 4. 
Shelter/Building Items 5. 
Shelter/Building Items 6. 
Shelter/Building Items 7. 
Shelter/Building Items 8. 
Shelter/Building Items 9.
Notebook - Plants

Plants 1. 
Plants 2. 
Plants 3. 
Plants 4. 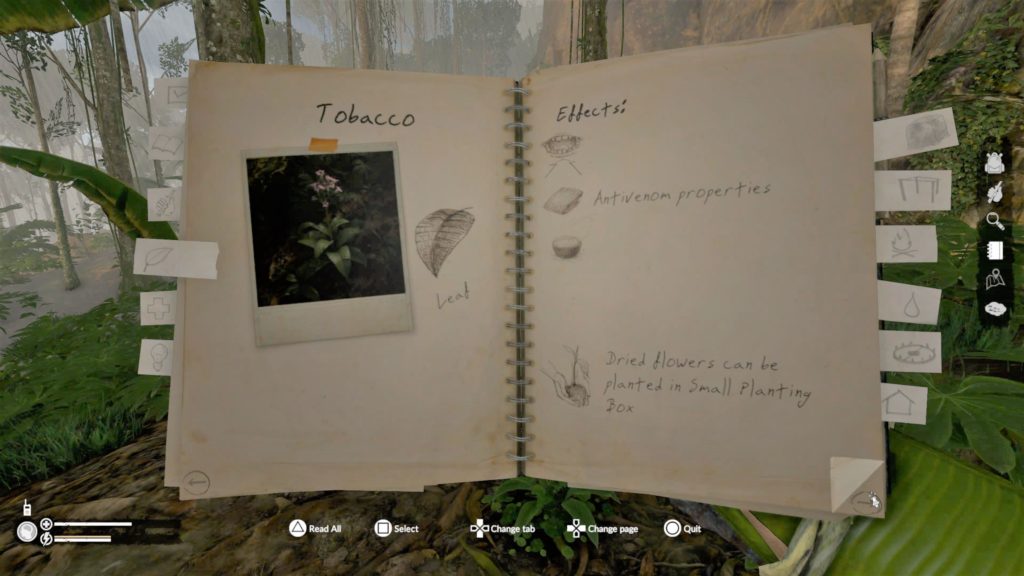
Plants 5. 
Plants 6. 
Plants 7. 
Plants 8, 
Plants 9. 
Plants 10. 
Plants 11. 
Plants 12. 
Plants 13. 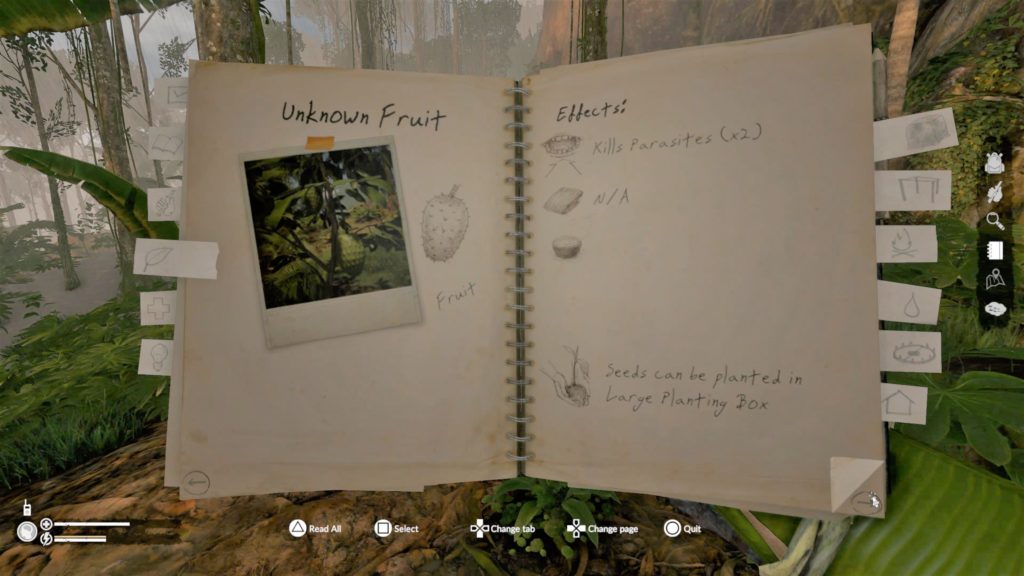
Plants 14. 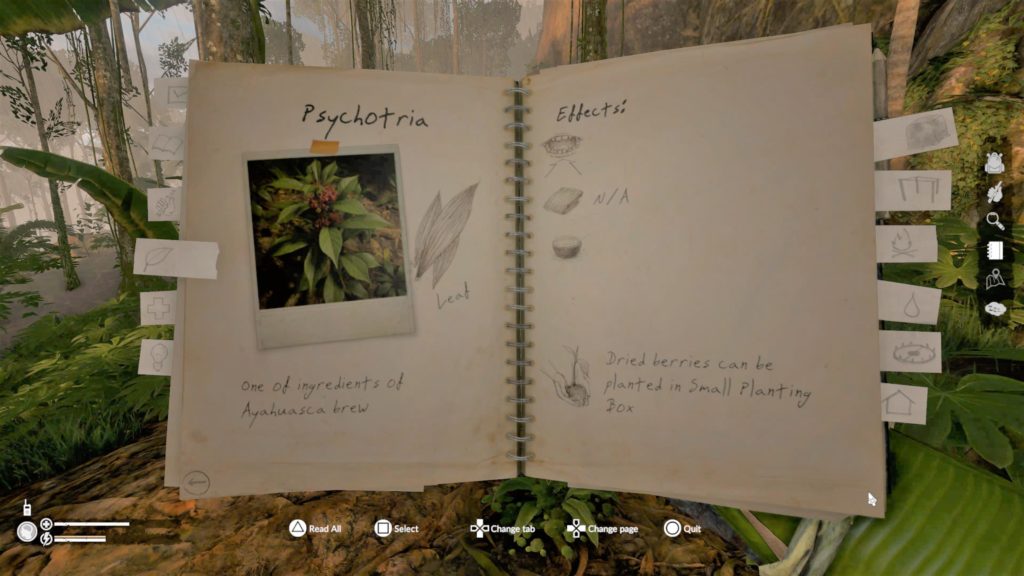
Plants 15.

 Green paradise
Make the jungle your home.
Congratulations on surviving the jungle and earning this new platinum trophy.

 Green Hell
Finish the game on Green Hell difficulty level.
Select from the Main Menu > Story >Green Hell difficulty. This is a permadeath mode, so there is no saving the game. If you die, you will have to restart this playthrough from the Main Menu to start a new game. This playthrough will be going from one location to the next and only collecting/doing what the basic requirements are for the story. In simple terms, you will be brewing the 4 Ayahuasca drinks and going through the hallucinations. Once you have woken up from a hallucination, your health and energy will be back at full, so these can be “soft” checkpoints to keep in mind.
As direct as possible, do the following:
-Skip the tutorial.
-Craft/gather resources.
-Go to the Abandoned Tribal Settlement at 46W 26S and make Brew 1.
-Take new pathway to find a road that leads to a Jeep at 44W 17S, collect the Gas Can.
-Go to the Elevator that is through a Cave at 41W 18S, use the Gas Can, take it down to the Gold Mine to collect the Grappling Hook and Bag of Gold.
-Follow your pathway back to the area that had previous opened up from using Brew 1 at 46W 24S.
-Go to around to around 43W 25S to use the Grappling Hook to go up to Brew 2 location at 42W 26S.
-Enter the new pathway and go to Anaconda Island at 35W 26S, continue East and use the Grappling Hook to go up to 31W 25S.
-Go to the Airport at 29W 22S, fix the Radio cable (yellow on east side of this building), use the Radio, collect the Key to open the other locked building, collect the Climbing Equipment.
-Go East past the Radio building to find a pathway and follow it to 27W 25S to go down to collect the Diving Equipment, swim in the water following the cable, continue following this descending pathway until you enter the Swamps.
-Then swim to 25W 31S to Brew 3, wake up and collect the Grappling Gun, swim West to go 27W 31S, go up and follow the pathway to the left to go to the Large Native Settlement at 32W 35S, make Brew 4 to finish the game.
Note: Always collect what is needed for the next Brews (you can rearrange your backpack to fit multiple items in it). Have weapons on hand to use them in case you need to kill anything along the way. Always have many bandages of the 3 types prepared so that you can quickly use them if you have any health problems/injuries. You will die and have to restart the run if you are not prepared for the worst. Listen to the sounds around you so that you can avoid enemies and/or quickly deal with them. You can also eat along the way, make sure that you are clean and carry mushrooms/some foods with you just in case.
 Just, wait for me…
Finish the Story – Good Ending.
In the Story Mode, you will be making the Ayahuasca brew four times to see hallucinations. During the last time, while in the hallucination, you will be prompted to answer Mia. Mia asks: “Was it worth it? Did you get what you wanted?”, and Jake needs to respond with the choice: “Yes, I have the cure.” (if you do not have the cure then this choice will be locked). This will lead to the good ending of the story mode.
Note: You can Save in the tents at the Research Lab Camp so that you have a Save before having or taking the Cure with you before the final Brew/hallucination at the Large Native Settlement. Use the reloaded save for the Bad Ending.
 It’s all over, again
Finish the Story – Bad Ending.
In the Story Mode, you will be making the Ayahuasca brew four times to see hallucinations. During the last time, while in the hallucination, you will be prompted to answer Mia. Mia asks: “Was it worth it? Did you get what you wanted?”, and Jake needs to respond with the choice, “I…I’m sorry.” and this will lead to the bad ending of the story.
Note: You can Save in the tents at the Research Lab Camp so that you have a Save before having or taking the Cure with you before the final Brew/hallucination at the Large Native Settlement. Use the reloaded save for the Good Ending.
 I’m not afraid of any work
Complete 7 Challenges.
There are 7 Challenges that you can select from the Main Menu > Challenges. These can be time consuming and difficult to accomplish. Each are described belong in details for success. See the pictures below.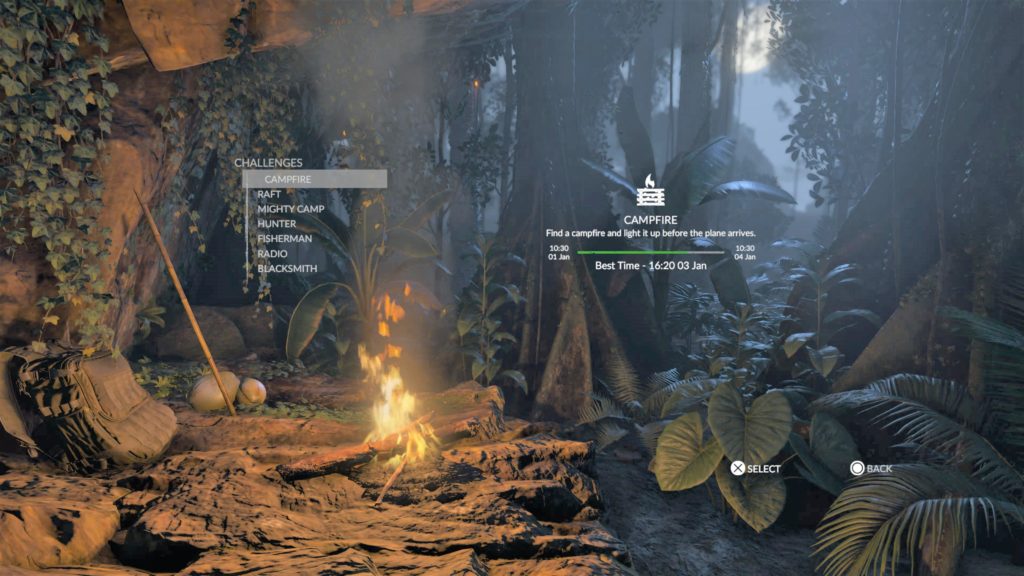
Seven Challenges. 
I’m not afraid of any work Trophy.

 Greedy
Complete Story mode on any difficulty with gold sack in backpack.
At the Gold Mine, during the Story Mode when you pick up the Grappling Hook, there is a Gold Sack on a nearby desk. Take this and keep it in your Backpack all the way to the ending of the story to earn this trophy.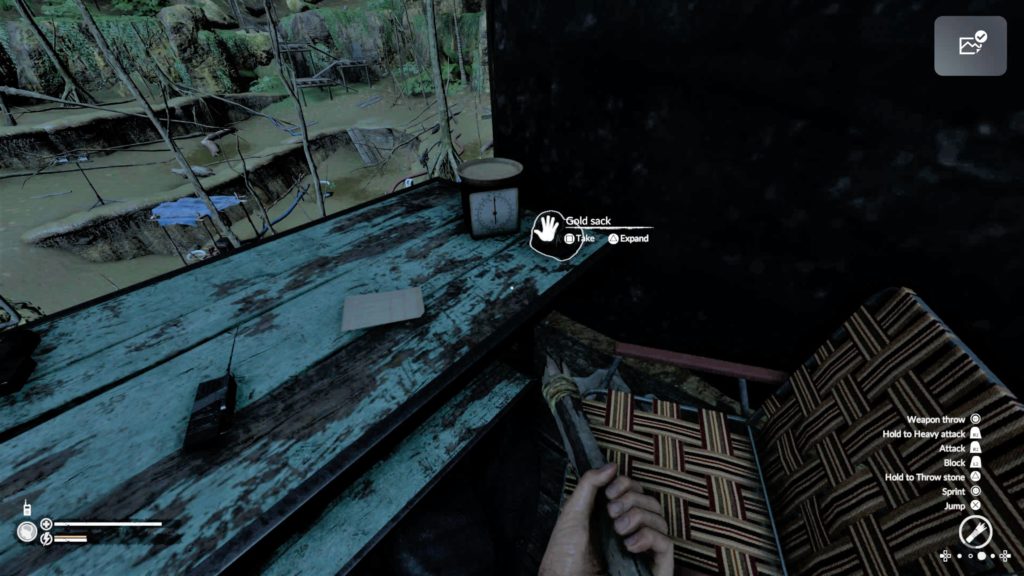
Bag of Gold is on the desk in the Gold Mine.
 Making progress
Reach Max at any skill.
In your notebook, under Light Bulb, there are pages that show the skills you have unlocked and how many times you have achieved them in the game. You only need to max out one of these skills to earn the trophy. For any of the skills, though, you will need to perform them more and more times before they register as being done. For example, repeatedly punching can be done with hitting a tortoise. However, it will be a little bit of a grind depending how successful you are at landing the hits. As you go up every few, it will take more repetitions until your counter increases. See picture below.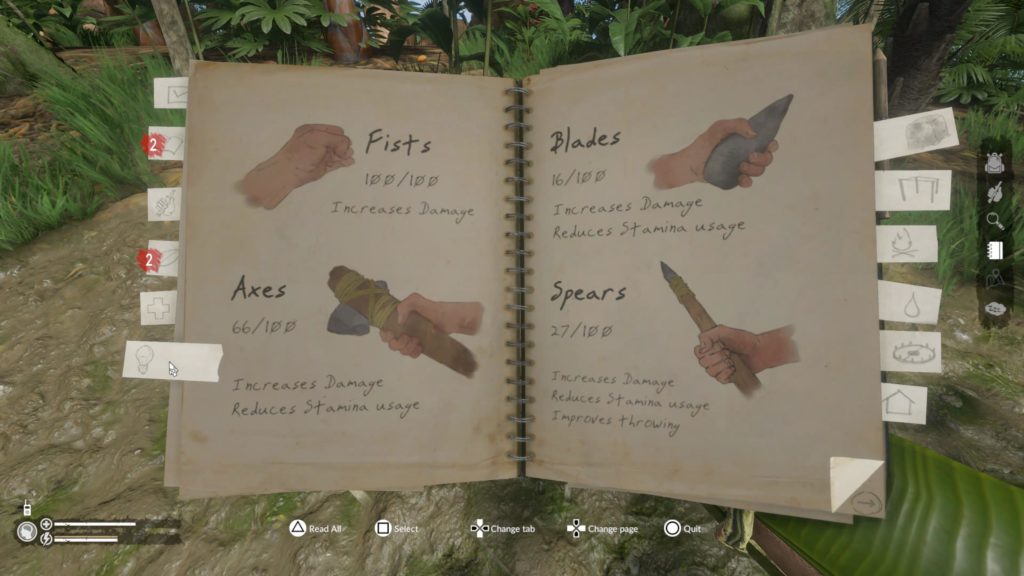
Fists – Maxed Out the Skill.
 Pacifist
Survive 10 days on King of the Jungle difficulty or higher without killing animals, humans, destroying bee nests and interacting with traps.
See the ‘Vegan!’ trophy description.
 It’s all their fault
Find the mushroom that started it all
There is a secret location that can only be reached during the final part of the Story mode. Before making the final Ayahuasca (Brew 4), you can go to around 34W 34S to climb up to a cave. In this cave you will need to follow its pathway until there is a section where you can swim to your right. Swim through the water and come out at around 32W 30S. There is a hidden camp here with a rock that has Green Mushrooms on it. Collect one of these mushrooms to earn this trophy. See the picture below.
Collect a Green Mushroom.
 I have it!
Find the Cure.
During the Story Mode, you will need to make the cure for Mia. When you enter the Swamp area of the game, you will be able to go to the Research Lab Camp at 25W 33S. Before going there, you will need to have prepared 2 tobacco bandages because you will be touching and gathering a Poison Dart Frog. These frogs are close to the Research Lab camp and this will give you a place to sleep in the tents to take care of the Fever after getting poisoned from the frog. Enter the Research Lab, take the Infected Blood Sample from the Refrigerator and place it into the Machine nearby. You will then insert the Poison Dart Frog into the Machine too. This will make the Cure and earn you the trophy.
Collect a Poison Dart Frog. 
Collect the Infected Blood Sample. 
Insert the Infected Blood Sample. 
Insert the Poison Dart Frog. 
Collect the Cure.
 Mr… I don’t feel so good
At the same time get leeches, worm, rash, fever, poison, food poisoning, parasites, insomnia, dirt and any wound.
Play either Story or Survival Mode. Make a save before attempted this trophy. If you die then reload and try again. It is recommended to use the spawn area from the Story Mode at around 46W 30S as there are fish in the water to the south, many resources, and all the associated items to cause all the problems. Do not make any armor or have it equipped during this trophy attempt. Catch some fish and harvest them for the fish meat and bones. Collect fruits so that a couple will spoil over time in your backpack, have coconut shells to collect rainwater to drink, and nuts. Keep a campfire lite under a shelter with a bed and have extra wood on standby to add to the fire as needed. This is best attempted during the wet season as leeches spawn more easily when it is wet in the jungle.
Once ready do the following in order:
1. Sleep on the ground – Get 1 worm in one of your arms and eliminate all others with fish bones and bandage them.
2. While it is raining, walk through the plants to get one or more leeches on the other arm. Eliminate and try again until it is on the other arm.
3. Stay around your campfire that is lite to keep up sanity higher. Cook fish, make stews, clean water if needed and stay up so that you will get insomnia.
4. Drink stream water to get a parasite from the dirty water.
5. Run into an ant hill to get a rash on one of your legs.
6. Pick up mud a few times so that you get a level 5 stack of being dirty so that if it rains it will not all wash off you.
7. Eat a spoil item to get food poisoning.
8. Go up to a rattlesnake so that it bites your other leg, giving you a wound, poisoning, and fever.
9. If your rash is gone from your leg because the rattlesnake bite that leg, then go back to the ant hill to get a rash again.
Repeat if needed by reloading your save if you die or fail to have all the problems at one time.
 Gardener
Cultivate 12 different plants.
There are 15 different plants that you can cultivate in the game, but you only have to plant and grow 12 of them. These can be done at any time in either the Story or Survival Mode, however, it is easiest when you are playing on the ‘Welcome to the Jungle’ difficulty. They can be done anywhere you choose and whenever you choose.
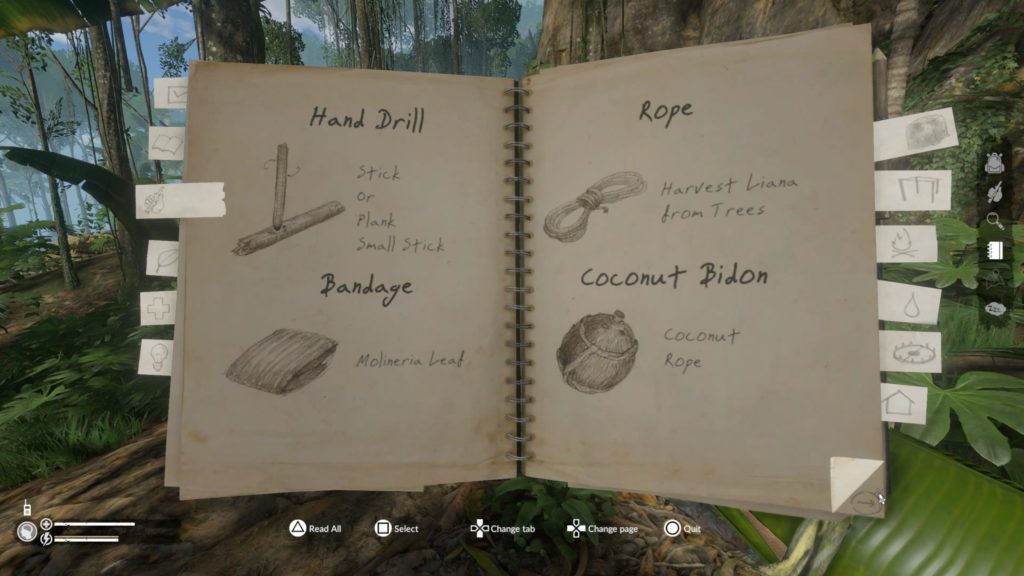
First, you will need to collect the plant (flower, root bulb, seed, etc.) and prepare it for planting. Second, you will need to make a small or large planting box for it. Once it is planted, you will need to water (manually with your Canteen or rainwater) and fertilize (use Animal Droppings or Spoiled Fruits) it so that it completes its cultivation cycle to count as being cultivated.
1. Purple Topped Herb – Use dried flowers in a small planting box.
2. Molineria – Use dried flowers in a small planting box.
3. Plantain Lily – Use dried flowers in a small planting box.
4. Psychotria – Use dried berries in a small planting box.
5. Tobacco – Use dried flowers in a small planting box.
6. Monstera Deliciosa – Use dried flowers in a large planting box.
7. Malanga – Use dried bulb root in a small planting box.
8. Soursop – Use seeds in a large planting box.
9. Orange Fruit Plant – Use seeds in a small planting box.
10. Bamboo Stick – Use Bamboo Stick (size that makes a Bamboo spear) in a large planting box.
11. Banana – Use seeds in a large planting box.
12. Cassava – Use dried bulb root in a large planting box.
13. Brazilian Nut – Use seeds in a large planting box.
14. Unknown Nut – Use unknown nut in a large planting box.
15. Quassia Amara – Use dried flowers in a large planting box.
Note: Flowers can be kept in your Backpack and they will dry or you can use a Drying Rack like the one in the Abandoned Tribal Settlement at 46W 26S. Seeds need to be harvested from the fruits that you collect. Bulbs need to be dried on the Drying Rack. It is best to attempt this during the Rain Season as you will need to manually water the plants less.
See ‘Notebook – Plants’ above for more information.
 Cartographer
Unlock 60 places on the map in the Story or Survival mode.
In Story or Survival mode (easier in Story mode), find 60 locations. There are more than 60 locations in the game, these are some of the examples in the below pictures. The game will automatically record a new location onto your Maps that you have found.
The 3 Maps locations are:
1. Abandoned Tribal Settlement in campfire suitcase – 46W 26S.
2. Airport in locked storage building on a shelf – 29W 22S.
3. Research Lab Camp in the sleeping tents – 25W 33S.
Map 1. 
Map 2. 
Map 3.
 Librarian
Read 50 collectibles in the Story mode.
Interact with any 50 papers and/or notes in the Story Mode. Most of these are found close together in groups of 3 – 5 depending on the locations. Some locations include: Drug Factory at 51W 27S, Airport at 29W 22S, and Anaconda Island at 35W 25S. Other reading materials will be in the hallucinations from drinking the Ayahuasca and these have between 5 – 10 each.

 You are not prepared
Finish the tutorial.
Complete the tutorial of the game.
Note: When starting the Story Mode, you can skip the tutorial portion of the game by pausing it, selecting skip tutorial, and then start where your character’s real story begins.
 Got to catch them all
Experience 12 unique diseases and wounds
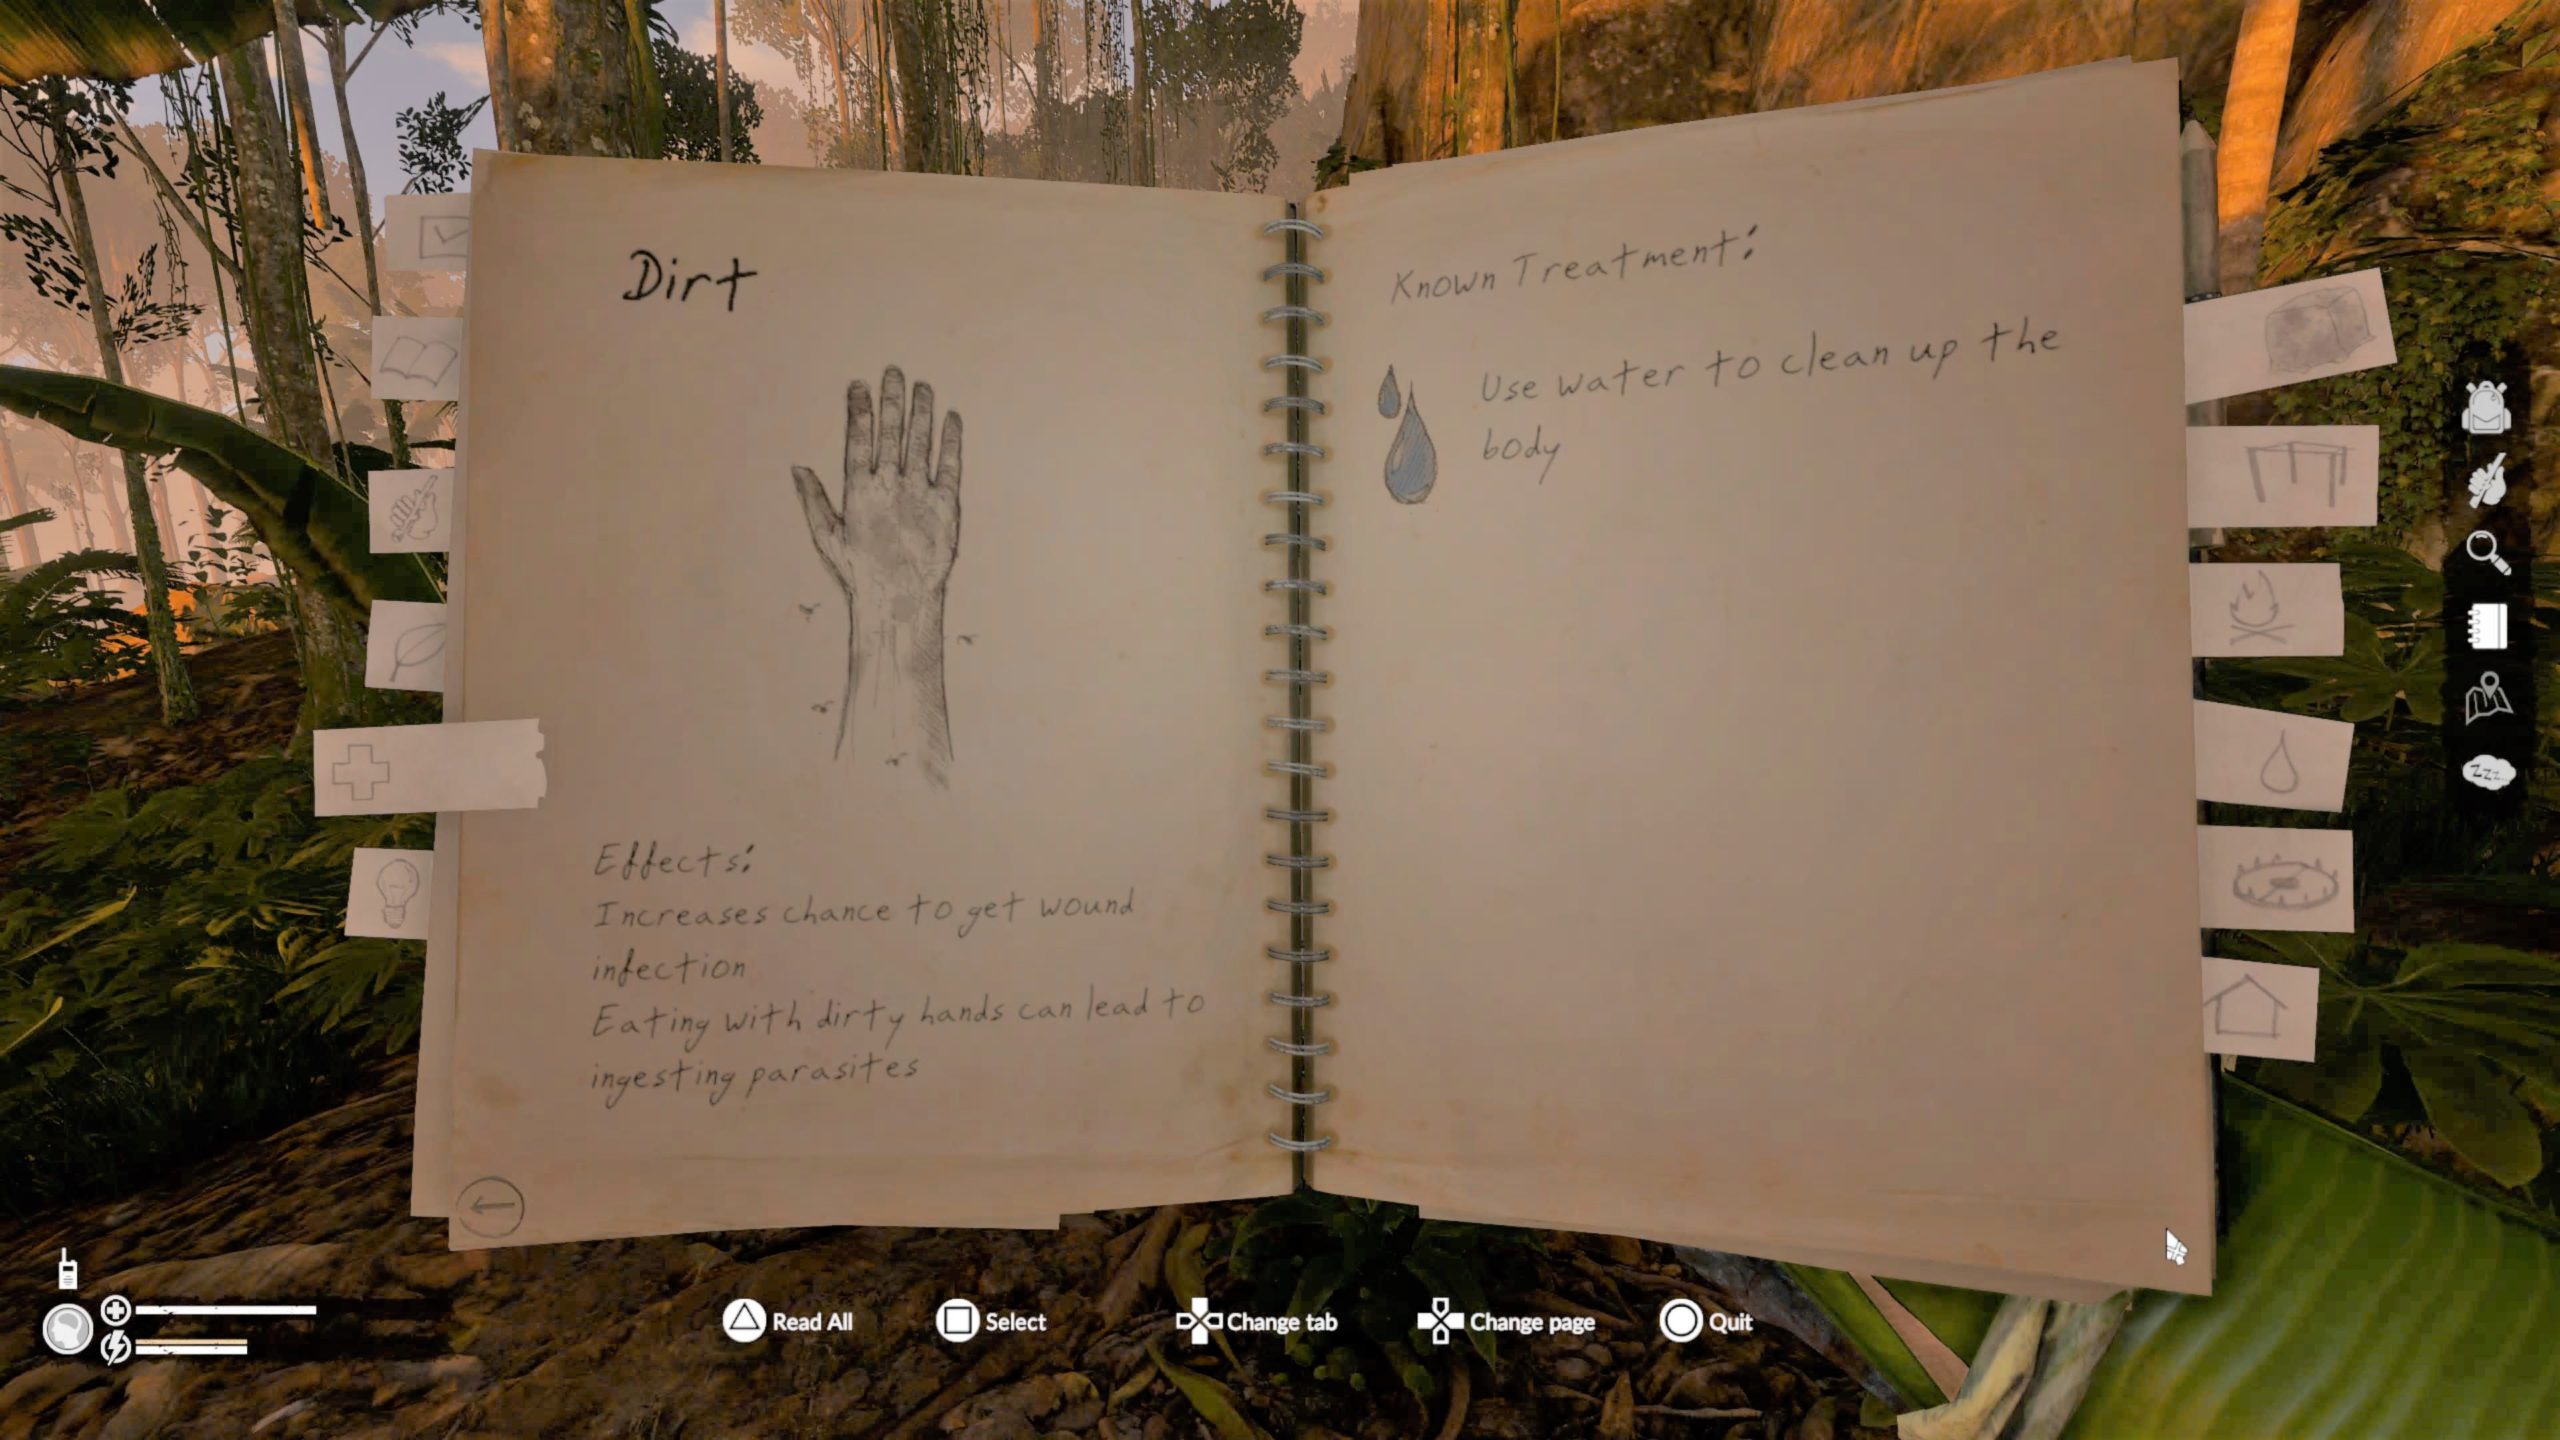
There are more than 12 unique diseases and wounds in the game and they accumulate over multiple replays and playing modes. Each one has a specific icon that appears in the bottom left HUD when you are experiencing one or more. These include: fever, food poisoning, rash, poison, and magnifying glass (this means either you have leeches to remove, have a wound, and/or worms). Wounds have many different types depending on how and what you got it from. See “Notebook – Health, Diseases, and Health Problems/Treatments” above for more information.
 Pyromaniac
Unlock 4 fire starting tools.
There are 4 different fire starting tools that you can craft (get the blueprint) and find in the game.
The fire starters are:
1. Hand Drill – 1 stick, 1 small stick.
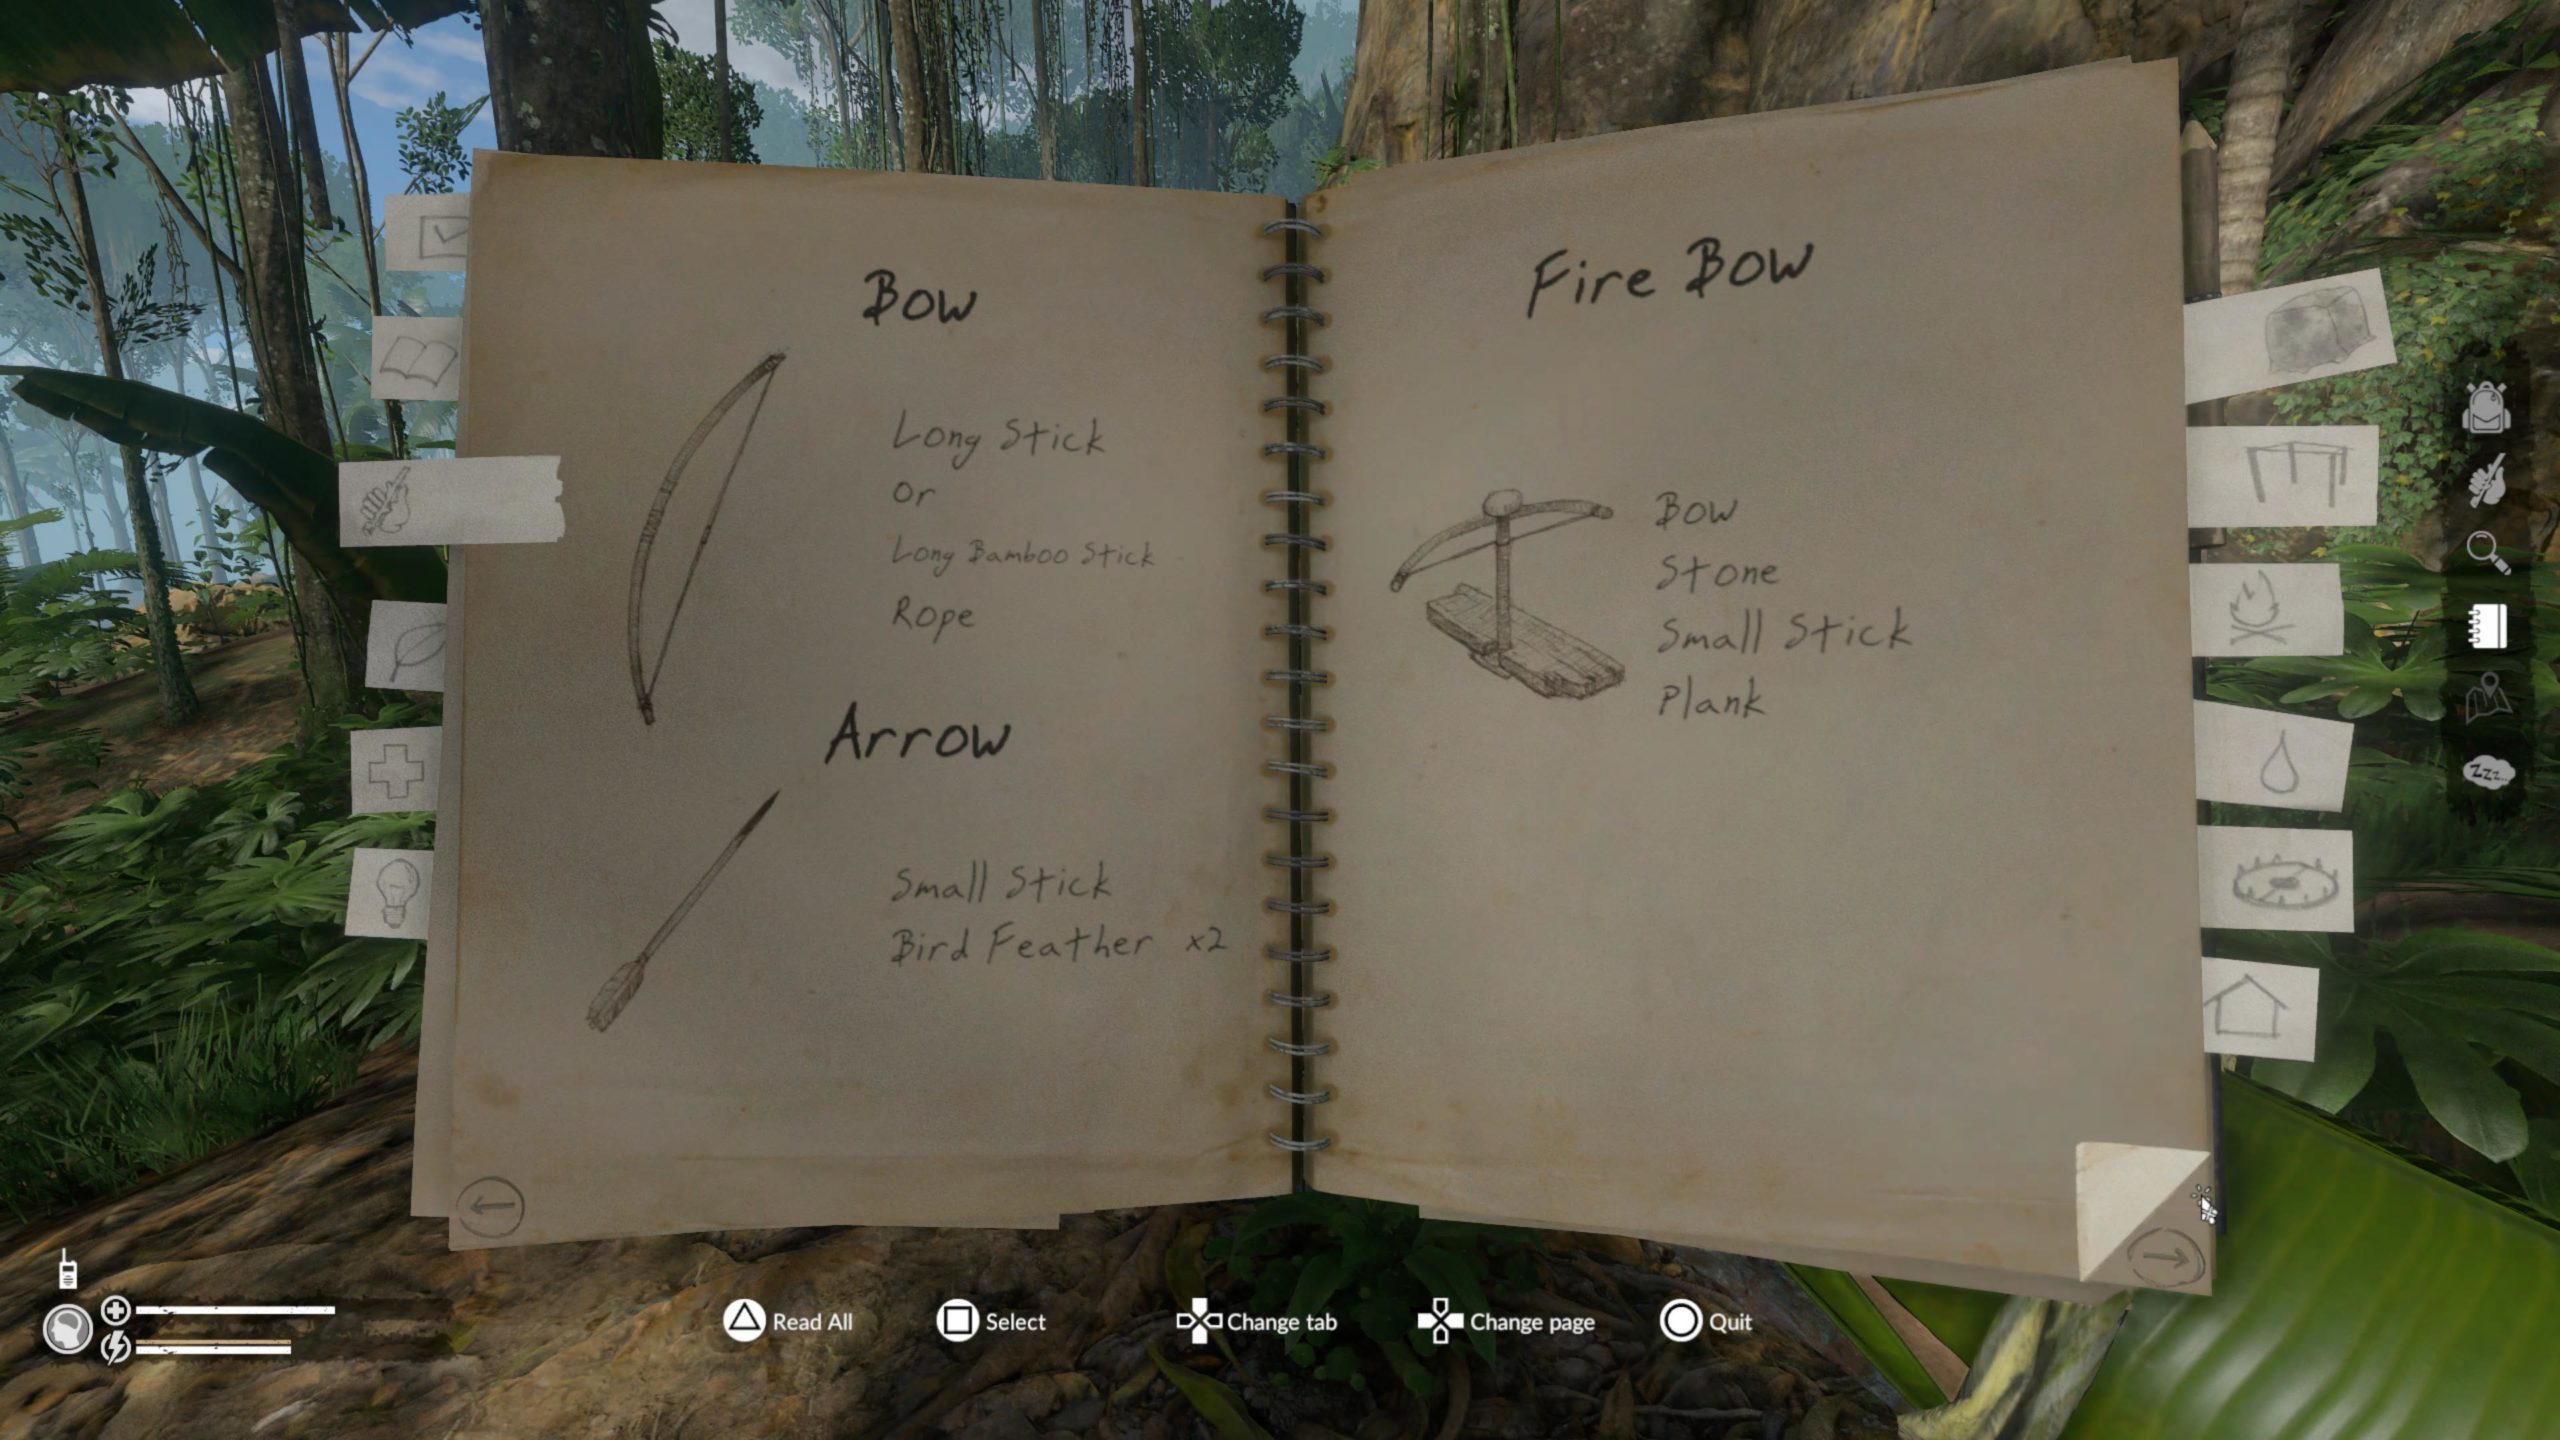
2. Fire Bow – 1 bow, 1 small stone, 1 small stick, 1 plank.
3. Hand Drill Plank – 1 stick, 1 plank.
4. Tribal Firestarter – collect from Native Settlement at 47W 17S – 2 sticks, 2 ropes.
 Do you want to play with a snowman?
Find a snowman package in 3 different locations.
There are 3 different locations where you will to look at packages with a snowman on them.
The locations are:
1. Small Shed at Airport – 29W 23S.
2. Drug Factory on the same table as the Microwave – 50W 27S.
3. Near a sleeping bag in a Cave – 53W 30S.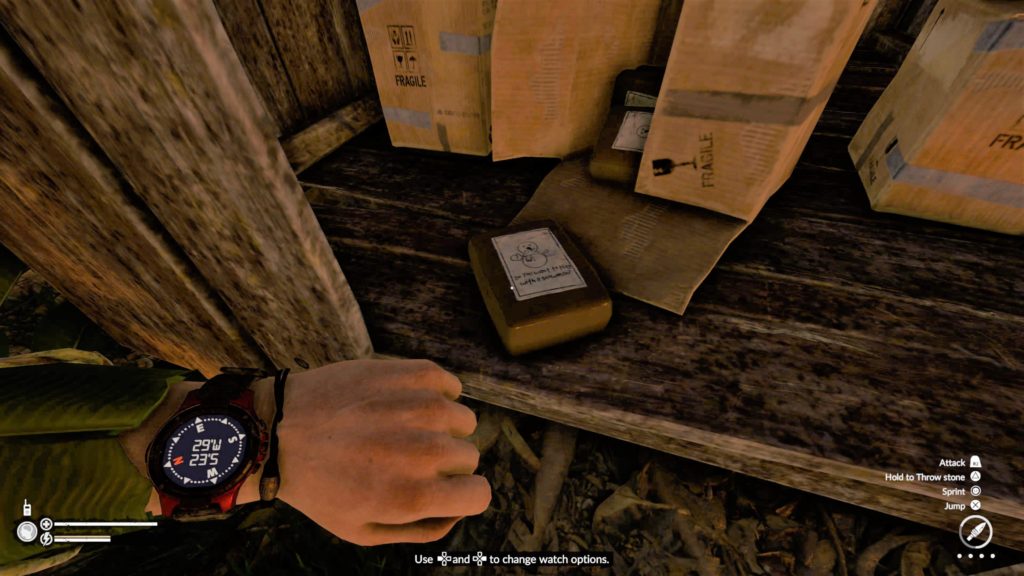
Location 1. 
Location 2. 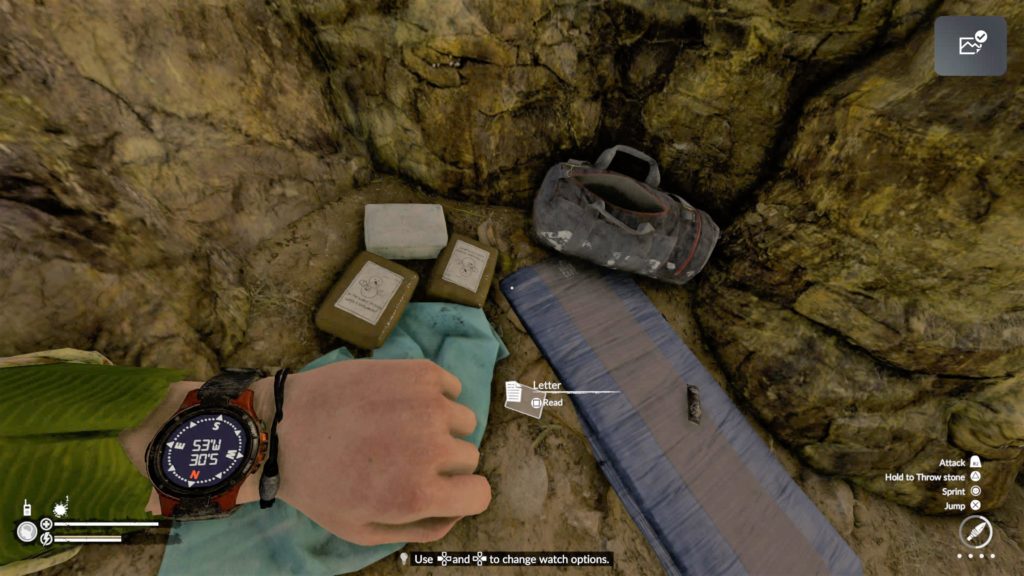
Location 3,
 King of the jungle
Hunt a Rattlesnake, Jaguar, Puma, Caiman and 3 types of arachnids
You will need to kill the following animals at least once: rattlesnake, jaguar, puma, caiman, scorpion, Brazilian wandering spider, and Goliath bird eater spider. Each of these has a distinct sound that they make when you are near them so that you can spot and kill them. The only two animals that you cannot get away from very easily are the jaguar and puma. Therefore, make sure to kill them by using headshots as they will not stop to kill you.
These animals can be found:
Rattlesnakes are found in some Caves, open areas, under trees and all over the Maps, especially during the wet season.
Jaguars are found near the Drug Lab or Large Native Settlement, but you can encounter them in other areas too.
Pumas are found in the Map area around Anaconda Island and the Airport, but you can encounter them in other areas too.
Caiman are found along the West beach coast, around Anaconda Island, and in the Swamps.
Scorpions are found in any Caves.
Brazilian wandering spiders are found under Banana trees and some pathways.
Goliath bird eater spiders are found near the Jeep and under trees drying the dry season.
 Gotcha!
Catch 9 aquatic animals.
Catch any 9 different aquatic animals by using either a weapon (like a spear or bow and arrow), fishing rod, prawn trap, large or small fish trap, and/or fishing rod trap. The fish in the game are: Angelfish, arowana, peacock bass, discus fish, river stingray, red-bellied piranha, prawn, mystery snail, and red crab. All can be found near Anaconda Island, however feel free to collect any other them that you find in other streams, ponds, and rivers.
 Going back home
Make tortoise soup in it’s shell.
You will need to find and harvest a tortoise which are found along the larger bodies of water like the northern shoreline, Anaconda Island, and near the Research Lab in the Swamps. After you have harvested the tortoise, place its shell on a lit campfire and add water to it. Boil the water and then add the raw tortoise meat to it to earn this trophy.
 Keeper of the flame
Keep a single fire burning for over 5 days on Welcome to the jungle difficulty or higher.
Make a campfire and add wood (sticks, small sticks, and/or planks) to keep the fire burning for 5 straight days. Play on Welcome to the Jungle difficulty. It is best to have a bed nearby so that you can sleep to pass time in the game. A small campfire will last for about 15 in game hours and a large campfire will last for about 20 in game hours before burning out. Do not over sleep and let the campfire burn out as you will have to start this all over again. Check your watch for the date and time to know when it should be time to check the fire and to approximate how much longer you need to continue this process.
 I don’t need to sleep
Get 5 stacks of insomnia.
There are some foods in the game that will provide you with small bursts of Energy. These will increase your Energy levels thus preventing your character from being as tired and wanting to rest or even collapse from exhaustion. Eating cooked meat, some fruits, making instant coffee, tea, and eating blue or yellow cup mushrooms will all raise your Energy levels. If your character stays up for an extended period of time you gaining Energy, you will start to have Insomnia as indicated in the lower left of your HUD (heads up display). It will start at level 1, and the longer you prevent your character from sleeping, the higher the level will go until you reach level 5.
 Fresh Water
Drink safe water.
During the tutorial there is a stream near the camp that has safe drinking water. Interact with the water and take a drink from it.
 Home Sweet Home
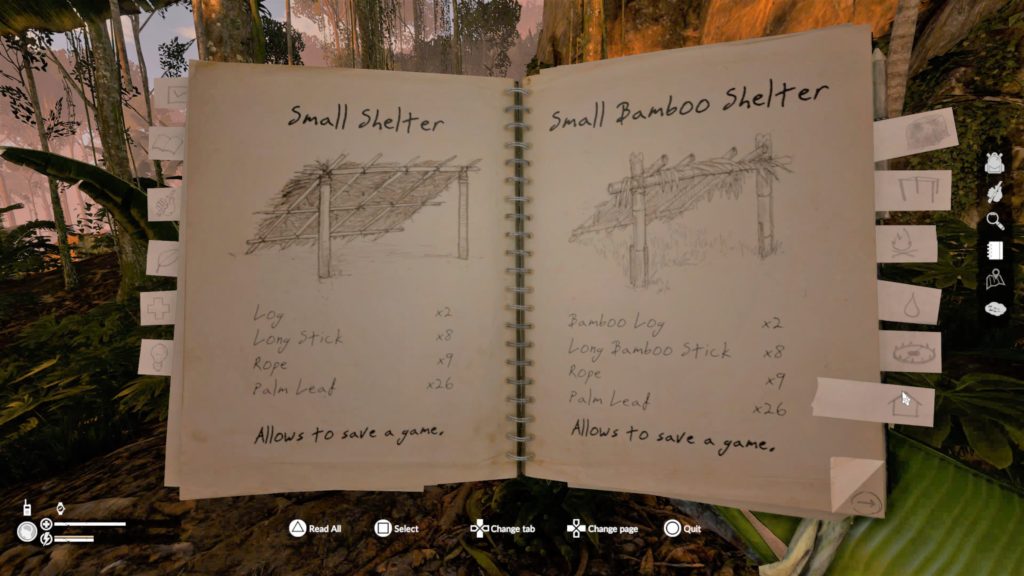
Build your first shelter.
You need to craft a shelter from your notebook under the shelter menu. They require that you gather the indicated materials for putting together whichever shelter you want to make.
 Improvise, adapt, survive
Let maggots eat your infected wound.
After getting a wound, if it does not heal, it will become infected (turn brown or green in colour) and you may get a fever. You need to insert collected maggots onto the wound. Maggots can be found on dead animals rotting in the jungle (listen for the buzzing of flies) or by harvesting spoiled meats from your backpack.
 Leeches, leeches everywhere
Remove 50 leeches from your body.
Across multiple playthroughs and game modes, you only need to have removed 50 leeches from your body. The game notifies you with a magnify glass in your lower left HUD and also states that your Sanity is decreasing on the right side of your screen from a Leech(es).
 Am I losing it?
Kill a Sanity tribesman.
You will start to lose your sanity if you do not sleep, do not remove leeches, do not cure fevers, and/or eat human meat. In the bottom left of your HUD there is a head icon that is completely filled in for 100% sanity, lower percent filled in white when you have lost some sanity, to red or empty when your percent is in the dangerous zone. In the dangerous zone, your character will hear voices, question everything, see hallucinations, and face off against Sanity Tribesmen. Kill at least one of Sanity Tribesmen to earn this trophy.
 I’m saved
Save your game in a shelter.
You will be able to craft a shelter that allows you to Save your game. Look for a shelter that says “Allows you to Save your game” underneath it. These are the only ones that you can build in the game yourself. Otherwise you can use the Save icons that are the Parrot Calendars at the Drug Factory, Gold Mine, Airport, and Research Lab tents in the Swamp.
 Iron Man
Create and wear a full metal armor set.
This can be done in Story, Survival, or Challenge Mode (recommended to use Blacksmith Challenge). You will need to make 4 metal armor and equip them. Iron Ore is in only a few Caves sometimes and Metal Cans are at the Drug Factory, Beach Fishing Shack, Anaconda Island, and Airport. Sometimes the metal cans are on tables, the ground, and/or in backpacks.
See the “I’m not afraid of any work – Blacksmith Challenge” trophy description for more information.
 Casted Far Away
Find an unexpected friend.
You will find a special friend (William – soccer/pineapple) at 55W 27S behind a large rock along the coastline.
 Caveman
Craft your first tool.
Play the tutorial and the first time you craft an item, you will earn this trophy.
 Self-defense
Kill a tribesman.
There are Tribesmen that are sometimes moving through the jungle or they are at certain places like a settlement. If they detect your presence, they will attack you and try to kill you. Use any weapon to fight back, but the most effective is a headshot which kills them in one shot. If you do not perform a headshot and still hit them, they will continue to fight until they bleed out or you die. Kill at least one of them to earn this trophy.
 Tastes like chicken…
Eat human meat.
After killing a Tribesman, you need to harvest their meat with a blade. You can then either eat the raw human meat, cook it or make a stew and eat it to earn this trophy. Note: This action will cause your sanity to decrease a large amount! It is recommended to make a manual save before attempting the “eating” part so that you can reload your save and not have to deal with the possible insanity problems after.
 Soul Vine
Drink Ayahuasca.
In Story Mode, there are 4 times that you will need to brew Ayahuasca at ritual locations. Go to the Abandoned Tribal Settlement at 46W 26S, interact with the suitcase in the campfire to get the recipe to make the brew for the first time. You also get the Map for this section. Each time you need to make the brew, you need to build and lite a fire below the ritual bowl, then add Psychotria (small green plant with red berries) and Banisteriopsis vine which grows on the Brazilian nut trees. See “Notebook – Plants” above.
 Globetrotter
Travel 64 km.
Across multiple replays and game modes, you will need to have accumulated at least 64 km travelled by foot in the game.
 Welcome to the jungle
Survive 1 night in the jungle.
After the tutorial and you have begun the Story Mode, you will need to collect resources and craft tools to survive at least one night in the jungle. See “Basic Survival Tips” above for more information.
 I made fire!
Start a fire.
Open your notebook, select Fire Making, and the type of fire. Place it on the ground and then add the needed items to make the fire setup, then use a fire starter with tinder to light the fire.
 The first step to greatness
Die.
Die from any disease, ailment, or even falling to your death from a high area. There are many, many ways to die in this game if you do not prevent or take care of your injuries.
 I made it
Survive 10 days on King of the Jungle difficulty or higher.
See “Vegan!” trophy description.